Craving easy, fuss-free recipes that deliver big flavor? Self-rising flour is your secret weapon! Whether you’re whipping up fluffy biscuits for breakfast, cozy cobblers for dessert, or speedy weeknight dinners, this pantry staple saves time without skimping on taste. From golden-brown classics to creative twists, we’ve rounded up 18 must-try dishes that’ll make you reach for that bag again and again. Ready to get baking (and eating)? Let’s dive in!
Fluffy Self Rising Flour Pancakes
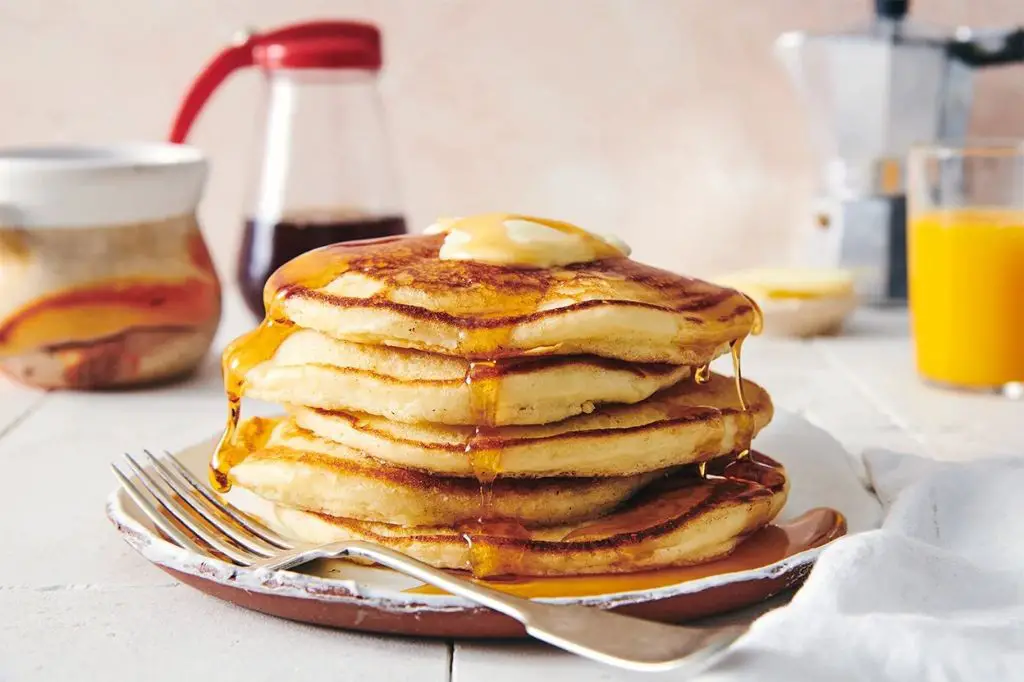
These Fluffy Self-Rising Flour Pancakes are the ultimate shortcut to a stack of light, airy pancakes—no fussy measuring of leaveners required!
- 1 ½ cups self-rising flour
- 2 tbsp granulated sugar
- 1 cup milk (whole or 2%)
- 1 large egg
- 2 tbsp unsalted butter, melted (plus extra for cooking)
- 1 tsp vanilla extract
- In a large bowl, whisk together 1 ½ cups self-rising flour and 2 tbsp sugar.
- In another bowl, beat 1 cup milk, 1 egg, 2 tbsp melted butter, and 1 tsp vanilla extract until smooth.
- Pour the wet ingredients into the dry ingredients and stir gently until just combined (a few lumps are okay—overmixing makes tough pancakes!).
- Heat a griddle or skillet over medium heat and brush with a little butter. Pour ¼-cup portions of batter onto the hot surface. Cook for 2–3 minutes until bubbles form on top and edges look set, then flip and cook for 1–2 minutes more until golden.
The magic of self-rising flour gives these pancakes an effortlessly tender crumb and just-right rise—no baking powder guesswork!
Tip: Keep pancakes warm in a 200°F oven while cooking the rest, but serve ASAP for maximum fluffiness.
Homemade Self Rising Flour Biscuits
Nothing beats the warm, buttery aroma of freshly baked biscuits—especially when they come together in minutes with self-rising flour!
Ingredients:
- 2 cups self-rising flour (plus extra for dusting)
- 1/4 cup cold unsalted butter, cubed
- 3/4 cup cold whole milk
- 1 tbsp granulated sugar
- 1/2 tsp salt
Instructions:
- Prep: Preheat oven to 450°F and line a baking sheet with parchment paper.
- Mix dry ingredients: In a large bowl, whisk together the self-rising flour, sugar, and salt.
- Cut in butter: Add the cold butter cubes and use a pastry cutter or fork to work them into the flour until the mixture resembles coarse crumbs.
- Add milk: Pour in the cold milk and stir just until a shaggy dough forms (don’t overmix!).
- Shape: Turn the dough onto a lightly floured surface, gently pat into a 1-inch-thick rectangle, and cut into 8 squares with a sharp knife.
- Bake: Arrange biscuits on the prepared sheet and bake for 12–15 minutes until puffed and golden.
The magic of self-rising flour means these biscuits rise sky-high with zero fuss—perfect for lazy Sundays or last-minute gravy emergencies.
Tip: For extra flaky layers, fold the dough in half before patting it down to cut.
Easy Self Rising Flour Pizza Dough
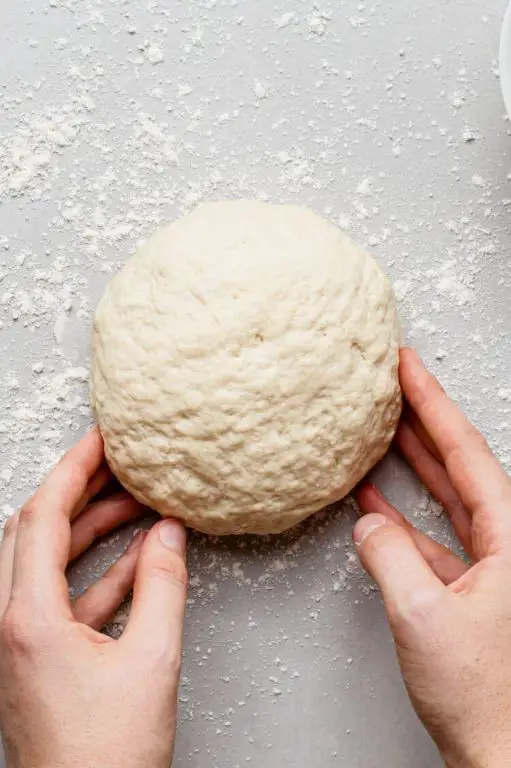
Skip the fuss with this no-yeast pizza dough that comes together in minutes—perfect for busy weeknights or last-minute cravings.
Ingredients:
- 2 cups self-rising flour (plus extra for dusting)
- 1 cup plain Greek yogurt (full-fat for best texture)
- 1 tbsp olive oil
- 1/2 tsp garlic powder
- 1/2 tsp dried oregano
Instructions:
- In a large bowl, mix 2 cups self-rising flour, 1/2 tsp garlic powder, and 1/2 tsp dried oregano until combined.
- Add 1 cup Greek yogurt and stir with a fork until a shaggy dough forms. Knead by hand for 2–3 minutes until smooth (add a sprinkle of extra flour if sticky).
- Drizzle 1 tbsp olive oil onto a clean surface, place the dough on top, and roll it into a 12-inch circle (or press with your hands for a rustic look).
- Transfer to a parchment-lined baking sheet, add toppings, and bake at 450°F for 12–15 minutes until the crust is puffed and golden at the edges.
The yogurt gives this crust a tender chew with just the right amount of crispiness—no resting time required!
Tip: For extra flavor, brush the rolled-out dough with olive oil and a pinch of salt before adding toppings.
Classic Self Rising Flour Scones
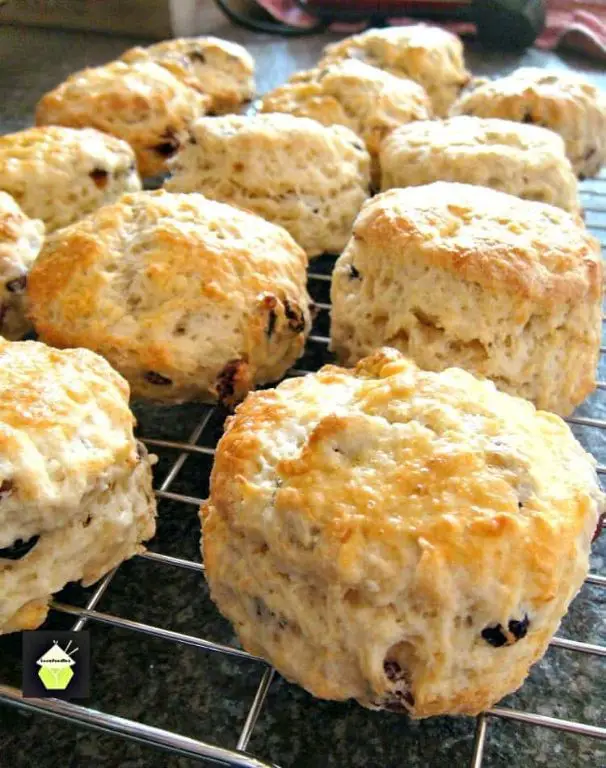
These buttery, flaky scones come together in a flash thanks to self-rising flour—no fussy measuring of leaveners required!
Ingredients:
- 2 cups self-rising flour (plus extra for dusting)
- 1/4 cup granulated sugar
- 1/2 tsp salt
- 1/2 cup cold unsalted butter, cubed
- 1/2 cup whole milk
- 1 large egg
- 1 tsp vanilla extract
- 1 tbsp heavy cream (for brushing)
- 1 tbsp turbinado sugar (for sprinkling)
Instructions:
- Preheat oven to 400°F. Line a baking sheet with parchment paper.
- In a large bowl, whisk together 2 cups self-rising flour, 1/4 cup granulated sugar, and 1/2 tsp salt. Cut in cold butter with a pastry cutter until pea-sized crumbs form.
- In a small bowl, whisk together milk, egg, and 1 tsp vanilla. Pour into dry ingredients and stir just until a shaggy dough forms.
- Turn dough onto a lightly floured surface and gently pat into a 1-inch-thick circle. Cut into 8 wedges and transfer to the baking sheet.
- Brush tops with 1 tbsp heavy cream and sprinkle with 1 tbsp turbinado sugar. Bake for 15–18 minutes until golden and puffed.
The magic of self-rising flour gives these scones an airy, tender crumb with zero guesswork—perfect for lazy weekend brunches when you want impressive results fast.
Tip: Freeze unbaked scones on the tray for 20 minutes before baking for extra flaky layers!
Quick Self Rising Flour Dumplings
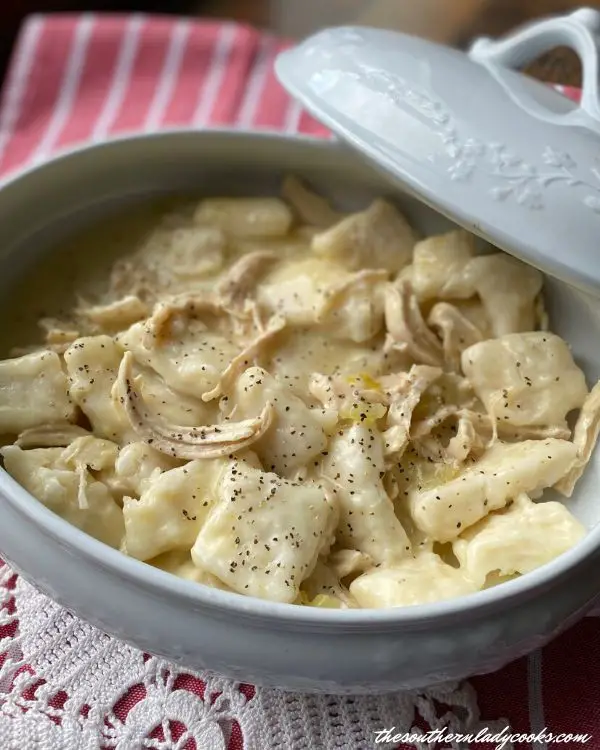
These fluffy, no-fuss dumplings come together in minutes and are the perfect cozy addition to soups or stews.
Ingredients:
- 2 cups self-rising flour
- 1/2 tsp salt
- 1/4 tsp black pepper
- 3/4 cup whole milk
- 2 tbsp unsalted butter, melted
Instructions:
- In a large bowl, whisk together 2 cups self-rising flour, 1/2 tsp salt, and 1/4 tsp black pepper.
- Make a well in the center and pour in 3/4 cup whole milk and 2 tbsp melted butter. Stir just until a shaggy dough forms (don’t overmix).
- Drop heaping tablespoonfuls of dough into simmering soup or stew. Cover and cook for 12–15 minutes until puffed and cooked through.
The magic of self-rising flour means no yeast or baking powder—just tender, cloud-like dumplings every time.
Tip: For extra richness, swap the milk for buttermilk and add a pinch of garlic powder to the dry ingredients.
Cheesy Self Rising Flour Muffins
These buttery, cheesy muffins come together in minutes with just a handful of pantry staples—perfect for a quick savory snack or a cozy breakfast side.
Ingredients:
- 2 cups self-rising flour
- 1 cup shredded sharp cheddar cheese
- 1/2 cup whole milk
- 1/4 cup unsalted butter, melted and slightly cooled
- 1 large egg
- 1/2 tsp garlic powder
- 1/4 tsp smoked paprika
Instructions:
- Preheat oven to 375°F and grease a 12-cup muffin tin or line with parchment liners.
- In a large bowl, whisk together the self-rising flour, 1/2 tsp garlic powder, and 1/4 tsp smoked paprika. Fold in the shredded cheddar cheese.
- In another bowl, whisk together the whole milk, melted butter, and egg until smooth.
- Pour the wet ingredients into the dry ingredients and stir just until combined (a few lumps are okay—don’t overmix!).
- Divide the batter evenly among the muffin cups (about 3/4 full) and bake for 18–20 minutes, until puffed and golden.
The magic of self-rising flour gives these muffins an airy crumb, while the smoked paprika adds a subtle smoky depth to the cheesy goodness.
Tip: For extra flavor, sprinkle a pinch of extra cheese and paprika on top before baking!
Sweet Self Rising Flour Banana Bread
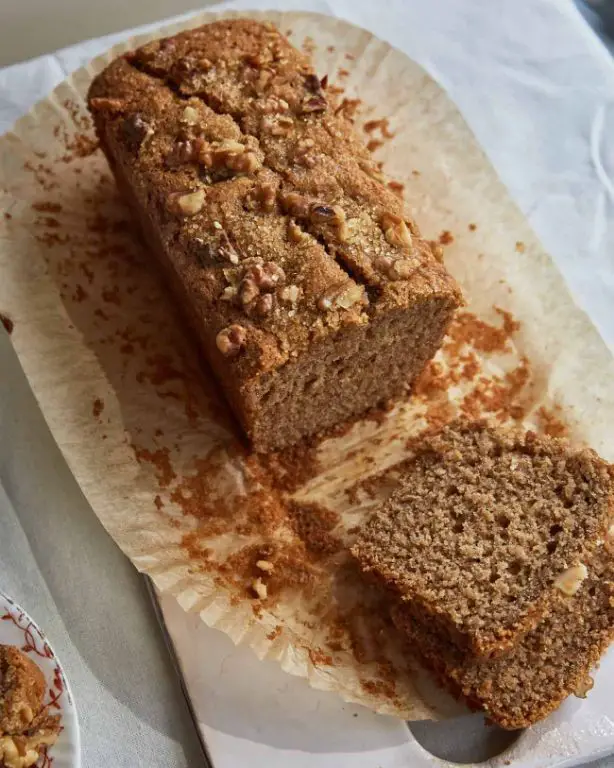
This banana bread skips the fuss of measuring baking powder and soda—just grab self-rising flour for a reliably tender crumb and caramelized edges every time.
Ingredients
- 3 very ripe bananas, mashed (about 1 1/2 cups)
- 1/2 cup (1 stick) unsalted butter, melted
- 2 large eggs
- 1 cup granulated sugar
- 1 tsp vanilla extract
- 2 cups self-rising flour
- 1/2 tsp cinnamon
- 1/4 tsp salt
Instructions
- Preheat oven to 350°F. Grease a 9×5-inch loaf pan.
- In a large bowl, whisk together mashed bananas, melted butter, eggs, 1 cup sugar, and 1 tsp vanilla until smooth.
- Gently fold in 2 cups self-rising flour, 1/2 tsp cinnamon, and 1/4 tsp salt until just combined (small lumps are okay).
- Pour batter into prepared pan and bake for 50–55 minutes, until a toothpick inserted in the center comes out clean.
- Cool in pan for 10 minutes, then transfer to a wire rack.
The self-rising flour gives this loaf a light, airy texture while keeping the crust satisfyingly crisp—perfect for slicing thick and slathering with salted butter.
Tip: For extra caramel notes, sprinkle the top with 1 tbsp turbinado sugar before baking.
Crispy Self Rising Flour Fried Chicken

This Southern-style fried chicken gets its extra-crunchy crust from a simple but genius trick: self-rising flour!
Ingredients:
- 3 lbs bone-in chicken pieces (thighs, drumsticks, or breasts)
- 2 cups self-rising flour
- 1 tbsp garlic powder
- 1 tbsp smoked paprika
- 2 tsp salt
- 1 tsp black pepper
- 1 tsp cayenne pepper (optional, for heat)
- 1 cup buttermilk
- 1 large egg
- Vegetable oil (for frying, about 2 inches deep)
Instructions:
- In a large bowl, whisk together 2 cups self-rising flour, 1 tbsp garlic powder, 1 tbsp smoked paprika, 2 tsp salt, 1 tsp black pepper, and 1 tsp cayenne pepper (if using). Set aside.
- In another bowl, whisk 1 cup buttermilk and 1 large egg until smooth. Dip chicken pieces in the buttermilk mixture, letting excess drip off, then coat thoroughly in the flour mixture. Place on a wire rack while heating oil.
- Heat vegetable oil in a deep skillet or Dutch oven to 350°F over medium-high heat. Working in batches, fry chicken for 12–15 minutes (dark meat) or 10–12 minutes (white meat), turning occasionally, until deep golden brown and internal temperature reaches 165°F. Drain on a wire rack.
The self-rising flour creates an airy, shatteringly crisp crust that stays crunchy for hours—no double-dipping required!
Tip: For extra flavor, season the chicken with a pinch of salt 1 hour before frying and let it rest uncovered in the fridge.
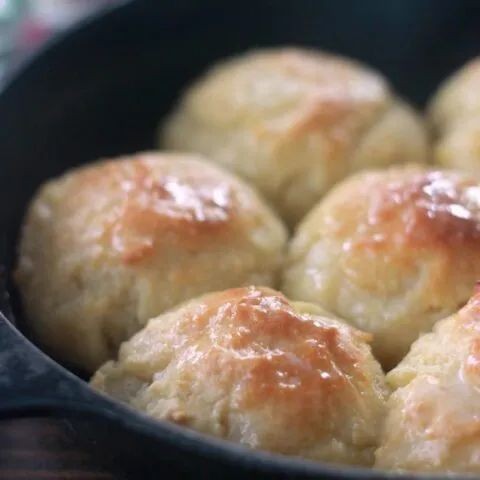
Soft Self Rising Flour Dinner Rolls
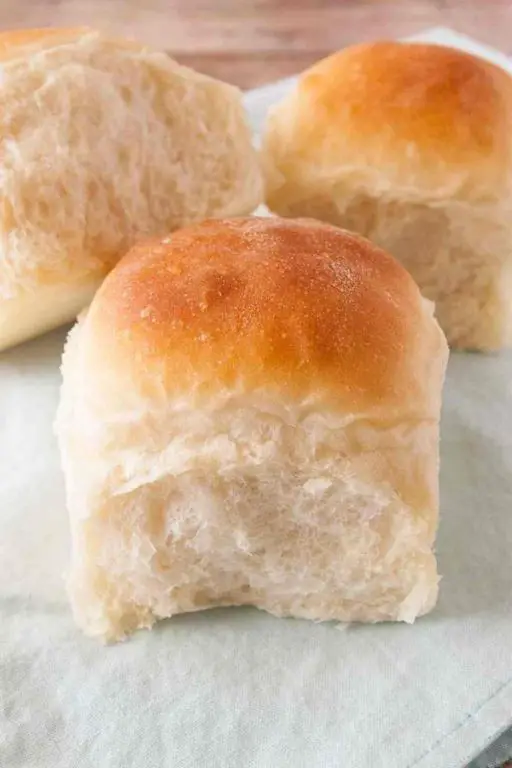
These Soft Self-Rising Flour Dinner Rolls are buttery, fluffy, and come together in a flash—no yeast required!
- 2 cups self-rising flour (plus extra for dusting)
- 1/4 cup granulated sugar
- 1/2 tsp salt
- 1/2 cup whole milk
- 1/4 cup unsalted butter, melted (plus 2 tbsp for brushing)
- Preheat oven to 400°F. Line a baking sheet with parchment paper.
- In a large bowl, whisk together 2 cups self-rising flour, 1/4 cup sugar, and 1/2 tsp salt.
- Stir in 1/2 cup milk and 1/4 cup melted butter until a shaggy dough forms. Turn onto a lightly floured surface and knead gently 4–5 times until smooth (don’t overwork!).
- Divide dough into 8 equal pieces, roll into balls, and place on the baking sheet. Brush tops with 2 tbsp melted butter.
- Bake 15–18 minutes until golden and puffed. Serve warm.
The magic of self-rising flour gives these rolls an airy crumb without the wait—perfect for last-minute gatherings!
Tip: For extra richness, swap the milk for buttermilk and add a pinch of garlic powder to the dough.
Savory Self Rising Flour Cornbread
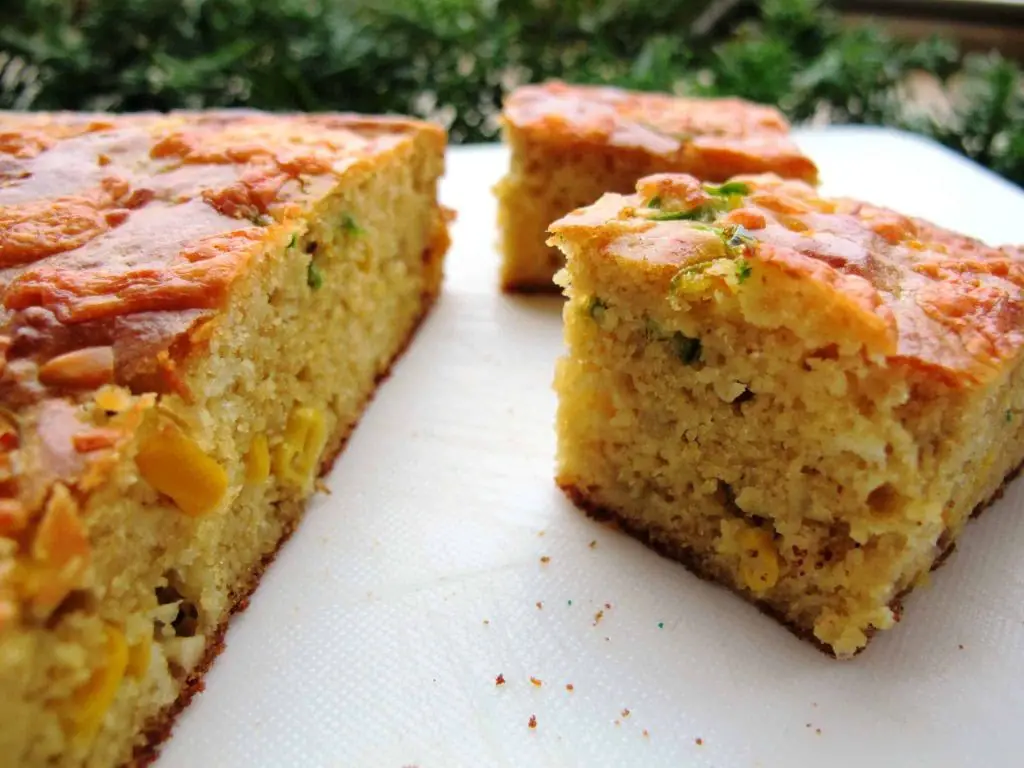
This golden, slightly crumbly cornbread skips the sugar for a hearty, savory twist—perfect for sopping up chili or serving alongside BBQ.
Ingredients:
- 1 cup self-rising flour
- 1 cup yellow cornmeal
- 1/2 tsp salt
- 1/4 tsp black pepper
- 1/4 tsp garlic powder
- 1 cup buttermilk
- 1 large egg
- 1/4 cup unsalted butter, melted
- 1/4 cup shredded sharp cheddar cheese (optional)
Instructions:
- Preheat oven to 400°F. Grease an 8-inch cast-iron skillet or square baking pan.
- In a large bowl, whisk together 1 cup self-rising flour, 1 cup yellow cornmeal, 1/2 tsp salt, 1/4 tsp black pepper, and 1/4 tsp garlic powder.
- In another bowl, beat 1 cup buttermilk, 1 large egg, and 1/4 cup melted butter. Pour into dry ingredients; stir until just combined. Fold in 1/4 cup cheddar cheese (if using).
- Spread batter into the skillet and bake for 20–22 minutes until edges pull away and a toothpick comes out clean.
The self-rising flour gives this cornbread a lighter crumb than traditional versions, while the garlic powder and black pepper add a subtle kick. Tip: For extra crisp edges, preheat the skillet in the oven before adding the batter.
Gluten-Free Self Rising Flour Waffles
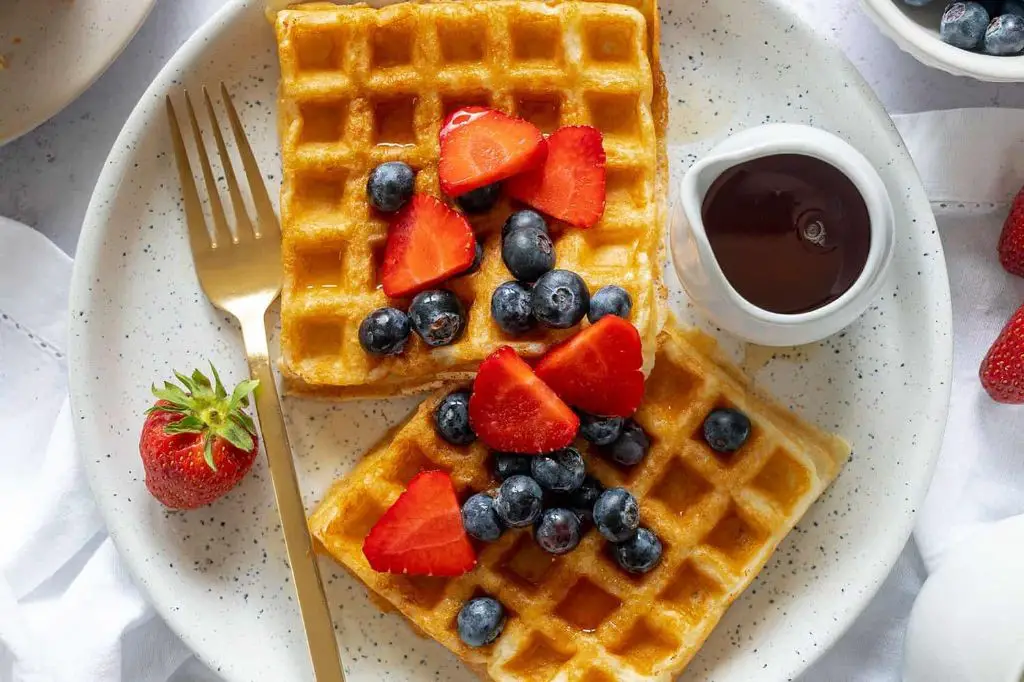
These light, crispy waffles come together in minutes with gluten-free self-rising flour—no fussy blends or extra binders needed!
Ingredients
- 1 1/2 cups gluten-free self-rising flour (like Bob’s Red Mill 1:1)
- 1 tbsp granulated sugar
- 1/4 tsp salt
- 1 cup milk (dairy or unsweetened almond)
- 1 large egg
- 2 tbsp melted butter or coconut oil
- 1 tsp vanilla extract
Instructions
- Preheat your waffle iron to medium-high (375°F for most models).
- In a large bowl, whisk together 1 1/2 cups gluten-free self-rising flour, 1 tbsp sugar, and 1/4 tsp salt.
- In another bowl, beat 1 egg, then stir in 1 cup milk, 2 tbsp melted butter, and 1 tsp vanilla.
- Pour wet ingredients into dry ingredients and stir until just combined (small lumps are okay). Let batter rest 3 minutes to thicken slightly.
- Lightly grease the waffle iron, then pour 1/3 cup batter per waffle (or as directed by your iron’s manual). Cook 3–4 minutes until golden and crisp.
The magic here? The self-rising flour gives these waffles an airy texture without any added baking powder or xanthan gum—just pure, simple comfort.
Tip: For extra-crispy edges, let cooked waffles rest on a wire rack (not a plate) while you finish the batch.
Rich Self Rising Flour Chocolate Cake
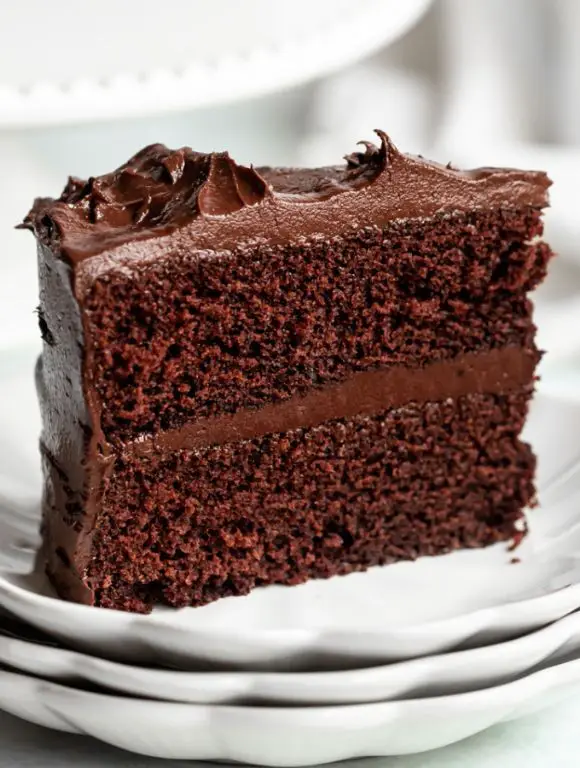
This Rich Self-Rising Flour Chocolate Cake is a dreamy one-bowl wonder—moist, decadent, and impossibly easy for when a chocolate craving strikes.
- 1 ½ cups self-rising flour
- 1 cup granulated sugar
- ½ cup unsweetened cocoa powder
- ½ cup vegetable oil
- 2 large eggs
- 1 cup whole milk
- 1 tsp vanilla extract
- ½ tsp instant espresso powder (optional, enhances chocolate flavor)
- Preheat oven to 350°F. Grease an 8-inch round cake pan and line the bottom with parchment paper.
- In a large bowl, whisk together 1 ½ cups self-rising flour, 1 cup sugar, ½ cup cocoa powder, and ½ tsp espresso powder (if using).
- Add ½ cup oil, 2 eggs, 1 cup milk, and 1 tsp vanilla. Beat with a hand mixer (or whisk vigorously) until smooth, about 2 minutes.
- Pour batter into the prepared pan and bake for 30–35 minutes, until a toothpick inserted in the center comes out clean.
- Cool in the pan for 10 minutes, then transfer to a wire rack to cool completely.
The espresso powder deepens the chocolate flavor without tasting like coffee, giving this humble cake a sophisticated edge. Serve dusted with powdered sugar or topped with whipped cream!
Tip: For extra richness, swap the milk for buttermilk—it adds a subtle tang and tender crumb.
Spicy Self Rising Flour Tortillas
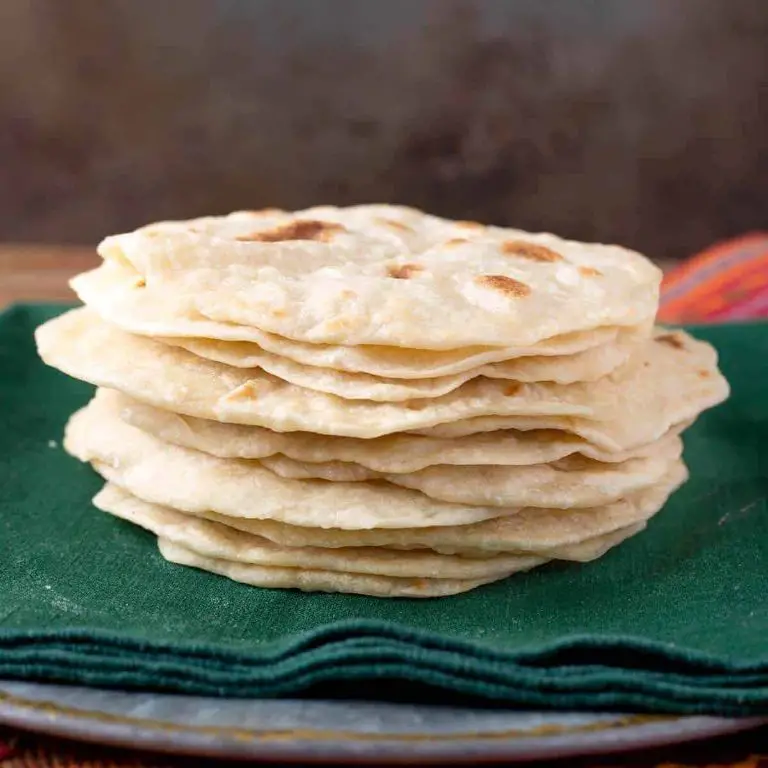
These homemade tortillas pack a punch with smoky heat and come together in minutes—no yeast or rolling pin required!
Ingredients:
- 2 cups self-rising flour (plus extra for dusting)
- 1 tsp smoked paprika
- 1/2 tsp garlic powder
- 1/2 tsp cayenne pepper
- 3/4 cup warm water
- 2 tbsp vegetable oil
Instructions:
- In a bowl, whisk together 2 cups self-rising flour, 1 tsp smoked paprika, 1/2 tsp garlic powder, and 1/2 tsp cayenne pepper.
- Make a well in the center and pour in 3/4 cup warm water and 2 tbsp vegetable oil. Stir until a shaggy dough forms, then knead by hand for 1 minute until smooth.
- Divide dough into 8 equal balls. On a lightly floured surface, flatten each ball into a 6-inch circle (about 1/8-inch thick) using your palms.
- Heat a dry skillet over medium-high. Cook each tortilla for 1 minute per side until puffed and charred in spots. Stack cooked tortillas under a towel to keep soft.
The magic of self-rising flour gives these tortillas an airy lift, while the smoky-spicy blend makes them irresistible for tacos or dipping.
Tip: For extra kick, brush cooked tortillas with melted butter mixed with a pinch of cayenne.
Flaky Self Rising Flour Pie Crust
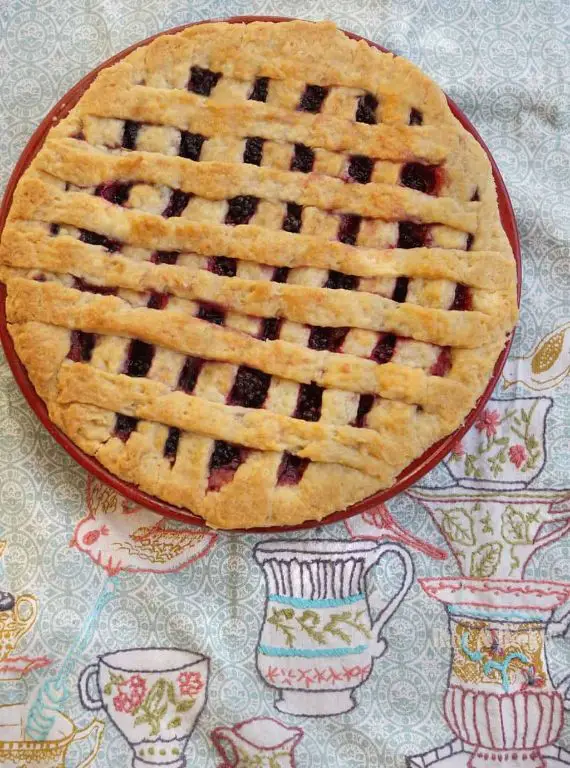
This fuss-free pie crust comes together in minutes with self-rising flour, delivering tender, flaky layers every time—no chilling required!
Ingredients:
- 2 cups self-rising flour (plus extra for dusting)
- 1/2 cup cold unsalted butter, cubed
- 1/3 cup ice water
- 1 tsp granulated sugar
Instructions:
- Mix dry ingredients: In a large bowl, whisk together 2 cups self-rising flour and 1 tsp sugar.
- Cut in butter: Add cold cubed butter. Use a pastry cutter or fork to work it into the flour until pea-sized crumbs form.
- Add water: Drizzle in 1/3 cup ice water, 1 tbsp at a time, stirring with a rubber spatula just until the dough clumps together.
- Roll out: Turn dough onto a lightly floured surface, knead gently 2-3 times, then roll into a 12-inch circle. Transfer to a pie dish and trim edges.
- Bake or fill: For pre-baked crusts, prick with a fork and bake at 375°F for 12-15 minutes until lightly golden. For filled pies, proceed with your recipe.
The magic of self-rising flour means no extra leavening agents—just pure, buttery layers that shatter with each bite.
Tip: Freeze leftover dough scraps and grate them over fruit crisps for an instant streusel topping!
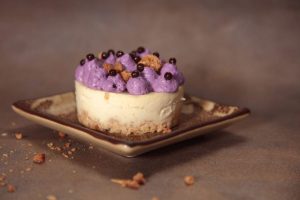
Tangy Self Rising Flour Lemon Bars
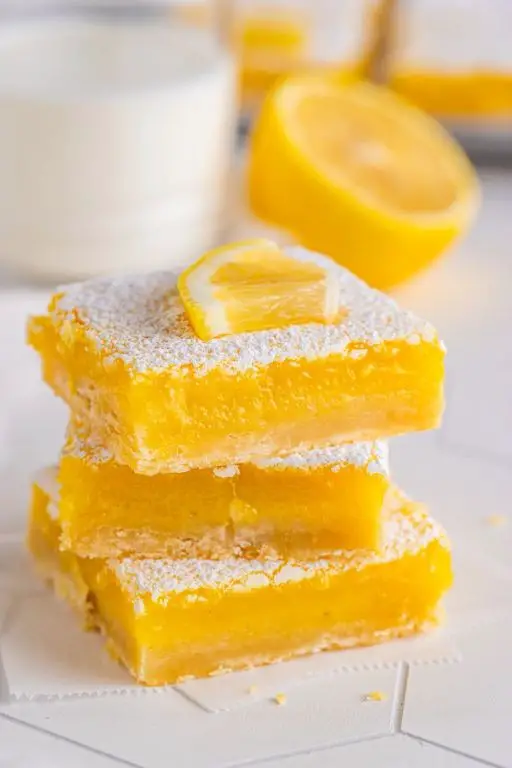
These tangy self-rising flour lemon bars are the perfect balance of sweet and zesty, with a tender crust that comes together in a snap—no fussy dough required!
- 1 cup self-rising flour
- 1/2 cup unsalted butter, softened
- 1/4 cup powdered sugar
- 2 large eggs
- 1 cup granulated sugar
- 2 tbsp lemon zest
- 1/4 cup fresh lemon juice
- 1/4 tsp salt
- Extra powdered sugar for dusting
- Preheat oven to 350°F. Line an 8×8-inch baking pan with parchment paper.
- In a bowl, mix 1 cup self-rising flour, 1/2 cup softened butter, and 1/4 cup powdered sugar until crumbly. Press evenly into the pan. Bake for 15 minutes until lightly golden.
- Whisk together eggs, 1 cup granulated sugar, 2 tbsp lemon zest, 1/4 cup lemon juice, and 1/4 tsp salt. Pour over the warm crust.
- Bake for 20–25 minutes until the filling is set (edges should be slightly bubbly). Cool completely, then dust with powdered sugar.
The magic here? Self-rising flour gives the crust a lift without extra leavening, while the filling stays luxuriously creamy with a bright lemon punch.
Tip: For clean cuts, chill the bars for 30 minutes before slicing!
Herbed Self Rising Flour Focaccia
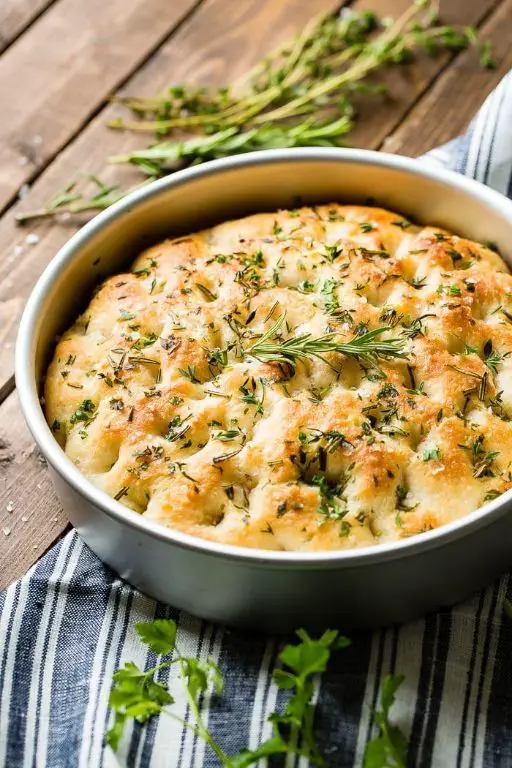
This fuss-free focaccia skips the yeast and relies on self-rising flour for a quick, fluffy bread packed with aromatic herbs—perfect for weeknight dinners or last-minute guests.
Ingredients:
- 2 cups self-rising flour
- 1 cup whole milk
- 1/4 cup olive oil, divided
- 1 tbsp chopped fresh rosemary
- 1 tbsp chopped fresh thyme
- 1 tsp garlic powder
- 1/2 tsp flaky sea salt
Instructions:
- Preheat oven to 375°F. Grease a 9-inch round cake pan with 1 tbsp olive oil.
- In a bowl, whisk together self-rising flour, 1 tbsp chopped rosemary, 1 tbsp chopped thyme, and 1 tsp garlic powder. Slowly stir in milk and 2 tbsp olive oil until just combined (dough will be sticky).
- Transfer dough to the prepared pan, pressing gently to edges. Drizzle with remaining 1 tbsp olive oil and sprinkle with 1/2 tsp flaky sea salt.
- Bake for 25–30 minutes until golden and puffed. Let cool 5 minutes before slicing.
The magic here? Self-rising flour gives this focaccia a tender crumb without kneading or proofing—just mix, bake, and enjoy those herby, garlicky notes in every bite.
Tip: For extra crunch, sprinkle coarse cornmeal in the pan before adding the dough.
Moist Self Rising Flour Carrot Cake
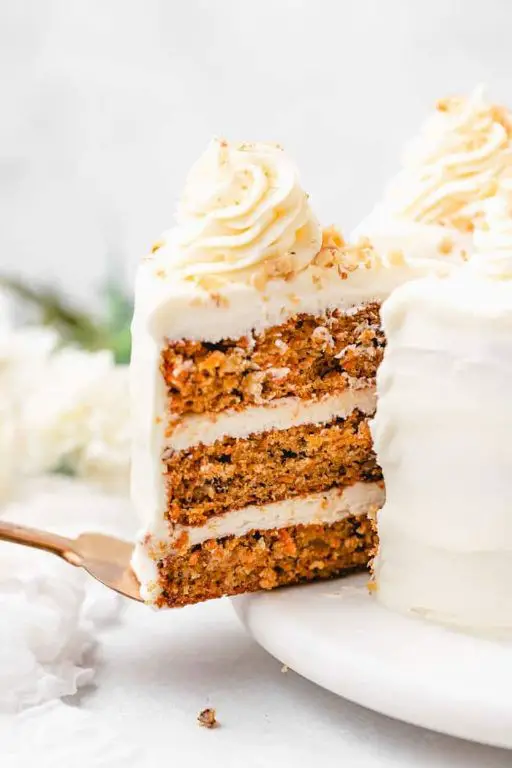
This fuss-free carrot cake skips the extra leavening agents but stays incredibly tender, thanks to self-rising flour and a generous pour of oil.
Ingredients:
- 2 cups self-rising flour
- 1 1/2 cups granulated sugar
- 1 tsp ground cinnamon
- 1/2 tsp ground nutmeg
- 3 large eggs, room temperature
- 1 cup vegetable oil
- 2 tsp vanilla extract
- 2 cups finely grated carrots (about 3 medium)
- 1/2 cup crushed pineapple, drained
- 1/2 cup chopped walnuts or pecans (optional)
Instructions:
- Preheat oven to 350°F. Grease a 9×13-inch baking pan.
- In a large bowl, whisk together 2 cups self-rising flour, 1 1/2 cups sugar, 1 tsp cinnamon, and 1/2 tsp nutmeg.
- Add 3 eggs, 1 cup oil, and 2 tsp vanilla. Stir until just combined.
- Fold in carrots, pineapple, and nuts (if using). Spread batter evenly in the pan.
- Bake for 30–35 minutes until a toothpick inserted in the center comes out clean. Cool completely before frosting.
The pineapple keeps every bite moist while letting the carrots shine—no dry crumbs here! For extra flair, top with cream cheese frosting and a sprinkle of toasted nuts.
Tip: Grate carrots on the fine side of a box grater for the softest texture.
Simple Self Rising Flour Shortcakes
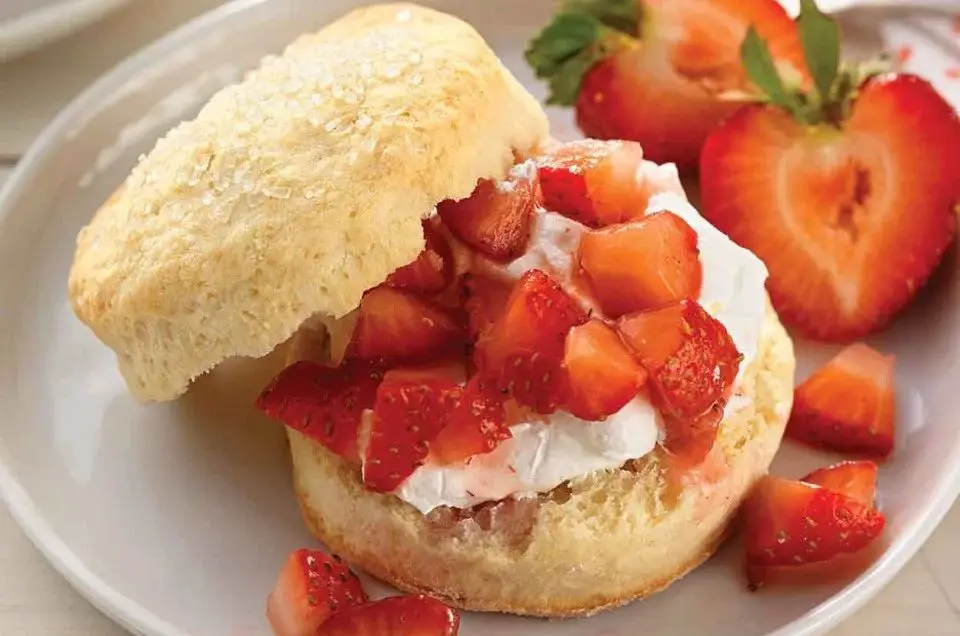
These tender, buttery shortcakes come together in minutes with self-rising flour—perfect for lazy weekend breakfasts or last-minute strawberry shortcake cravings.
Ingredients:
- 2 cups self-rising flour (plus extra for dusting)
- 1/4 cup granulated sugar
- 1/2 tsp salt
- 1/2 cup cold unsalted butter, cubed
- 3/4 cup whole milk
- 1 tbsp heavy cream (for brushing)
- 1 tbsp turbinado sugar (for sprinkling)
Instructions:
- Preheat oven to 425°F. Line a baking sheet with parchment paper.
- In a large bowl, whisk together 2 cups self-rising flour, 1/4 cup granulated sugar, and 1/2 tsp salt.
- Cut in cold butter with a pastry cutter or fingers until mixture resembles coarse crumbs with pea-sized butter pieces.
- Pour in whole milk and stir just until a shaggy dough forms (don’t overmix).
- Turn dough onto a lightly floured surface, pat into a 1-inch-thick rectangle, and cut into 6 squares. Arrange on baking sheet.
- Brush tops with 1 tbsp heavy cream and sprinkle with 1 tbsp turbinado sugar.
- Bake for 15–18 minutes until golden and puffed. Cool slightly before splitting.
The magic here? Self-rising flour gives these shortcakes an airy lift without fussing with leaveners—plus, the turbinado sugar adds a delightful crunch.
Tip: For extra flaky layers, fold the dough in half like a letter before patting it out.
Conclusion
There you have it—18 mouthwatering ways to put self-rising flour to work in your kitchen! Whether you’re craving fluffy biscuits, tender cakes, or savory snacks, this list has something for everyone. Don’t forget to whip up your favorites, share your thoughts in the comments, and pin this roundup for later. Happy baking!

I’m Brandon, the face behind the recipes. As a dedicated food enthusiast, I love experimenting with flavors and sharing my culinary adventures with you.