Your KitchenAid mixer is about to become your new best friend in the kitchen! Whether you’re whipping up quick weeknight dinners, baking seasonal favorites, or indulging in cozy comfort food, this powerhouse appliance makes it all a breeze. From fluffy cakes to savory pastas, we’ve rounded up 20 must-try recipes that’ll inspire you to dust off that mixer and get cooking. Ready to mix things up? Let’s dive in!
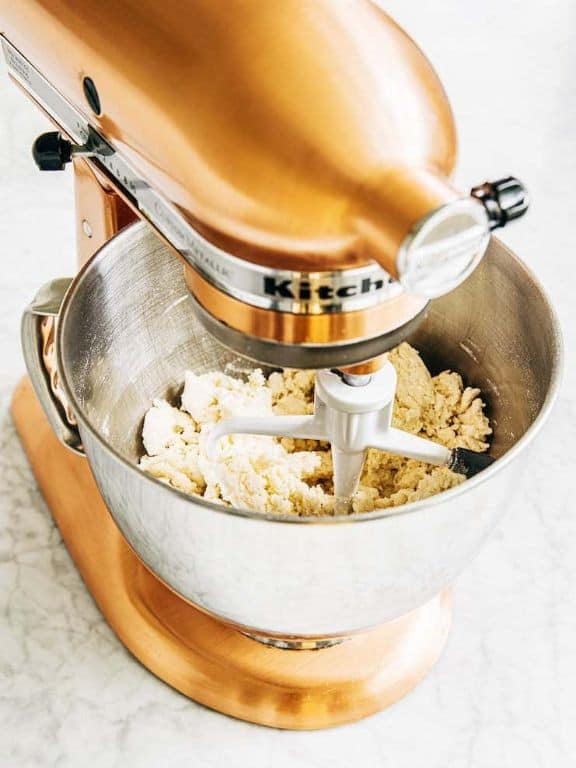
Classic Homemade Bread with KitchenAid Mixer
There’s nothing quite like the smell of fresh bread filling your kitchen—and with a trusty stand mixer, it’s easier than ever to whip up a loaf that’s soft, fluffy, and downright irresistible.
Ingredients:
- 1 cup warm water (110°F)
- 2 ¼ tsp active dry yeast (1 packet)
- 2 tbsp granulated sugar
- 3 cups all-purpose flour, divided
- 1 tsp salt
- 2 tbsp unsalted butter, melted
Instructions:
- In the bowl of your KitchenAid mixer, combine 1 cup warm water, 2 ¼ tsp yeast, and 2 tbsp sugar. Let sit for 5 minutes until foamy.
- Attach the dough hook. Add 2 cups flour, 1 tsp salt, and 2 tbsp melted butter. Mix on low until combined, then increase to medium and knead for 3 minutes.
- Gradually add the remaining 1 cup flour until the dough pulls away from the bowl (about 2–3 minutes). It should be slightly sticky but smooth.
- Transfer dough to a greased bowl, cover with a towel, and let rise in a warm spot for 1 hour or until doubled.
- Punch down dough, shape into a loaf, and place in a greased 9×5-inch pan. Cover and rise again for 30 minutes.
- Preheat oven to 375°F. Bake for 25–30 minutes until golden and hollow-sounding when tapped. Cool before slicing.
The secret? The KitchenAid mixer does the heavy lifting, giving you bakery-quality texture with minimal effort—no kneading by hand required!
Tip: For a softer crust, brush the baked loaf with melted butter right out of the oven.
Creamy Mashed Potatoes Using KitchenAid Mixer

Fluffy, buttery mashed potatoes are a must-have side, and your stand mixer makes them effortlessly smooth—no elbow grease required!
Ingredients:
- 3 lbs Yukon Gold potatoes, peeled and quartered
- 1/2 cup whole milk, warmed
- 1/2 cup heavy cream, warmed
- 1/2 cup (1 stick) unsalted butter, softened
- 1 1/2 tsp kosher salt
- 1/4 tsp freshly ground black pepper
Instructions:
- In a large pot, cover potatoes with cold water. Bring to a boil over high heat, then reduce to a simmer. Cook for 15–18 minutes until fork-tender. Drain well.
- Transfer potatoes to the bowl of a KitchenAid mixer fitted with the paddle attachment. Mix on low speed for 30 seconds to break them up.
- With the mixer running, add softened butter, 1 1/2 tsp salt, and 1/4 tsp pepper. Gradually pour in warm milk and heavy cream. Increase speed to medium and mix for 1–2 minutes until ultra-creamy (don’t overmix).
- Taste and adjust seasoning if needed. Serve immediately.
The stand mixer whips these into cloud-like perfection—no lumps, just velvety richness in every bite.
Tip: For extra flavor, steep a garlic clove or fresh herbs in the warming milk and cream, then strain before adding.
Perfectly Whipped Cream with KitchenAid Mixer
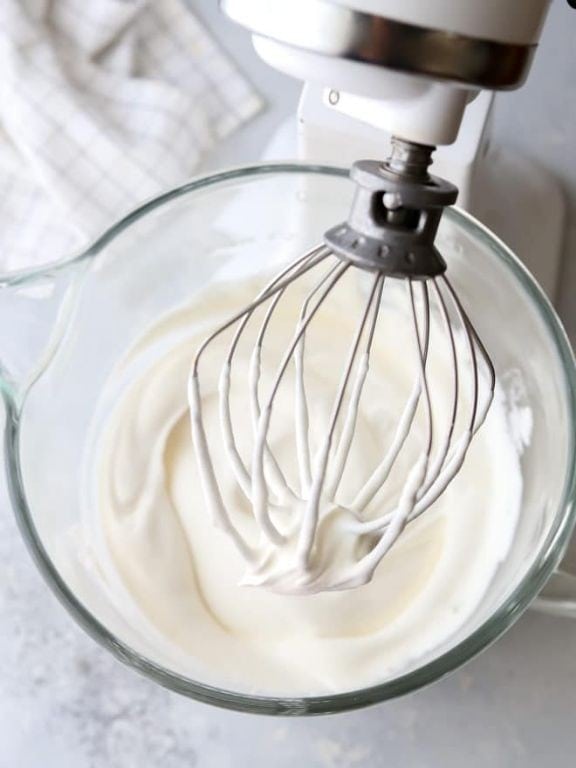
Light, fluffy, and just sweet enough—this whipped cream is a dreamy topping for pies, hot cocoa, or fresh berries.
Ingredients:
- 1 cup heavy whipping cream, chilled
- 2 tbsp granulated sugar
- 1 tsp pure vanilla extract
Instructions:
- Chill the KitchenAid mixer bowl and whisk attachment in the freezer for 10 minutes before starting.
- Pour 1 cup heavy whipping cream into the chilled bowl. Attach the whisk and mix on medium speed (setting 4–6) for 1–2 minutes until soft peaks form.
- With the mixer running, slowly add 2 tbsp granulated sugar and 1 tsp vanilla extract. Increase speed to high (setting 8–10) and whip for another 1–2 minutes until stiff peaks hold when the whisk is lifted.
- Use immediately or refrigerate for up to 2 hours.
The secret? Chilling the bowl ensures maximum volume, so your whipped cream stays airy and pillowy—never grainy or flat.
Tip: For a fun twist, swap vanilla with almond extract or a pinch of cinnamon for cozy warmth.
Fluffy Pancake Batter Made in KitchenAid Mixer

Nothing beats a stack of fluffy, golden pancakes—especially when your trusty KitchenAid mixer does all the heavy lifting for you!
- 1 1/2 cups all-purpose flour
- 3 1/2 tsp baking powder
- 1 tbsp granulated sugar
- 1/2 tsp salt
- 1 1/4 cups whole milk
- 1 large egg
- 3 tbsp unsalted butter, melted and cooled
- 1 tsp vanilla extract
- In your KitchenAid mixer bowl, whisk together 1 1/2 cups all-purpose flour, 3 1/2 tsp baking powder, 1 tbsp granulated sugar, and 1/2 tsp salt using the flat beater attachment on low speed (Stir setting).
- In a separate bowl, whisk together 1 1/4 cups whole milk, 1 large egg, 3 tbsp melted butter, and 1 tsp vanilla extract until smooth.
- With the mixer on low, slowly pour the wet ingredients into the dry ingredients. Mix just until combined (about 30 seconds—small lumps are okay!).
- Heat a lightly greased griddle or skillet over medium heat (375°F if using an electric griddle). Pour 1/4 cup batter per pancake and cook until bubbles form on the surface and edges look set (about 2–3 minutes). Flip and cook for another 1–2 minutes until golden.
The KitchenAid ensures a perfectly aerated batter every time, giving these pancakes an irresistible cloud-like fluffiness. Serve with maple syrup and a pat of butter for the ultimate breakfast treat!
Tip: For extra-tender pancakes, let the batter rest for 5 minutes before cooking—this gives the baking powder time to work its magic.
Decadent Chocolate Cake with KitchenAid Mixer
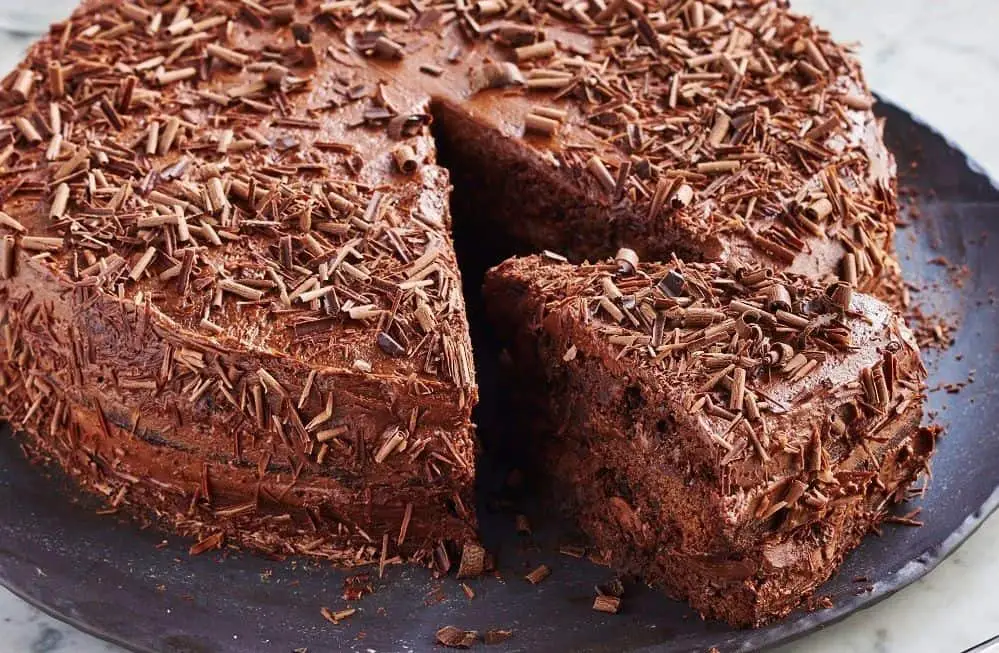
This rich, fudgy chocolate cake is a showstopper—perfect for birthdays or anytime you crave a slice of pure indulgence.
Ingredients
- 1 3/4 cups all-purpose flour
- 2 cups granulated sugar
- 3/4 cup unsweetened cocoa powder
- 1 1/2 tsp baking powder
- 1 1/2 tsp baking soda
- 1 tsp salt
- 2 large eggs
- 1 cup whole milk
- 1/2 cup vegetable oil
- 2 tsp vanilla extract
- 1 cup boiling water
Instructions
- Preheat oven to 350°F. Grease and flour two 9-inch round cake pans.
- In the bowl of a KitchenAid mixer, combine 1 3/4 cups flour, 2 cups sugar, 3/4 cup cocoa powder, 1 1/2 tsp baking powder, 1 1/2 tsp baking soda, and 1 tsp salt. Mix on low for 30 seconds.
- Add eggs, 1 cup milk, 1/2 cup oil, and 2 tsp vanilla. Mix on medium until smooth (about 2 minutes).
- Reduce speed to low and slowly pour in 1 cup boiling water. Batter will be thin—this is normal!
- Divide batter evenly between pans. Bake for 30–35 minutes until a toothpick comes out clean.
- Cool in pans for 10 minutes, then transfer to a wire rack.
The secret? That boiling water intensifies the chocolate flavor while keeping the crumb ultra-moist. Frost with your favorite ganache or buttercream.
Tip: For extra depth, swap 1/2 cup of the boiling water for hot brewed coffee.
Soft and Chewy Sugar Cookies Using KitchenAid Mixer

These soft and chewy sugar cookies are a nostalgic treat with just the right balance of crisp edges and pillowy centers—perfect for decorating or enjoying straight from the oven.
- 2 1/4 cups all-purpose flour
- 1/2 tsp baking powder
- 1/4 tsp salt
- 3/4 cup unsalted butter, softened
- 3/4 cup granulated sugar
- 1 large egg
- 2 tsp vanilla extract
- 1/4 cup sanding sugar (for rolling)
- Preheat oven to 350°F. Line baking sheets with parchment paper.
- In a bowl, whisk together the 2 1/4 cups all-purpose flour, 1/2 tsp baking powder, and 1/4 tsp salt.
- In your KitchenAid mixer fitted with the paddle attachment, beat the 3/4 cup unsalted butter and 3/4 cup granulated sugar on medium speed until fluffy (about 2 minutes). Add the 1 large egg and 2 tsp vanilla extract, mixing until combined.
- Gradually add the dry ingredients, mixing on low until just incorporated.
- Scoop 1-tbsp portions of dough, roll into balls, then coat in sanding sugar. Place 2 inches apart on baking sheets.
- Bake for 10–12 minutes until the edges are set but centers still look slightly soft. Cool on sheets for 5 minutes before transferring to a rack.
The secret to their chewiness? A touch of baking powder keeps them tender, while the sanding sugar adds a delicate crunch. These cookies hold their shape beautifully for holiday cutouts, too!
Tip: For extra-fluffy cookies, chill the dough for 30 minutes before baking.
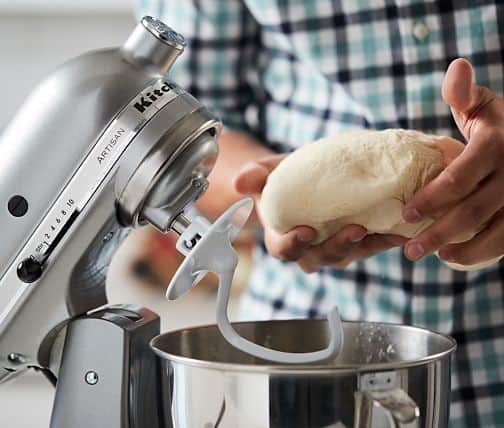
Homemade Pizza Dough with KitchenAid Mixer

Nothing beats the satisfaction of homemade pizza dough—especially when your trusty KitchenAid mixer does the heavy lifting for you!
Ingredients:
- 3 ½ cups (440g) all-purpose flour, plus extra for dusting
- 1 ½ tsp (6g) active dry yeast
- 1 ½ tsp (9g) salt
- 1 ½ tsp (6g) sugar
- 1 ¼ cups (300ml) warm water (110°F)
- 2 tbsp (30ml) olive oil, plus extra for greasing
Instructions:
- In the bowl of your KitchenAid mixer, whisk together the warm water, sugar, and yeast. Let sit for 5 minutes until foamy.
- Attach the dough hook, then add the flour, salt, and 2 tbsp (30ml) olive oil. Mix on low speed for 2 minutes until combined, then increase to medium and knead for 5 minutes until smooth and elastic.
- Lightly grease a large bowl with olive oil. Shape the dough into a ball, place it in the bowl, and cover with a damp towel. Let rise in a warm spot for 1 hour or until doubled in size.
- Punch down the dough, then transfer to a floured surface. Divide into 2 equal portions (or leave whole for a thicker crust) and roll out to your desired thickness.
This dough bakes up crisp yet chewy, with just the right amount of stretch—perfect for loading with your favorite toppings. Bonus: it freezes beautifully for future pizza nights!
Tip: For extra flavor, swap 1 cup of all-purpose flour with bread flour or add 1 tsp garlic powder to the dry ingredients.
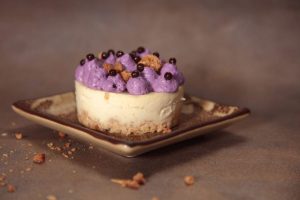
Rich and Creamy Cheesecake Made in KitchenAid Mixer
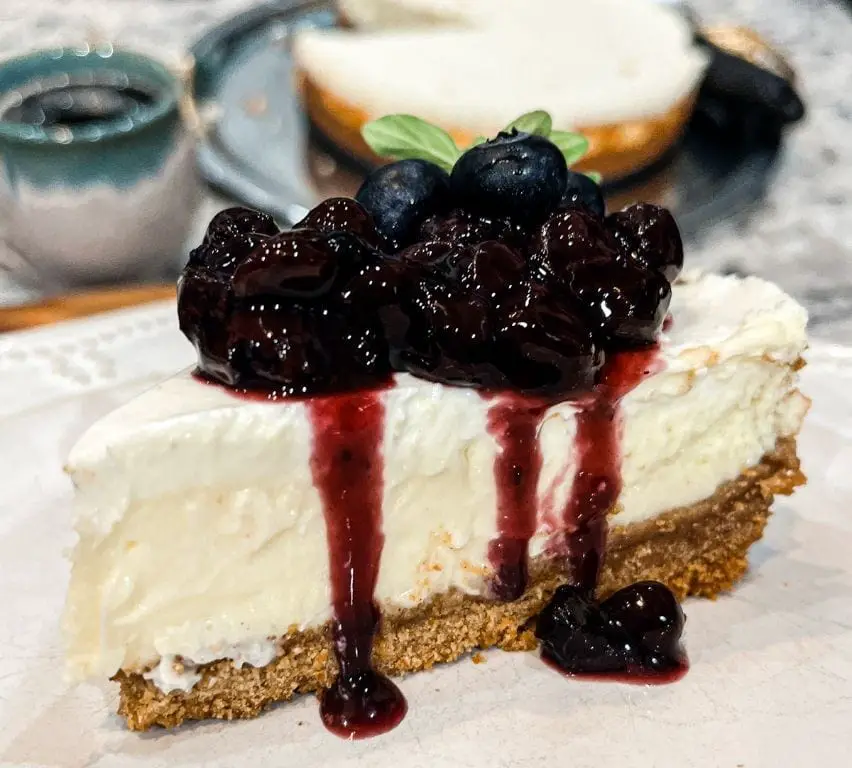
This velvety cheesecake is a dreamy dessert that comes together effortlessly with the help of your trusty stand mixer—no water bath required!
Ingredients
- 2 cups graham cracker crumbs
- 1/2 cup unsalted butter, melted
- 1/4 cup granulated sugar
- 4 (8 oz) blocks cream cheese, room temperature
- 1 1/4 cups granulated sugar
- 1 tsp vanilla extract
- 1/4 tsp salt
- 4 large eggs, room temperature
- 1/2 cup sour cream
Instructions
- Prep the crust: Mix 2 cups graham cracker crumbs, 1/2 cup melted butter, and 1/4 cup sugar in a bowl. Press firmly into a 9-inch springform pan. Bake at 325°F for 10 minutes, then cool.
- Make the filling: In your KitchenAid mixer with the paddle attachment, beat the cream cheese on medium until smooth (1–2 minutes). Gradually add 1 1/4 cups sugar, 1 tsp vanilla, and 1/4 tsp salt, scraping the bowl. Mix in eggs one at a time, then fold in sour cream until just combined.
- Bake: Pour filling over the crust. Bake at 325°F for 50–55 minutes until the edges are set but the center jiggles slightly. Turn off the oven, crack the door, and let cool inside for 1 hour.
- Chill: Refrigerate for at least 6 hours (overnight is best) before slicing.
The KitchenAid mixer ensures an ultra-smooth filling, while the sour cream adds a subtle tang that balances the sweetness perfectly.
Tip: For clean slices, dip your knife in hot water and wipe it between cuts!
Fresh Pasta Dough Using KitchenAid Mixer

Nothing beats the silky texture of homemade pasta, and with your trusty KitchenAid mixer, it’s easier than you think!
Ingredients:
- 2 cups (250g) all-purpose flour, plus extra for dusting
- 3 large eggs
- 1/2 tsp fine sea salt
- 1 tbsp olive oil
Instructions:
- Attach the dough hook to your KitchenAid mixer. Add the 2 cups flour and 1/2 tsp salt to the bowl, then mix on low speed for 10 seconds to combine.
- With the mixer running on medium-low, add the 3 eggs one at a time, letting each incorporate before adding the next. Drizzle in the 1 tbsp olive oil and mix until a shaggy dough forms, about 2 minutes.
- Knead on medium speed for 5–6 minutes until the dough is smooth and elastic (it should spring back when pressed). If sticky, add a dusting of flour; if dry, sprinkle with water.
- Shape the dough into a ball, wrap tightly in plastic, and let rest at room temperature for 30 minutes before rolling and cutting.
The secret to this dough’s perfect chew? The KitchenAid’s steady kneading mimics hand-stretching—without the arm workout.
Tip: Roll the dough slightly thicker for pillowy pappardelle or thinner for delicate tagliatelle.
Velvety Buttercream Frosting with KitchenAid Mixer

This dreamy buttercream is so silky and rich, it’ll make any cake or cupcake feel extra special—no fancy skills required!
Ingredients:
- 1 cup (2 sticks) unsalted butter, softened to room temperature
- 4 cups powdered sugar, sifted
- 1/4 cup heavy cream or whole milk
- 2 tsp pure vanilla extract
- 1/4 tsp fine sea salt
Instructions:
- In the bowl of a KitchenAid mixer fitted with the paddle attachment, beat the butter on medium speed for 2 minutes until creamy and pale.
- With the mixer on low, gradually add the powdered sugar, 1 cup at a time, scraping down the bowl after each addition.
- Pour in the heavy cream, vanilla extract, and salt. Increase speed to medium-high and beat for 3–4 minutes until fluffy and smooth, stopping to scrape the bowl once halfway through.
- If the frosting is too thick, add more cream, 1 tbsp at a time; if too thin, add powdered sugar, 2 tbsp at a time, until desired consistency is reached.
The secret? Whipping the butter first ensures a cloud-like texture that holds its shape but melts luxuriously on the tongue. Perfect for piping swirls or smoothing over layer cakes!
Tip: For pure white frosting, use clear vanilla extract and avoid overbeating (which can incorporate air bubbles).
Crispy Waffle Batter Made in KitchenAid Mixer
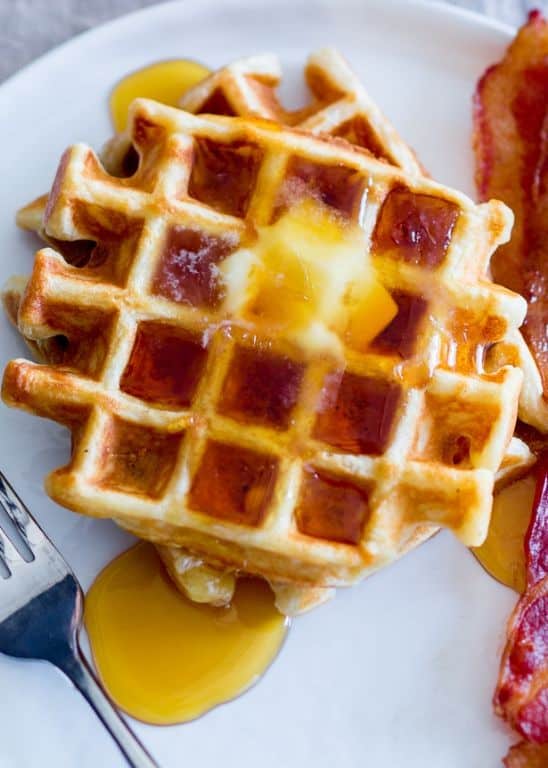
This fluffy, golden waffle batter comes together effortlessly in your stand mixer, giving you crispy edges and a tender center every time.
Ingredients:
- 2 cups all-purpose flour
- 2 tbsp granulated sugar
- 1 tbsp baking powder
- 1/2 tsp salt
- 2 large eggs
- 1 3/4 cups whole milk
- 1/2 cup unsalted butter, melted and slightly cooled
- 1 tsp vanilla extract
Instructions:
- Preheat your waffle iron to medium-high heat (about 375°F).
- In the bowl of a KitchenAid mixer fitted with the whisk attachment, combine 2 cups all-purpose flour, 2 tbsp granulated sugar, 1 tbsp baking powder, and 1/2 tsp salt. Mix on low for 10 seconds to blend.
- Add the eggs, 1 3/4 cups whole milk, 1/2 cup melted butter, and 1 tsp vanilla extract. Mix on medium speed just until smooth, about 1 minute (don’t overmix—small lumps are okay).
- Pour batter onto the hot waffle iron (about 1/2 cup per waffle) and cook until steam stops and waffles are deep golden brown, 4–5 minutes.
The KitchenAid mixer aerates the batter perfectly for waffles that are crisp outside yet light as air inside—no more dense or soggy results!
Tip: For extra-crispy waffles, let finished waffles rest on a wire rack (not a plate) to prevent steaming.
Zesty Lemon Meringue Pie Using KitchenAid Mixer
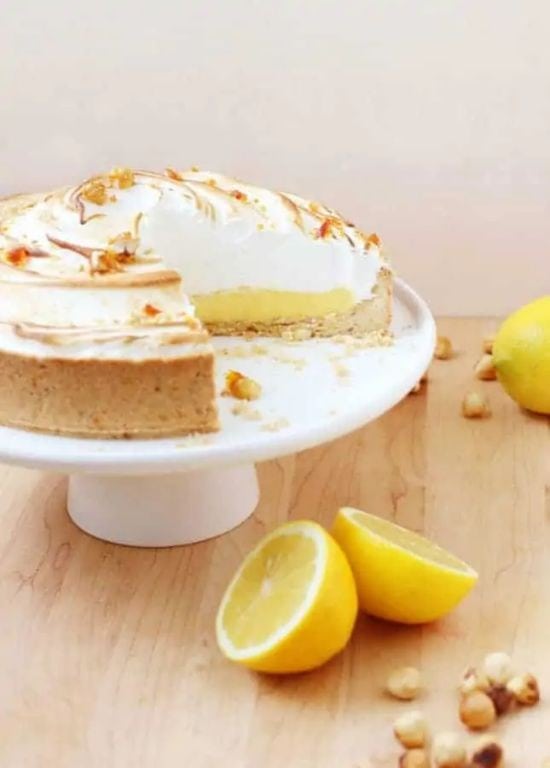
This bright, tangy lemon meringue pie is a showstopper, and your KitchenAid mixer does most of the work—perfect for impressing guests without the stress!
Ingredients:
- 1 (9-inch) pre-baked pie crust
- 1 cup granulated sugar
- 1/4 cup cornstarch
- 1/4 tsp salt
- 1 1/2 cups water
- 4 large egg yolks (reserve whites for meringue)
- 1/2 cup fresh lemon juice (about 3 lemons)
- 2 tbsp unsalted butter
- 1 tbsp lemon zest
- 4 large egg whites
- 1/2 tsp cream of tartar
- 1/2 cup granulated sugar
Instructions:
- Make the filling: In a saucepan, whisk together 1 cup granulated sugar, 1/4 cup cornstarch, and 1/4 tsp salt. Gradually stir in 1 1/2 cups water and bring to a boil over medium heat, whisking constantly. Cook for 2 minutes until thickened.
- Whisk egg yolks in a bowl, then slowly pour in 1/2 cup of the hot sugar mixture to temper. Return everything to the saucepan and cook for 1 more minute. Remove from heat; stir in lemon juice, butter, and lemon zest. Pour into the pie crust.
- Whip the meringue: Using the KitchenAid mixer with the whisk attachment, beat egg whites and 1/2 tsp cream of tartar on medium-high until soft peaks form. Gradually add 1/2 cup sugar, 1 tbsp at a time, and whip until stiff, glossy peaks form (about 3–4 minutes).
- Spread meringue over the warm filling, sealing to the edges. Bake at 350°F for 12–15 minutes until golden. Cool completely (4 hours) before slicing.
The secret? Whipping the meringue in your stand mixer ensures cloud-like volume, while the fresh lemon zest adds a sunny punch to every bite.
Tip: For clean slices, dip your knife in hot water and wipe it between cuts.
Flaky Pie Crust with KitchenAid Mixer
This buttery, flaky pie crust comes together effortlessly with your stand mixer—no elbow grease required, just perfect layers every time.
Ingredients:
- 2 ½ cups all-purpose flour
- 1 tsp salt
- 1 tbsp granulated sugar
- 1 cup (2 sticks) unsalted butter, chilled and cubed
- ¼ cup ice water, plus 1 tbsp as needed
Instructions:
- Attach the flat beater to your KitchenAid mixer. Add the flour, salt, and sugar to the bowl. Mix on low speed for 10 seconds to combine.
- With the mixer running on low, add the cubed butter a few pieces at a time. Mix until the butter is pea-sized and the dough looks crumbly, about 1 minute.
- Drizzle in ¼ cup ice water while mixing on low. Stop when the dough just begins to clump (add the remaining 1 tbsp water if needed). The dough should hold together when pressed but not feel wet.
- Turn the dough onto a floured surface, divide in half, and shape into disks. Wrap tightly in plastic and chill for at least 1 hour before rolling.
The secret? The mixer gently cuts in the butter without overworking the dough, guaranteeing those dreamy, flaky layers. Perfect for fruit pies or savory quiches!
Tip: Freeze the butter for 15 minutes before starting—it helps keep the dough extra flaky.
Light and Airy Meringue Cookies Made in KitchenAid Mixer

These dreamy meringue cookies are crisp on the outside, marshmallowy inside, and practically melt in your mouth—perfect for gifting or a sweet afternoon treat!
Ingredients:
- 4 large egg whites, at room temperature
- 1 cup granulated sugar
- 1/4 tsp cream of tartar
- 1 tsp pure vanilla extract
- Pinch of salt
Instructions:
- Preheat oven to 200°F and line two baking sheets with parchment paper.
- In the bowl of a KitchenAid mixer fitted with the whisk attachment, beat 4 large egg whites, 1/4 tsp cream of tartar, and a pinch of salt on medium-high until foamy (about 1 minute).
- Gradually add 1 cup granulated sugar, 1 tbsp at a time, while mixing. Increase speed to high and whip until stiff, glossy peaks form (about 5–7 minutes). Add 1 tsp vanilla extract and mix just until blended.
- Pipe or spoon dollops of meringue onto prepared sheets, spacing 1 inch apart. Bake for 1.5–2 hours until crisp and easily lifts off parchment. Turn off oven and let cool inside for 1 hour.
The secret? Whipping the meringue slowly at first ensures those picture-perfect peaks and cloud-like texture.
Tip: For fun variations, fold in 1/4 cup crushed freeze-dried strawberries or a sprinkle of cinnamon with the vanilla!
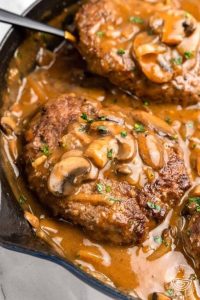
Savory Meatloaf Mix Prepared with KitchenAid Mixer
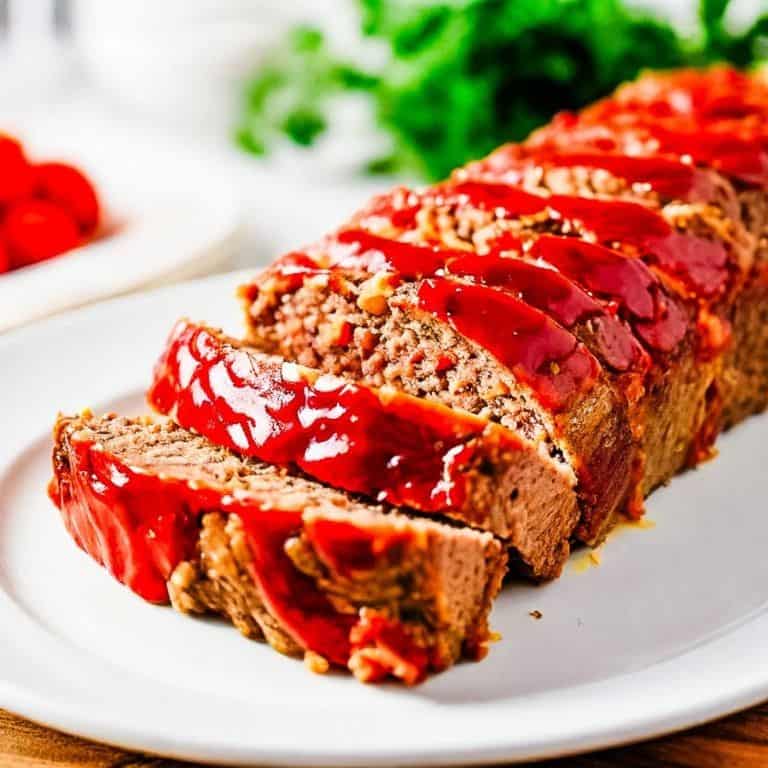
This hearty meatloaf gets a boost of flavor (and ease!) from your trusty KitchenAid mixer, blending everything to perfection without the arm workout.
- 1 ½ lbs ground beef (85% lean)
- ½ cup breadcrumbs
- ⅓ cup whole milk
- 1 large egg
- ¼ cup finely diced yellow onion
- 2 cloves garlic, minced
- 2 tbsp ketchup
- 1 tbsp Worcestershire sauce
- 1 tsp salt
- ½ tsp black pepper
- ½ tsp dried thyme
- Preheat oven to 375°F. Line a loaf pan with parchment paper or lightly grease.
- In the bowl of your KitchenAid mixer fitted with the paddle attachment, combine breadcrumbs, milk, egg, onion, garlic, ketchup, Worcestershire sauce, salt, pepper, and thyme. Mix on low for 30 seconds until evenly combined.
- Add ground beef and mix on low just until incorporated (about 1 minute)—don’t overmix or the loaf will be dense.
- Transfer mixture to the prepared pan, shaping into an even loaf. Bake for 50–55 minutes until the internal temperature reaches 160°F.
- Let rest 10 minutes before slicing. The mixer ensures a tender, evenly seasoned loaf with zero pockets of unmixed spices.
Tip: For a caramelized crust, brush the top with extra ketchup during the last 10 minutes of baking.
Delicious Cinnamon Rolls Using KitchenAid Mixer

These cinnamon rolls are impossibly soft, swirled with just the right amount of spice, and topped with a tangy cream cheese glaze—your mixer does most of the work!
Ingredients
- 3 1/2 cups all-purpose flour, divided
- 1/4 cup granulated sugar
- 1 tsp salt
- 1 packet (2 1/4 tsp) active dry yeast
- 1 cup warm whole milk (110°F)
- 1 large egg
- 1/4 cup unsalted butter, softened
- 1/2 cup packed brown sugar
- 2 tbsp ground cinnamon
- 1/4 cup melted butter (for filling)
- 4 oz cream cheese, softened
- 1 cup powdered sugar
- 1/2 tsp vanilla extract
- 2 tbsp milk (for glaze)
Instructions
- In your KitchenAid mixer’s bowl, combine 2 cups flour, 1/4 cup granulated sugar, 1 tsp salt, and yeast. Attach the dough hook. Pour in 1 cup warm milk and mix on low. Add 1 egg and 1/4 cup softened butter; mix until combined. Gradually add remaining flour until dough pulls away from the bowl (about 5 minutes). Cover and let rise 1 hour.
- Roll dough into a 12×18-inch rectangle. Brush with 1/4 cup melted butter, then sprinkle evenly with 1/2 cup brown sugar and 2 tbsp cinnamon. Tightly roll into a log, slice into 12 rolls, and place in a greased 9×13-inch pan. Cover and rise 30 minutes.
- Bake at 375°F for 20–25 minutes until golden. Meanwhile, beat 4 oz cream cheese, 1 cup powdered sugar, 1/2 tsp vanilla, and 2 tbsp milk until smooth. Drizzle over warm rolls.
The secret? Letting the KitchenAid develop the dough’s gluten for that signature pull-apart texture. No kneading by hand required!
Tip: For extra-gooey rolls, spread 1/4 cup softened butter in the pan before adding the dough.
Nutrient-Packed Smoothie Bowl Made in KitchenAid Mixer
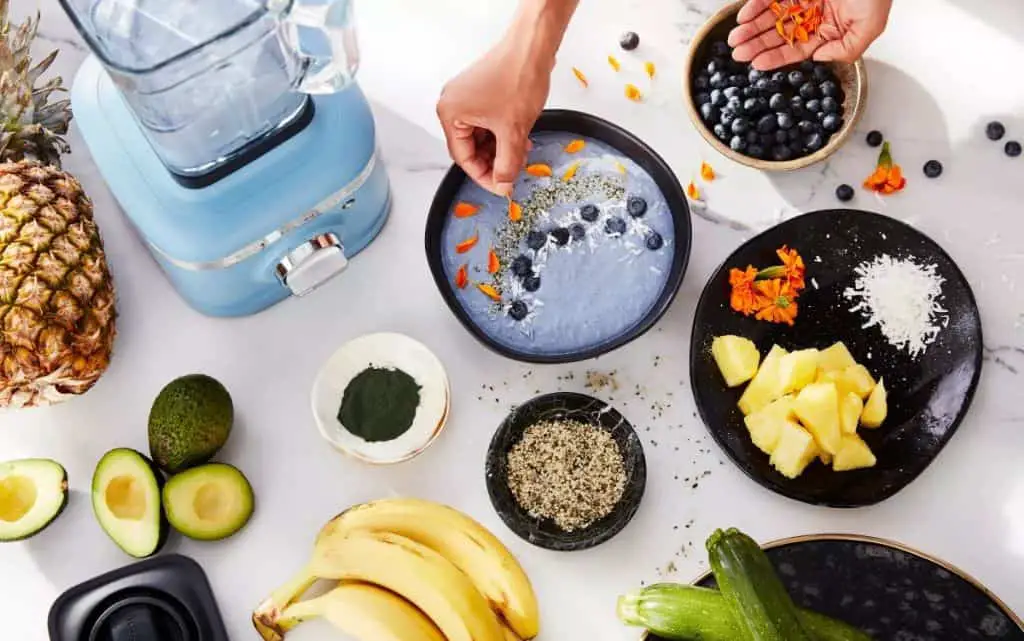
This vibrant smoothie bowl is a breeze to whip up in your KitchenAid mixer, blending creamy texture with a powerhouse of nutrients—no fancy blender required!
Ingredients:
- 1 frozen banana, sliced
- 1 cup frozen mixed berries (strawberries, blueberries, raspberries)
- 1/2 cup plain Greek yogurt
- 1/4 cup almond milk
- 1 tbsp honey
- 1 tbsp chia seeds
- Toppings: 2 tbsp granola, 1 tbsp sliced almonds, fresh berries
Instructions:
- Attach the flat beater to your KitchenAid mixer. Add the frozen banana, mixed berries, Greek yogurt, almond milk, and honey. Mix on low speed (Stir setting) for 1 minute to break down the fruit, then increase to medium speed (4) for 2–3 minutes until smooth and thick, scraping the bowl as needed.
- Fold in the chia seeds with a spatula and let sit for 2 minutes to thicken slightly.
- Pour into a bowl and top with granola, sliced almonds, and fresh berries.
The KitchenAid mixer creates an ultra-creamy consistency that’s perfect for scooping—almost like soft-serve ice cream with a nutrient boost!
Tip: For a thicker bowl, freeze the blended mixture for 10 minutes before topping.
Perfectly Mixed Cookie Dough with KitchenAid Mixer
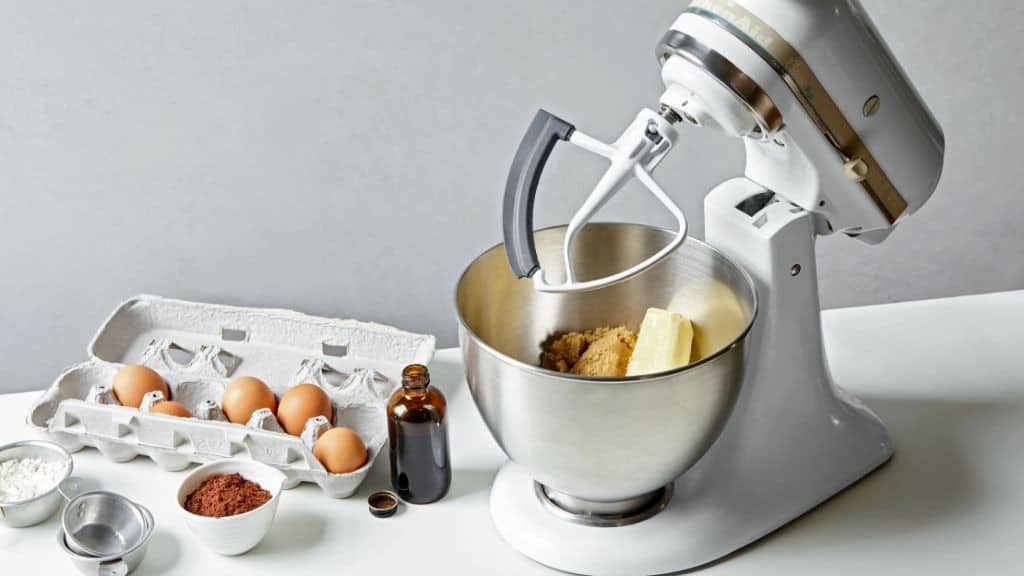
This foolproof cookie dough comes together in minutes with your stand mixer, delivering buttery, bakery-style results every time.
Ingredients:
- 1 cup (2 sticks) unsalted butter, softened
- 3/4 cup granulated sugar
- 3/4 cup packed light brown sugar
- 2 large eggs, room temperature
- 2 tsp pure vanilla extract
- 2 1/4 cups all-purpose flour
- 1 tsp baking soda
- 1 tsp fine sea salt
- 2 cups semi-sweet chocolate chips
Instructions:
- Preheat oven to 375°F. Line baking sheets with parchment paper.
- In your KitchenAid mixer bowl fitted with the paddle attachment, beat 1 cup butter, 3/4 cup granulated sugar, and 3/4 cup brown sugar on medium speed for 2 minutes until fluffy.
- Add 2 eggs and 2 tsp vanilla, mixing just until combined (30 seconds). Scrape bowl.
- Whisk together 2 1/4 cups flour, 1 tsp baking soda, and 1 tsp salt in a separate bowl. With mixer on low, gradually add dry ingredients until just incorporated.
- Fold in 2 cups chocolate chips by hand with a spatula.
- Drop 2-tbsp portions onto prepared sheets, spacing 2″ apart. Bake 9–11 minutes until edges are set but centers look slightly underdone.
The KitchenAid’s gentle mixing prevents overworking the dough, giving these cookies that ideal crisp-edge/chewy-center contrast.
Tip: For extra-thick cookies, chill dough 30 minutes before baking.
Flavorful Hummus Made in KitchenAid Mixer

Skip the store-bought tubs—this creamy, garlicky hummus comes together in minutes with the help of your trusty stand mixer.
Ingredients:
- 2 (15-oz) cans chickpeas, drained (reserve 1/4 cup liquid)
- 1/3 cup tahini
- 1/4 cup fresh lemon juice
- 3 tbsp extra-virgin olive oil, plus extra for drizzling
- 2 garlic cloves, minced
- 1 tsp ground cumin
- 3/4 tsp salt
- 1/4 tsp smoked paprika
Instructions:
- Add chickpeas, tahini, lemon juice, olive oil, garlic, cumin, and salt to the KitchenAid mixer bowl. Attach the flat beater and mix on medium-low speed (setting 4) for 1 minute until roughly combined.
- With the mixer running, slowly pour in reserved chickpea liquid. Increase to medium speed (setting 6) and whip for 2–3 minutes until ultra-smooth, scraping the bowl halfway.
- Transfer to a serving dish, drizzle with extra olive oil, and sprinkle with smoked paprika.
The stand mixer whips this hummus to an impossibly fluffy texture—no tedious hand-mashing required!
Tip: For roasted red pepper hummus, blend in 1/2 cup jarred roasted peppers with the chickpeas.
Easy-to-Make Dinner Rolls Using KitchenAid Mixer
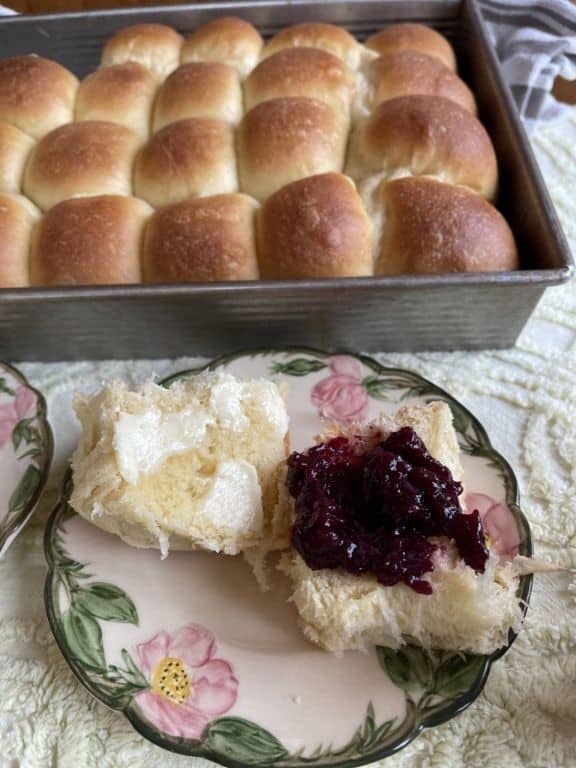
These fluffy, buttery dinner rolls come together effortlessly with the help of your stand mixer—perfect for weeknights or holiday gatherings.
Ingredients
- 1 cup warm whole milk (110°F)
- 2 1/4 tsp active dry yeast (1 packet)
- 1/4 cup granulated sugar
- 4 tbsp unsalted butter, melted and cooled
- 1 large egg, room temperature
- 1 tsp salt
- 3 1/2 cups all-purpose flour, plus extra for dusting
Instructions
- In the bowl of a KitchenAid mixer fitted with the dough hook, combine warm milk, yeast, and sugar. Let sit for 5 minutes until foamy.
- Add melted butter, egg, and salt. Mix on low speed until combined.
- Gradually add flour, 1 cup at a time, mixing until a soft dough forms (about 5 minutes). The dough should pull away from the sides but remain slightly sticky.
- Transfer dough to a lightly greased bowl, cover with a towel, and let rise in a warm place for 1 hour or until doubled in size.
- Punch down dough and divide into 12 equal pieces. Roll each into a smooth ball and place in a greased 9×13-inch baking dish.
- Cover and let rise again for 30 minutes. Meanwhile, preheat oven to 375°F.
- Bake for 18–20 minutes until golden brown. Brush with extra melted butter right after baking.
The KitchenAid mixer does the heavy lifting, giving these rolls an airy, bakery-style crumb without the elbow grease. They’re irresistible straight from the oven!
Tip: For extra flavor, swap 1/4 cup of the sugar for honey in the dough.
Conclusion
With 20 delicious recipes for every occasion, your KitchenAid mixer is about to become your favorite kitchen sidekick! Whether you’re baking cookies, whipping up dinner, or trying something new, there’s a recipe here to inspire you. Give them a try, then let us know which ones you loved—and don’t forget to share this roundup with fellow foodies on Pinterest. Happy mixing!

I’m Brandon, the face behind the recipes. As a dedicated food enthusiast, I love experimenting with flavors and sharing my culinary adventures with you.