Who says managing diabetes means giving up dessert? Not us! With these 18 delicious diabetic-friendly treats, you can satisfy your sweet tooth without the guilt. From rich chocolate avocado mousse to zesty lemon chia pudding, these recipes prove healthy can still mean indulgent. So grab your mixing bowl—let’s whip up some desserts that are as kind to your blood sugar as they are to your taste buds!
Peanut Butter Protein Balls
Craving a quick, healthy snack that packs a protein punch? You’re in luck! These peanut butter protein balls are no-bake, easy to make, and perfect for on-the-go energy.
Ingredients
- 1 cup creamy peanut butter
- 1/2 cup honey
- 1 tsp vanilla extract
- 1 1/2 cups old-fashioned oats
- 1/2 cup ground flaxseed
- 1/2 cup mini chocolate chips
- 1/4 cup protein powder
Instructions
- In a large mixing bowl, combine 1 cup creamy peanut butter and 1/2 cup honey. Stir until smooth.
- Add 1 tsp vanilla extract to the peanut butter mixture. Mix well.
- Gradually stir in 1 1/2 cups old-fashioned oats and 1/2 cup ground flaxseed until fully incorporated.
- Fold in 1/2 cup mini chocolate chips and 1/4 cup protein powder. Tip: If the mixture is too sticky, chill it in the fridge for 10 minutes to make it easier to handle.
- Roll the mixture into 1-inch balls. Tip: Use a small cookie scoop for evenly sized balls.
- Place the balls on a baking sheet lined with parchment paper. Tip: For extra firmness, refrigerate for at least 30 minutes before serving.
You’ll love the chewy texture and the perfect balance of sweet and nutty flavors. Try rolling them in crushed nuts or coconut flakes for an extra crunch!
Low-Carb Cheesecake Bites
Very few desserts hit the spot like these low-carb cheesecake bites. They’re creamy, dreamy, and won’t derail your diet. Plus, they’re a breeze to make.
Ingredients
- 1 cup almond flour
- 3 tbsp butter, melted
- 2 tbsp granulated erythritol
- 16 oz cream cheese, softened
- 1/2 cup powdered erythritol
- 1 tsp vanilla extract
- 2 large eggs
Instructions
- Preheat your oven to 350°F. Line a mini muffin tin with paper liners.
- In a bowl, mix 1 cup almond flour, 3 tbsp melted butter, and 2 tbsp granulated erythritol until combined. Press 1 tsp of the mixture into each liner to form the crust.
- Bake the crusts for 5 minutes. Let them cool slightly.
- In another bowl, beat 16 oz softened cream cheese until smooth. Add 1/2 cup powdered erythritol and 1 tsp vanilla extract, beating until fluffy.
- Add 2 large eggs one at a time, mixing just until incorporated. Overmixing can lead to cracks.
- Spoon the filling over the crusts, filling each liner almost to the top.
- Bake for 15 minutes, or until the centers are just set. The bites will firm up as they cool.
- Let them cool in the tin for 10 minutes, then transfer to a wire rack to cool completely. Chill for at least 2 hours before serving.
Now, these cheesecake bites are perfectly creamy with a slight tang, and the almond crust adds a nice crunch. Try topping them with fresh berries or a drizzle of sugar-free chocolate for an extra treat.
Sugar-Free Pumpkin Pie
Ready to dive into a guilt-free dessert that doesn’t skimp on flavor? This sugar-free pumpkin pie is your go-to for a cozy, healthy treat that’s as easy to make as it is delicious.
Ingredients
- 1 1/2 cups pumpkin puree
- 3/4 cup almond milk
- 2 large eggs
- 1 tsp vanilla extract
- 1/2 tsp ground cinnamon
- 1/4 tsp ground nutmeg
- 1/4 tsp ground ginger
- 1/8 tsp ground cloves
- 1 pre-made sugar-free pie crust
Instructions
- Preheat your oven to 350°F (175°C).
- In a large bowl, whisk together the pumpkin puree, almond milk, eggs, and vanilla extract until smooth.
- Add the cinnamon, nutmeg, ginger, and cloves to the bowl, mixing well to combine all the spices evenly.
- Pour the mixture into the pre-made sugar-free pie crust, spreading it out evenly with a spatula.
- Bake for 45-50 minutes, or until the center is set and a toothpick inserted comes out clean.
- Let the pie cool on a wire rack for at least 2 hours before serving to allow it to set properly.
With its creamy texture and warm spices, this pie is a hit at any gathering. Try serving it with a dollop of whipped coconut cream for an extra special touch.
Coconut Flour Brownies
Hey, you’re going to love these coconut flour brownies—they’re rich, fudgy, and just the right amount of sweet. Plus, they’re a breeze to make, even if you’re not a baking pro.
Ingredients
- 1/2 cup coconut flour
- 1/2 cup cocoa powder
- 1/2 cup melted coconut oil
- 1/2 cup honey
- 4 large eggs
- 1 tsp vanilla extract
- 1/4 tsp salt
- 1/2 cup dark chocolate chips
Instructions
- Preheat your oven to 350°F and line an 8×8 inch baking pan with parchment paper.
- In a large bowl, whisk together the coconut flour and cocoa powder until no lumps remain.
- Add the melted coconut oil, honey, eggs, vanilla extract, and salt to the bowl. Mix until well combined. Tip: For extra fudgy brownies, don’t overmix the batter.
- Fold in the dark chocolate chips gently. Tip: Reserve a few chips to sprinkle on top before baking for a pretty finish.
- Pour the batter into the prepared pan and smooth the top with a spatula.
- Bake for 20-25 minutes, or until a toothpick inserted into the center comes out mostly clean. Tip: The brownies will continue to set as they cool, so don’t wait for the toothpick to be completely clean.
- Let the brownies cool in the pan for at least 10 minutes before slicing.
Just imagine biting into these brownies—they’re incredibly moist with a deep chocolate flavor that’s perfectly balanced by the slight sweetness of the honey. Serve them warm with a scoop of vanilla ice cream for an indulgent treat.
Vanilla Almond Butter Fat Bombs
Now, if you’re looking for a quick, delicious treat that’s both satisfying and easy to make, these Vanilla Almond Butter Fat Bombs are your go-to. They’re perfect for a sweet snack or a post-workout boost, and the best part? They come together in no time.
Ingredients
- 1 cup almond butter
- 1/4 cup coconut oil, melted
- 2 tbsp honey
- 1 tsp vanilla extract
- 1/4 tsp sea salt
Instructions
- Line a mini muffin tin with paper liners or silicone molds for easy removal.
- In a medium bowl, combine the almond butter, melted coconut oil, honey, vanilla extract, and sea salt. Tip: Ensure the coconut oil is melted but not hot to avoid altering the texture.
- Stir the mixture until smooth and fully combined. Tip: If the mixture is too thick, gently warm it to make stirring easier.
- Pour the mixture into the prepared muffin tin, filling each cavity about 3/4 full.
- Place the tin in the freezer for at least 30 minutes, or until the fat bombs are solid. Tip: Freezing them ensures they hold their shape and have the perfect texture.
- Once set, remove the fat bombs from the tin and store them in an airtight container in the freezer.
Light and creamy with a rich almond butter flavor, these fat bombs are a dreamy treat straight from the freezer. Try drizzling them with a bit of melted dark chocolate for an extra decadent touch.
Zucchini Bread Muffins
Oh, you’re going to love these zucchini bread muffins! They’re the perfect way to sneak some veggies into your day, and they’re so moist and flavorful, you won’t even notice they’re packed with zucchini. Plus, they’re super easy to make, so let’s get started.
Ingredients
– 1.5 cups all-purpose flour
– 1 tsp baking soda
– 1/2 tsp baking powder
– 1/2 tsp salt
– 1 tsp ground cinnamon
– 1/2 cup granulated sugar
– 1/2 cup brown sugar
– 1/2 cup vegetable oil
– 1 large egg
– 1 tsp vanilla extract
– 1.5 cups grated zucchini
Instructions
1. Preheat your oven to 350°F and line a muffin tin with paper liners or grease it lightly.
2. In a large bowl, whisk together the flour, baking soda, baking powder, salt, and cinnamon.
3. In another bowl, mix the granulated sugar, brown sugar, oil, egg, and vanilla until well combined.
4. Fold the grated zucchini into the wet ingredients. Tip: Squeeze excess moisture from the zucchini to prevent soggy muffins.
5. Gradually add the dry ingredients to the wet, stirring just until combined. Tip: Overmixing can lead to tough muffins, so mix until you no longer see flour streaks.
6. Divide the batter evenly among the muffin cups, filling each about 2/3 full.
7. Bake for 20-25 minutes, or until a toothpick inserted into the center comes out clean. Tip: Rotate the pan halfway through baking for even browning.
8. Let the muffins cool in the pan for 5 minutes, then transfer to a wire rack to cool completely.
Crisp on the outside and tender on the inside, these muffins are a delightful treat any time of day. Try them warm with a smear of cream cheese for an extra indulgent twist.
Lemon Poppy Seed Loaf
Oh, you’re going to love this Lemon Poppy Seed Loaf. It’s the perfect blend of tangy and sweet, with a little crunch from the poppy seeds. Plus, it’s super easy to make, even if you’re not a baking pro.
Ingredients
- 1 1/2 cups all-purpose flour
- 1/2 tsp baking soda
- 1/2 tsp baking powder
- 1/4 tsp salt
- 1/2 cup unsalted butter, softened
- 1 cup granulated sugar
- 2 large eggs
- 1 tbsp lemon zest
- 2 tbsp fresh lemon juice
- 1/2 cup buttermilk
- 1 tbsp poppy seeds
Instructions
- Preheat your oven to 350°F (175°C). Grease a 9×5 inch loaf pan and line it with parchment paper.
- In a medium bowl, whisk together 1 1/2 cups all-purpose flour, 1/2 tsp baking soda, 1/2 tsp baking powder, and 1/4 tsp salt. Set aside.
- In a large bowl, beat 1/2 cup unsalted butter and 1 cup granulated sugar until light and fluffy, about 3 minutes.
- Add 2 large eggs one at a time, beating well after each addition.
- Mix in 1 tbsp lemon zest and 2 tbsp fresh lemon juice.
- Alternately add the flour mixture and 1/2 cup buttermilk to the butter mixture, beginning and ending with the flour mixture. Stir just until combined.
- Fold in 1 tbsp poppy seeds.
- Pour the batter into the prepared loaf pan and smooth the top with a spatula.
- Bake for 45-50 minutes, or until a toothpick inserted into the center comes out clean.
- Let the loaf cool in the pan for 10 minutes, then transfer to a wire rack to cool completely.
Great for breakfast or a snack, this loaf is moist with a tender crumb and bursts of lemon flavor. Try serving it with a dollop of whipped cream and fresh berries for an extra special treat.
Strawberry Coconut Popsicles
Mmm, can you think of anything more refreshing on a hot summer day than a cold, fruity popsicle? These Strawberry Coconut Popsicles are not just a treat; they’re a mini vacation in every bite, blending the sweetness of strawberries with the creamy richness of coconut milk.
Ingredients
- 2 cups fresh strawberries, hulled
- 1 cup coconut milk
- 1/4 cup honey
- 1 tbsp lemon juice
Instructions
- In a blender, combine 2 cups fresh strawberries, 1 cup coconut milk, 1/4 cup honey, and 1 tbsp lemon juice.
- Blend on high speed for 1 minute, or until the mixture is completely smooth. Tip: For an extra smooth texture, strain the mixture through a fine mesh sieve to remove any strawberry seeds.
- Pour the mixture into popsicle molds, leaving about 1/4 inch space at the top for expansion.
- Insert popsicle sticks into each mold. Tip: If your sticks won’t stay upright, cover the molds with foil and make a small slit to insert the sticks through.
- Freeze for at least 6 hours, or until solid. Tip: For easier removal, run the molds under warm water for a few seconds before pulling out the popsicles.
Delightfully creamy with a vibrant strawberry flavor, these popsicles are a hit with both kids and adults. Serve them at your next BBQ or enjoy one as a cool afternoon snack—either way, they’re sure to impress.
Dark Chocolate Truffles
Now, who doesn’t love a rich, indulgent treat that’s surprisingly simple to make? These dark chocolate truffles are your next favorite dessert, combining deep cocoa flavors with a smooth, melt-in-your-mouth texture.
Ingredients
- 1 cup heavy cream
- 12 oz dark chocolate, finely chopped
- 2 tbsp unsalted butter
- 1/2 cup cocoa powder
Instructions
- Heat the heavy cream in a small saucepan over medium heat until it just begins to simmer, about 3 minutes. Tip: Watch closely to avoid boiling.
- Place the chopped dark chocolate in a heatproof bowl. Pour the hot cream over the chocolate and let it sit for 2 minutes to soften.
- Stir the mixture gently until the chocolate is completely melted and smooth. Tip: Use a spatula for even mixing.
- Add the unsalted butter to the chocolate mixture, stirring until fully incorporated and glossy.
- Cover the bowl with plastic wrap and refrigerate for at least 2 hours, or until the mixture is firm enough to scoop. Tip: Chilling overnight ensures the best consistency.
- Using a small scoop or tablespoon, form the mixture into 1-inch balls and roll them between your palms to smooth.
- Place the cocoa powder in a shallow dish. Roll each truffle in cocoa powder until evenly coated.
- Arrange the truffles on a parchment-lined tray and refrigerate for another 30 minutes to set.
Kick your dessert game up a notch with these truffles. Their velvety center and rich cocoa shell make them perfect for gifting or as a fancy finish to your dinner party. Try rolling them in crushed nuts or coconut for a fun twist.
Cinnamon Apple Crisp
This cinnamon apple crisp is the perfect cozy dessert for any season. You’ll love the sweet, spiced apples topped with a crunchy oat topping—it’s like a hug in a bowl.
Ingredients
- 6 cups sliced apples
- 1/2 cup granulated sugar
- 1 tbsp ground cinnamon
- 1 cup all-purpose flour
- 1 cup rolled oats
- 1/2 cup packed brown sugar
- 1/2 cup unsalted butter, melted
Instructions
- Preheat your oven to 375°F (190°C).
- In a large bowl, mix the sliced apples, granulated sugar, and cinnamon until the apples are evenly coated.
- Transfer the apple mixture to a 9×13 inch baking dish, spreading it out evenly.
- In another bowl, combine the flour, rolled oats, and brown sugar.
- Pour the melted butter over the flour mixture and stir until the mixture resembles coarse crumbs.
- Sprinkle the crumb mixture evenly over the apples in the baking dish.
- Bake for 30 minutes, or until the topping is golden brown and the apples are bubbly.
- Let the crisp cool for 10 minutes before serving to allow the filling to set.
Craving something extra? Serve this crisp warm with a scoop of vanilla ice cream for a delightful contrast of temperatures and textures. The apples are tender and spiced, while the topping adds a satisfying crunch. It’s a simple dessert that feels special every time.
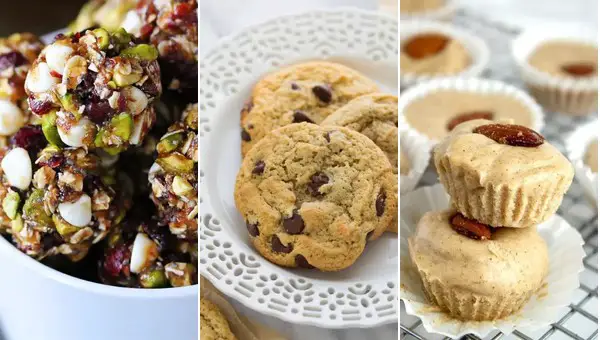
Pistachio Energy Bites
Busy days call for quick, nutritious snacks, and these Pistachio Energy Bites are just the ticket. You’ll love how easy they are to make, and how perfectly they satisfy those mid-afternoon cravings.
Ingredients
- 1 cup pistachios, shelled
- 1/2 cup dates, pitted
- 1/4 cup almond butter
- 2 tbsp honey
- 1/2 tsp vanilla extract
- 1/4 tsp sea salt
- 1/4 cup shredded coconut
Instructions
- Place the pistachios in a food processor. Pulse until finely chopped, but not pasty.
- Add the dates, almond butter, honey, vanilla extract, and sea salt to the food processor. Process until the mixture starts to clump together.
- Roll the mixture into 12 even balls, about 1 tablespoon each. Tip: Wet your hands slightly to prevent sticking.
- Spread the shredded coconut on a plate. Roll each ball in the coconut until lightly coated.
- Place the energy bites on a parchment-lined tray. Chill in the refrigerator for at least 30 minutes to firm up.
Great for a quick energy boost, these bites are chewy with a slight crunch from the pistachios. Try serving them with a drizzle of dark chocolate for an extra indulgent treat.
Raspberry Almond Tart
Just imagine biting into a Raspberry Almond Tart, where the sweet tang of raspberries meets the nutty crunch of almonds—all nestled in a buttery crust. It’s the kind of dessert that feels fancy but is totally doable on a lazy weekend.
Ingredients
- 1 1/2 cups all-purpose flour
- 1/2 cup unsalted butter, chilled and diced
- 1/4 cup granulated sugar
- 1/4 tsp salt
- 1 large egg yolk
- 2 tbsp ice water
- 1 cup almond flour
- 1/2 cup granulated sugar
- 1/4 cup unsalted butter, softened
- 1 large egg
- 1 tsp almond extract
- 1 1/2 cups fresh raspberries
- 1/4 cup sliced almonds
Instructions
- Preheat your oven to 350°F (175°C).
- In a food processor, combine 1 1/2 cups all-purpose flour, 1/2 cup chilled butter, 1/4 cup sugar, and 1/4 tsp salt. Pulse until the mixture resembles coarse crumbs.
- Add 1 egg yolk and 2 tbsp ice water. Pulse until the dough starts to come together.
- Press the dough into a 9-inch tart pan with a removable bottom. Chill for 30 minutes.
- Bake the crust for 15 minutes, or until lightly golden. Let it cool slightly.
- In a bowl, mix 1 cup almond flour, 1/2 cup sugar, 1/4 cup softened butter, 1 egg, and 1 tsp almond extract until smooth.
- Spread the almond mixture over the cooled crust. Arrange 1 1/2 cups raspberries on top and sprinkle with 1/4 cup sliced almonds.
- Bake for 25-30 minutes, or until the filling is set and the edges are golden.
- Let the tart cool completely before slicing.
Every bite of this tart is a delightful contrast—creamy almond filling, juicy raspberries, and a crisp crust. Serve it with a dollop of whipped cream or a scoop of vanilla ice cream for an extra treat.
Carrot Cake Cupcakes
Now, who doesn’t love a good carrot cake? These carrot cake cupcakes are your classic favorite, but in a cute, handheld size. Perfect for sharing or keeping all to yourself—no judgment here.
Ingredients
- 1 1/2 cups all-purpose flour
- 1 tsp baking soda
- 1/2 tsp salt
- 1 tsp ground cinnamon
- 1/2 cup granulated sugar
- 1/2 cup brown sugar
- 2 large eggs
- 1/2 cup vegetable oil
- 1 tsp vanilla extract
- 1 1/2 cups grated carrots
- 1/2 cup crushed pineapple, drained
- 1/2 cup chopped walnuts
Instructions
- Preheat your oven to 350°F and line a muffin tin with cupcake liners.
- In a large bowl, whisk together the flour, baking soda, salt, and cinnamon until well combined.
- In another bowl, beat the granulated sugar, brown sugar, eggs, vegetable oil, and vanilla extract until smooth.
- Gradually mix the dry ingredients into the wet ingredients until just combined.
- Fold in the grated carrots, crushed pineapple, and chopped walnuts until evenly distributed throughout the batter.
- Divide the batter evenly among the prepared cupcake liners, filling each about 2/3 full.
- Bake for 20-22 minutes, or until a toothpick inserted into the center of a cupcake comes out clean.
- Let the cupcakes cool in the tin for 5 minutes, then transfer to a wire rack to cool completely.
With their moist texture and sweet, spiced flavor, these cupcakes are a hit any time of year. Try topping them with a dollop of cream cheese frosting for an extra special treat.
Mango Coconut Chia Pudding
Now, if you’re looking for a tropical escape in a bowl, this mango coconut chia pudding is your ticket. It’s creamy, dreamy, and packed with flavors that’ll transport you straight to paradise.
Ingredients
- 1 cup coconut milk
- 1/4 cup chia seeds
- 1 tbsp honey
- 1/2 tsp vanilla extract
- 1 cup diced mango
Instructions
- In a medium bowl, whisk together 1 cup coconut milk, 1/4 cup chia seeds, 1 tbsp honey, and 1/2 tsp vanilla extract until well combined.
- Cover the bowl with plastic wrap and refrigerate for at least 4 hours, or overnight, until the mixture thickens to a pudding-like consistency. Tip: Stir the mixture after the first hour to prevent clumping.
- Once the chia pudding has set, gently fold in 1 cup diced mango. Tip: For an extra burst of flavor, use ripe, sweet mangoes.
- Divide the pudding into serving bowls and top with additional diced mango if desired. Tip: For a crunchy texture, sprinkle some toasted coconut flakes on top before serving.
Fluffy and rich, this pudding strikes the perfect balance between sweet and tropical. Serve it in a hollowed-out coconut shell for an Instagram-worthy presentation that screams summer.
Conclusion
With these 18 delicious diabetic-friendly desserts, you can enjoy sweet treats without guilt! Whether you’re craving cookies, cakes, or puddings, there’s something here for every occasion. Give these recipes a try, and let us know which ones are your favorites in the comments below. Don’t forget to share this roundup with fellow bakers on Pinterest—happy baking!

I’m Brandon, the face behind the recipes. As a dedicated food enthusiast, I love experimenting with flavors and sharing my culinary adventures with you.