Looking to spice up your kitchen routine? Whether you’re craving cozy comfort food, quick weeknight dinners, or seasonal favorites with a twist, we’ve got you covered. From playful twists on classics to totally unexpected flavor combos, these 20 creative recipes are guaranteed to make cooking at home fun—and delicious. Ready to get inspired? Let’s dive in!
Rainbow Pancake Stack
Kickstart your morning with a vibrant and fluffy Rainbow Pancake Stack that’s as fun to make as it is to eat. Perfect for beginners, this recipe guides you through creating a colorful breakfast masterpiece step by step.
Ingredients
- 1 cup all-purpose flour (I swear by King Arthur for consistent results)
- 1 tbsp granulated sugar (a little sweetness goes a long way)
- 2 tsp baking powder (the secret to fluffy pancakes)
- 1/2 tsp salt (balances the sweetness)
- 1 cup milk (whole milk makes them extra rich)
- 1 large egg (room temp eggs blend better)
- 2 tbsp unsalted butter, melted (plus extra for the pan)
- 1 tsp vanilla extract (pure vanilla is my preference)
- Food coloring gels (red, orange, yellow, green, blue, purple for that rainbow effect)
Instructions
- In a large bowl, whisk together the flour, sugar, baking powder, and salt until well combined.
- In another bowl, beat the milk, egg, melted butter, and vanilla extract until smooth.
- Pour the wet ingredients into the dry ingredients and stir until just combined. A few lumps are okay; overmixing leads to tough pancakes.
- Divide the batter evenly into six small bowls. Add a different food coloring gel to each bowl and mix until the color is uniform.
- Heat a non-stick skillet over medium heat (350°F) and lightly butter it. Pour about 1/4 cup of one colored batter onto the skillet for each pancake.
- Cook until bubbles form on the surface and the edges look set, about 2 minutes, then flip and cook for another 1-2 minutes until golden.
- Repeat with the remaining colors, stacking the pancakes in rainbow order as you go.
- Serve immediately with maple syrup and fresh berries for a burst of freshness.
Light and airy with a slight crisp edge, these pancakes are a feast for the eyes and the palate. For an extra touch, drizzle with honey or sprinkle with powdered sugar before serving.
Homemade Pizza with Fun Toppings
Preparing a homemade pizza with fun toppings is a delightful way to bring creativity and flavor into your kitchen. Let’s dive into making a pizza that’s not only delicious but also a reflection of your personal taste.
Ingredients
- 1 1/2 cups of warm water (around 110°F, perfect for activating the yeast)
- 1 packet of active dry yeast (I always check the expiration date to ensure it’s active)
- 3 1/2 cups of all-purpose flour (plus extra for dusting, I find it gives the dough the right texture)
- 2 tbsp of extra virgin olive oil (my go-to for its fruity flavor)
- 1 tsp of sugar (just a pinch to feed the yeast)
- 1 tsp of salt (I prefer sea salt for its subtle crunch)
- 1/2 cup of pizza sauce (homemade or store-bought, depending on your time)
- 2 cups of shredded mozzarella cheese (the more, the merrier, in my opinion)
- Your choice of toppings (today, I’m feeling pepperoni and bell peppers)
Instructions
- In a large bowl, combine the warm water, yeast, and sugar. Let it sit for 5 minutes until frothy, a sign the yeast is active.
- Add the flour, salt, and olive oil to the yeast mixture. Stir until a dough forms, then knead on a floured surface for 5 minutes until smooth and elastic.
- Place the dough in a greased bowl, cover with a damp cloth, and let it rise in a warm place for 1 hour, or until doubled in size.
- Preheat your oven to 475°F (a hot oven is key for a crispy crust) and lightly grease a pizza pan or baking sheet.
- Roll out the dough on a floured surface to your desired thickness, then transfer to the prepared pan.
- Spread the pizza sauce evenly over the dough, leaving a small border for the crust.
- Sprinkle the shredded mozzarella cheese over the sauce, then add your chosen toppings.
- Bake for 12-15 minutes, or until the crust is golden and the cheese is bubbly and slightly browned.
Once baked, the pizza will have a perfectly crispy crust with a chewy interior, topped with melted cheese and your favorite toppings. Opt for serving it straight from the oven, perhaps with a side of garlic knots or a fresh salad for a complete meal.
DIY Sushi Rolls with Colorful Fillings
Alright, let’s dive into making your own sushi rolls at home, a fun and interactive way to enjoy this Japanese delicacy with a personal twist. Assembling sushi rolls might seem daunting at first, but with these step-by-step instructions, you’ll be rolling like a pro in no time.
Ingredients
- 2 cups sushi rice – I find that short-grain works best for that perfect sticky texture.
- 2 1/4 cups water – for cooking the rice to fluffy perfection.
- 1/4 cup rice vinegar – my secret to adding that authentic tangy flavor.
- 2 tbsp sugar – just the right amount to balance the vinegar’s acidity.
- 1 tsp salt – enhances all the flavors beautifully.
- 4 sheets nori (seaweed) – look for the crisp, dark green ones for the best results.
- 1 avocado, sliced – adds a creamy texture that contrasts nicely with the crunch of other fillings.
- 1 small cucumber, julienned – I prefer English cucumbers for their fewer seeds and crispness.
- 1/2 lb fresh sushi-grade salmon, sliced – always opt for the freshest you can find.
- 1/2 cup cream cheese, cut into strips – a little indulgence that makes the rolls extra special.
Instructions
- Rinse the sushi rice under cold water until the water runs clear, then drain well. This removes excess starch for the perfect texture.
- Combine the rice and water in a rice cooker or pot. Cook according to your rice cooker’s instructions or bring to a boil, then simmer covered for 20 minutes on low heat.
- While the rice cooks, mix rice vinegar, sugar, and salt in a small bowl until dissolved. Heat gently if needed to help the sugar dissolve.
- Spread the cooked rice in a wide bowl and gently fold in the vinegar mixture. Let it cool to room temperature, fanning it occasionally to give it a glossy finish.
- Place a nori sheet on a bamboo mat. With wet hands, spread a thin layer of rice over the nori, leaving a 1-inch border at the top.
- Arrange slices of avocado, cucumber, salmon, and cream cheese in a line along the bottom edge of the rice-covered nori.
- Roll the sushi tightly from the bottom, using the mat to shape it. Press gently but firmly to ensure it holds together.
- With a sharp, wet knife, slice the roll into 6-8 pieces. Wipe the knife between cuts for clean slices.
Creating these DIY sushi rolls is not just about the delicious outcome but also the joy of crafting something beautiful and tasty with your own hands. The combination of creamy avocado, crisp cucumber, and rich salmon wrapped in slightly tangy rice is a symphony of textures and flavors. Serve these vibrant rolls with a side of soy sauce, wasabi, and pickled ginger for an authentic experience or get creative with your own dipping sauces.
Chocolate Fondue with Assorted Dippers
Gathering around a fondue pot is one of life’s simple pleasures, especially when it involves rich, melted chocolate. Today, we’re making a classic Chocolate Fondue with Assorted Dippers, perfect for sharing and customizing to your taste.
Ingredients
- 8 oz high-quality semi-sweet chocolate, chopped (I find Ghirardelli melts beautifully)
- 1/2 cup heavy cream (the richer, the better for a silky texture)
- 1 tbsp unsalted butter (adds a lovely gloss to the fondue)
- 1 tsp pure vanilla extract (a splash enhances the chocolate’s depth)
- Assorted dippers: strawberries, banana slices, marshmallows, and pretzel rods (choose your favorites!)
Instructions
- In a medium saucepan, heat the heavy cream over low heat until it begins to simmer, about 3-4 minutes. Tip: Keep the heat low to avoid scalding the cream.
- Remove the saucepan from the heat and add the chopped chocolate. Let it sit for 2 minutes to soften. Tip: This waiting period ensures the chocolate melts evenly without seizing.
- Stir the mixture gently until the chocolate is completely melted and the mixture is smooth.
- Add the butter and vanilla extract, stirring until fully incorporated. Tip: The butter not only adds shine but also makes the fondue smoother for dipping.
- Transfer the chocolate fondue to a fondue pot or a serving bowl. Keep warm over a low flame or a tea light.
- Arrange the assorted dippers on a platter around the fondue pot for easy access.
This Chocolate Fondue is luxuriously smooth with a deep chocolate flavor that pairs wonderfully with the variety of dippers. Try drizzling any leftover fondue over ice cream for an indulgent treat the next day.
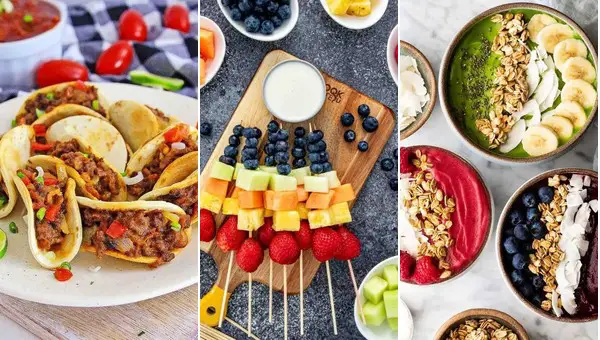
Mini Tacos with Customizable Fillings
Baking up a storm in the kitchen doesn’t have to be complicated, especially when you’re whipping up these Mini Tacos with Customizable Fillings. Perfect for any gathering, these bite-sized delights are as fun to make as they are to eat, offering endless possibilities for customization to suit every palate.
Ingredients
– 1 cup all-purpose flour (I find that sifting it first makes for a lighter taco shell)
– 1/2 cup warm water (around 110°F is perfect for activating the yeast)
– 1 tbsp olive oil (extra virgin is my go-to for its fruity notes)
– 1 tsp salt (I like to use sea salt for its subtle crunch)
– 1/2 lb ground beef (opt for lean to keep it light)
– 1/2 cup shredded cheddar cheese (sharp cheddar adds a nice bite)
– 1/4 cup diced tomatoes (ripe, juicy ones are best)
– 1/4 cup chopped lettuce (iceberg for crunch or romaine for sweetness)
– 1 tbsp taco seasoning (homemade or store-bought, both work great)
– 1/2 cup sour cream (for that creamy finish)
Instructions
1. In a large bowl, combine the flour, warm water, olive oil, and salt to form a dough. Tip: Let the dough rest for 10 minutes to make it easier to handle.
2. Divide the dough into small balls, then roll each out into a thin circle. Tip: Use a tortilla press if you have one for uniform thickness.
3. Heat a non-stick pan over medium heat and cook each dough circle for about 1 minute on each side until lightly browned. Tip: Keep them warm in a towel until ready to serve.
4. In a separate pan, cook the ground beef over medium heat until no longer pink, about 5 minutes. Drain any excess fat.
5. Stir in the taco seasoning and 1/4 cup of water, simmering for another 5 minutes until the mixture thickens.
6. Assemble the tacos by spooning the beef mixture onto each shell, then topping with cheese, tomatoes, lettuce, and a dollop of sour cream.
Wrapping up, these mini tacos boast a delightful contrast of textures—from the crisp shell to the juicy filling—and a flavor that’s boldly customizable. Serve them on a platter with extra toppings on the side for a fun, interactive meal.
Stuffed French Toast with Berries
Very few breakfast dishes can rival the indulgent delight of stuffed French toast, especially when it’s bursting with fresh berries. This recipe is a foolproof way to bring a touch of elegance to your morning routine, guiding you through each step to ensure perfection.
Ingredients
- 4 thick slices of brioche bread (day-old works best for absorbing the custard)
- 1 cup mixed berries (I love a combination of strawberries, blueberries, and raspberries for a vibrant mix)
- 4 oz cream cheese, softened (room temperature blends smoother)
- 2 large eggs (I prefer room temp eggs here for a more uniform mixture)
- 1/2 cup whole milk (the richness makes a difference)
- 1 tsp vanilla extract (pure extract is my go-to for the best flavor)
- 2 tbsp unsalted butter (for that golden, crispy exterior)
- 2 tbsp powdered sugar (for a sweet finish)
Instructions
- In a medium bowl, whisk together the eggs, milk, and vanilla extract until fully combined. This is your custard base.
- Spread 1 oz of softened cream cheese on two slices of the brioche bread. Top with a generous handful of mixed berries, then sandwich with the remaining slices.
- Heat a large non-stick skillet over medium heat and add 1 tbsp of butter, allowing it to melt and coat the pan evenly.
- Dip each stuffed sandwich into the custard mixture, ensuring both sides are well-coated but not soggy. Let excess drip off.
- Place the sandwiches in the skillet and cook for 3-4 minutes on each side, or until golden brown and the custard is set. Tip: Don’t rush the cooking; medium heat ensures the inside warms through without burning the outside.
- Remove from the skillet, dust with powdered sugar, and serve immediately. Tip: For an extra touch, drizzle with maple syrup or a berry compote.
Expect each bite to offer a creamy, berry-filled center encased in a custardy, golden crust. Serve it with a side of crispy bacon or a fresh fruit salad for a complete breakfast experience.
Homemade Pretzels with Cheese Dip
Finally, let’s dive into making some delicious homemade pretzels with a creamy cheese dip that’s perfect for any gathering or a cozy night in. This recipe is straightforward, ensuring even beginners can achieve that golden, soft pretzel with a satisfying chew.
Ingredients
- 1 1/2 cups warm water (110°F to 115°F) – the perfect temperature to activate the yeast without killing it.
- 1 tbsp sugar – just a touch to feed the yeast and add a slight sweetness.
- 2 tsp salt – I like using sea salt for its clean, sharp flavor.
- 1 package active dry yeast – the magic starter for our dough.
- 4 cups all-purpose flour – plus extra for dusting; I always keep a little extra on hand for adjustments.
- 2 tbsp unsalted butter, melted – for that rich, tender crumb.
- 1/2 cup baking soda – for the pretzel’s signature bath.
- 1 egg, beaten – for that glossy, golden finish.
- Coarse salt for sprinkling – because pretzels aren’t pretzels without that salty bite.
- 1 cup shredded cheddar cheese – sharp cheddar melts beautifully for the dip.
- 1/2 cup milk – whole milk gives the dip its creamy consistency.
- 1 tbsp butter – to sauté the garlic for the dip, adding depth of flavor.
- 1 clove garlic, minced – because garlic makes everything better.
Instructions
- In a large bowl, combine warm water, sugar, and salt. Sprinkle yeast on top and let sit for 5 minutes until frothy.
- Stir in melted butter and gradually add flour until a dough forms. Tip: The dough should be slightly sticky but manageable.
- Knead the dough on a floured surface for about 5 minutes until smooth and elastic.
- Place dough in a greased bowl, cover, and let rise in a warm place for 1 hour or until doubled in size.
- Preheat oven to 450°F and line a baking sheet with parchment paper.
- Bring 9 cups of water and baking soda to a boil in a large pot. Tip: Handle with care as the mixture will bubble up.
- Divide dough into 12 pieces, roll each into a rope, and shape into pretzels. Boil each pretzel for 30 seconds, then transfer to the baking sheet.
- Brush pretzels with beaten egg and sprinkle with coarse salt. Bake for 12-15 minutes until golden brown. Tip: Keep an eye on them to prevent over-browning.
- For the cheese dip, melt butter in a saucepan over medium heat, sauté garlic until fragrant, about 1 minute.
- Add milk and shredded cheese, stirring until smooth and creamy. Serve warm with pretzels.
Golden and glossy on the outside with a soft, chewy interior, these pretzels are a delight. The sharp cheddar dip adds a creamy contrast, making them irresistible. Try serving them with a side of spicy mustard for an extra kick.
DIY Ice Cream Sandwiches
Gathering around the kitchen to make DIY Ice Cream Sandwiches is a delightful way to spend an afternoon, especially when you can customize them to your heart’s content. Let’s dive into creating these sweet treats with a methodical approach that ensures success every time.
Ingredients
- 2 cups all-purpose flour (I find that sifting it first makes for a lighter cookie)
- 1/2 cup unsalted butter, softened (room temperature blends more smoothly)
- 3/4 cup granulated sugar (for that perfect sweetness)
- 1 large egg (room temperature eggs incorporate better)
- 1 tsp vanilla extract (pure extract gives the best flavor)
- 1/2 tsp baking powder (for a slight rise)
- 1/4 tsp salt (to balance the sweetness)
- 1 quart vanilla ice cream (or your favorite flavor, slightly softened for easy spreading)
Instructions
- Preheat your oven to 350°F (175°C) and line a baking sheet with parchment paper.
- In a large bowl, cream together the softened butter and granulated sugar until light and fluffy, about 3 minutes.
- Beat in the egg and vanilla extract until well combined.
- In a separate bowl, whisk together the sifted flour, baking powder, and salt.
- Gradually add the dry ingredients to the wet ingredients, mixing until just combined to avoid tough cookies.
- Roll the dough into 1-inch balls and place them 2 inches apart on the prepared baking sheet.
- Flatten each ball slightly with the bottom of a glass or your hand to ensure even baking.
- Bake for 10-12 minutes, or until the edges are just starting to turn golden. Let cool on the baking sheet for 5 minutes before transferring to a wire rack to cool completely.
- Once cooled, spread a generous scoop of slightly softened ice cream on the flat side of one cookie and top with another cookie, pressing gently to form a sandwich.
- Wrap each sandwich in plastic wrap and freeze for at least 2 hours to firm up.
How satisfying it is to bite into these homemade ice cream sandwiches, with their soft, chewy cookies and creamy, cold center. For an extra special touch, roll the edges in sprinkles or mini chocolate chips before the final freeze.
Rainbow Pasta Salad
You’ll love how this Rainbow Pasta Salad brings a burst of color and flavor to any table, perfect for beginners to master with its straightforward steps.
Ingredients
- 8 oz tri-color rotini pasta – the swirls hold the dressing beautifully.
- 1/2 cup extra virgin olive oil – my go-to for its fruity notes.
- 1/4 cup red wine vinegar – adds a tangy kick.
- 1 tsp Dijon mustard – for a subtle depth.
- 1 clove garlic, minced – fresh is best here.
- 1/2 tsp salt – enhances all the flavors.
- 1/4 tsp black pepper – freshly ground, if possible.
- 1 cup cherry tomatoes, halved – they’re like little bursts of sweetness.
- 1/2 cup sliced black olives – I prefer the kalamata variety for their richness.
- 1/2 cup diced cucumber – for a refreshing crunch.
- 1/4 cup diced red onion – soak in cold water for 10 minutes to mellow the bite.
- 1/4 cup chopped fresh basil – it’s worth using fresh for the aroma.
Instructions
- Bring a large pot of salted water to a boil over high heat. Tip: Salting the water seasons the pasta from the inside out.
- Add the tri-color rotini pasta and cook according to package instructions until al dente, about 8-10 minutes. Tip: Stir occasionally to prevent sticking.
- While the pasta cooks, whisk together the extra virgin olive oil, red wine vinegar, Dijon mustard, minced garlic, salt, and black pepper in a large bowl to make the dressing.
- Drain the pasta and rinse under cold water to stop the cooking process. Tip: Rinsing also removes excess starch, preventing clumping.
- Add the cooled pasta to the bowl with the dressing, along with the cherry tomatoes, black olives, diced cucumber, red onion, and chopped fresh basil.
- Toss everything together until well combined and the pasta is evenly coated with the dressing.
Let this Rainbow Pasta Salad sit for about 10 minutes before serving to let the flavors meld. The result is a vibrant dish with a perfect balance of textures – from the tender pasta to the crisp vegetables, all tied together with a zesty dressing. Serve it in a clear bowl to showcase its beautiful colors, or pack it for a picnic where it’s sure to be a hit.
Mini Burgers with Creative Toppings
Unleash your creativity in the kitchen with these mini burgers, a fun twist on the classic that’s perfect for parties or a unique family dinner. Each bite-sized burger is a canvas for your favorite toppings, making them as versatile as they are delicious.
Ingredients
- 1 lb ground beef (80/20 blend for juiciness)
- 1 tbsp Worcestershire sauce (my secret for umami depth)
- 1 tsp garlic powder (fresh minced garlic works too, but powder distributes evenly)
- 1/2 tsp salt (I like sea salt for its clean taste)
- 1/4 tsp black pepper (freshly ground is best)
- 12 mini burger buns (toasted lightly for crunch)
- 1/2 cup cheddar cheese, shredded (sharp cheddar adds a nice bite)
- 1/4 cup pickles, sliced (for a tangy contrast)
- 1/4 cup red onion, finely diced (soak in cold water for 10 minutes to mellow the sharpness)
- 1/4 cup mayonnaise (Duke’s is my go-to for its richness)
- 1 tbsp mustard (yellow for classic, Dijon for a kick)
Instructions
- Preheat your grill or skillet to medium-high heat, about 375°F, ensuring a good sear.
- In a bowl, gently mix the ground beef with Worcestershire sauce, garlic powder, salt, and pepper. Overmixing can toughen the burgers.
- Divide the mixture into 12 equal portions, shaping each into a mini patty about 1/2 inch thick. Tip: Use a lid or ring mold for uniform size.
- Cook the patties for 3-4 minutes per side, flipping only once, until they reach an internal temperature of 160°F.
- During the last minute of cooking, top each patty with shredded cheddar, allowing it to melt slightly.
- Toast the mini buns lightly on the grill or in a toaster for about 1 minute, just until golden.
- Spread mayonnaise and mustard on the bottom bun, then layer the cheese-topped patty, pickles, and red onion. Tip: Assemble just before serving to keep the buns from getting soggy.
These mini burgers boast a juicy interior with a slightly crispy exterior, balanced by the creamy mayo and sharp cheddar. Serve them on a platter with toothpicks for easy grabbing, or let guests build their own with an array of toppings for interactive fun.
Funfetti Cupcakes with Buttercream Frosting
Just imagine biting into a soft, fluffy cupcake bursting with colorful sprinkles and topped with creamy buttercream frosting. Today, we’re diving into the delightful world of Funfetti Cupcakes with Buttercream Frosting, a recipe that’s as fun to make as it is to eat.
Ingredients
- 1 1/2 cups all-purpose flour (I always sift mine for extra fluffiness)
- 1 cup granulated sugar (for that perfect sweetness)
- 1 1/2 tsp baking powder (the secret to a good rise)
- 1/2 tsp salt (balances the sweetness)
- 1/2 cup unsalted butter, room temperature (softens the texture)
- 2 large eggs, room temperature (they blend better when not cold)
- 2 tsp vanilla extract (pure extract makes all the difference)
- 1/2 cup whole milk (for moisture)
- 1/3 cup rainbow sprinkles (the more, the merrier!)
- 1 cup unsalted butter, room temperature (for the frosting)
- 4 cups powdered sugar (sifted to avoid lumps)
- 2 tbsp heavy cream (adds richness)
- 1 tsp vanilla extract (for flavor)
Instructions
- Preheat your oven to 350°F (175°C) and line a muffin tin with cupcake liners.
- In a medium bowl, whisk together the flour, sugar, baking powder, and salt until well combined.
- In a large bowl, beat the butter until creamy, about 2 minutes. Tip: Scrape down the sides of the bowl to ensure even mixing.
- Add the eggs one at a time to the butter, beating well after each addition. Stir in the vanilla extract.
- Alternately add the dry ingredients and milk to the butter mixture, beginning and ending with the dry ingredients. Mix until just combined. Tip: Overmixing can lead to dense cupcakes.
- Gently fold in the rainbow sprinkles until evenly distributed.
- Divide the batter evenly among the prepared muffin cups, filling each about 2/3 full.
- Bake for 18-20 minutes, or until a toothpick inserted into the center comes out clean. Tip: Rotate the pan halfway through baking for even cooking.
- Allow the cupcakes to cool in the pan for 5 minutes, then transfer to a wire rack to cool completely.
- For the frosting, beat the butter in a large bowl until smooth and creamy, about 2 minutes.
- Gradually add the powdered sugar, one cup at a time, beating well after each addition.
- Add the heavy cream and vanilla extract, and beat on high speed for 3 minutes until light and fluffy.
- Frost the cooled cupcakes as desired, and add extra sprinkles on top for decoration.
After all that effort, you’re rewarded with cupcakes that are wonderfully soft, with a tender crumb and a sweet, buttery frosting that melts in your mouth. Serve them at your next party or enjoy as a sweet treat with your afternoon coffee.
DIY Smoothie Bowls with Toppings
Let’s dive into creating your very own DIY Smoothie Bowls with Toppings, a perfect way to start your day with a burst of energy and flavor. This guide will walk you through each step, ensuring even beginners can achieve delicious results.
Ingredients
- 1 cup frozen mixed berries (I find the mix of strawberries, blueberries, and raspberries gives the best flavor balance)
- 1 ripe banana, sliced (for sweetness and creaminess)
- 1/2 cup almond milk (or any milk of your choice; I love almond for its subtle nutty flavor)
- 1 tbsp honey (local honey is my preference for its rich taste)
- 1/4 cup granola (for that essential crunch)
- 1 tbsp chia seeds (a great source of omega-3s)
- 1/4 cup sliced almonds (toasted lightly for extra flavor)
- Fresh mint leaves (for a refreshing garnish)
Instructions
- In a blender, combine the frozen mixed berries, sliced banana, almond milk, and honey. Blend on high until smooth, about 1 minute. Tip: If the mixture is too thick, add a splash more almond milk to reach your desired consistency.
- Pour the smoothie into a bowl. The consistency should be thick enough to support the toppings without sinking.
- Sprinkle the granola evenly over the smoothie, followed by the chia seeds and sliced almonds. Tip: Toasting the almonds beforehand enhances their flavor and adds a nice crunch.
- Garnish with fresh mint leaves for a pop of color and freshness. Tip: Gently press the mint leaves between your fingers before adding to release their aromatic oils.
With its creamy texture, sweet and tangy flavors, and satisfying crunch, this smoothie bowl is a delight to the senses. Try serving it in a hollowed-out pineapple half for an extra tropical twist that’s sure to impress.
Homemade Popcorn with Sweet and Savory Mix-ins
Getting your snack game to the next level doesn’t have to be complicated. This homemade popcorn with sweet and savory mix-ins is a foolproof way to delight your taste buds, combining the perfect crunch with a burst of flavors.
Ingredients
- 1/2 cup popcorn kernels (I find organic kernels pop the fluffiest)
- 3 tbsp coconut oil (for that irresistible aroma)
- 1/4 cup honey (local honey adds a lovely depth)
- 2 tbsp unsalted butter (melted, because it blends better)
- 1 tsp sea salt (fine grain dissolves evenly)
- 1/2 tsp smoked paprika (for a subtle kick)
- 1/4 cup grated Parmesan cheese (the fresher, the better)
Instructions
- Heat a large pot over medium heat and add the coconut oil, allowing it to melt completely.
- Add 3 popcorn kernels to the pot and cover. Once they pop, you know the oil is at the right temperature.
- Pour in the remaining kernels, cover the pot, and shake gently to coat them in oil. This ensures even popping.
- Once the popping slows to about 2 seconds between pops, remove the pot from heat. Let it sit covered for 30 seconds to catch any late popcorns.
- Transfer the popcorn to a large bowl, discarding any unpopped kernels.
- Drizzle the melted butter and honey over the popcorn, tossing gently to coat evenly. A rubber spatula works great here.
- Sprinkle the sea salt, smoked paprika, and grated Parmesan cheese over the popcorn, tossing again to distribute the flavors.
- Let the popcorn sit for a minute to allow the flavors to meld together before serving.
Lightly golden and perfectly seasoned, this popcorn offers a delightful contrast between sweet and savory. Serve it in individual paper cones for a fun, party-friendly presentation.
DIY Pizza Bagels
Alright, let’s dive into making these irresistible DIY Pizza Bagels, a perfect blend of convenience and homemade goodness that’ll have everyone asking for seconds.
Ingredients
- 4 plain bagels, halved – I find that fresh bagels give the best texture, but day-old ones work in a pinch.
- 1 cup marinara sauce – Homemade or your favorite store-bought brand, just make sure it’s thick to prevent sogginess.
- 2 cups shredded mozzarella cheese – The more, the merrier, but feel free to mix in some cheddar for extra flavor.
- 1/4 cup grated Parmesan cheese – This adds a nice salty kick and golden color when baked.
- 1 tbsp extra virgin olive oil – My go-to for brushing the bagels for that perfect crispness.
- 1/2 tsp garlic powder – A little goes a long way in enhancing the overall flavor.
- 1/4 tsp dried oregano – Sprinkle this on top for that authentic pizza taste.
- Your favorite pizza toppings (pepperoni, mushrooms, bell peppers) – Customize to your heart’s content.
Instructions
- Preheat your oven to 375°F (190°C) and line a baking sheet with parchment paper for easy cleanup.
- Brush each bagel half lightly with extra virgin olive oil to ensure they crisp up nicely in the oven.
- Spread about 2 tablespoons of marinara sauce on each bagel half, covering the surface evenly but not too thick to avoid sogginess.
- Sprinkle a generous amount of shredded mozzarella cheese over the sauce, followed by a pinch of grated Parmesan cheese on each half.
- Add your chosen pizza toppings evenly over the cheese. Tip: If using vegetables, sauté them lightly first to remove excess moisture.
- Sprinkle a little garlic powder and dried oregano over the top for that classic pizza flavor.
- Bake in the preheated oven for 12-15 minutes, or until the cheese is bubbly and slightly golden. Tip: Keep an eye on them after 10 minutes to prevent burning.
- Let the pizza bagels cool for a couple of minutes before serving. Tip: This waiting period allows the cheese to set slightly, making them easier to handle.
Crunchy on the outside, gooey on the inside, these pizza bagels are a delightful twist on two classics. Serve them with a side of extra marinara for dipping or cut into quarters for a fun party appetizer.
Rainbow Fruit Skewers with Yogurt Dip
Kickstart your summer with these vibrant Rainbow Fruit Skewers paired with a creamy Yogurt Dip, a perfect blend of sweetness and tang that’s as fun to make as it is to eat. This recipe is a fantastic way to introduce beginners to the joys of cooking with fresh, colorful ingredients.
Ingredients
- 1 cup Greek yogurt (I love the thickness of Greek yogurt for dips)
- 2 tbsp honey (local honey adds a lovely floral note)
- 1 tsp vanilla extract (pure vanilla makes all the difference)
- 1 cup strawberries, hulled and halved
- 1 cup pineapple chunks (fresh pineapple brings a tropical vibe)
- 1 cup green grapes
- 1 cup blueberries
- 1 cup mango chunks (ripe mangoes are sweeter and more flavorful)
- Wooden skewers (soak them in water for 30 minutes to prevent burning)
Instructions
- In a medium bowl, whisk together the Greek yogurt, honey, and vanilla extract until smooth. Set aside in the refrigerator to chill.
- Thread the strawberries, pineapple, grapes, blueberries, and mango onto the soaked wooden skewers in a rainbow pattern.
- Arrange the skewers on a serving platter, leaving space for the yogurt dip bowl.
- Remove the yogurt dip from the refrigerator and give it a quick stir before serving alongside the skewers.
- Tip: For an extra touch, drizzle a little honey over the skewers before serving.
- Tip: If preparing ahead, cover the skewers with plastic wrap and refrigerate until ready to serve.
- Tip: Experiment with different fruits based on what’s in season for a new twist every time.
Present these skewers at your next gathering for a visually stunning and deliciously healthy option. The combination of juicy fruits with the cool, creamy dip is irresistibly refreshing, making it a hit among guests of all ages.
Mini Cheesecakes with Assorted Toppings
Here’s a delightful way to enjoy the classic cheesecake in a fun, bite-sized form. Mini cheesecakes with assorted toppings are not only adorable but also incredibly versatile, allowing everyone to customize their dessert just the way they like it.
Ingredients
- 1 1/2 cups graham cracker crumbs (I find that crushing them myself gives a better texture)
- 1/4 cup unsalted butter, melted (extra virgin olive oil is my go-to for a lighter version)
- 16 oz cream cheese, softened (I prefer room temp cream cheese for smoother blending)
- 1/2 cup granulated sugar
- 2 large eggs (room temperature eggs incorporate better)
- 1 tsp vanilla extract
- Assorted toppings: fresh berries, chocolate chips, caramel sauce (get creative here!)
Instructions
- Preheat your oven to 325°F and line a muffin tin with paper liners.
- In a bowl, mix the graham cracker crumbs and melted butter until well combined. Press about 1 tablespoon of the mixture into the bottom of each liner, using the back of a spoon to compact it firmly.
- Bake the crusts for 5 minutes, then remove from the oven and let cool slightly. Tip: This pre-baking step ensures your crust won’t get soggy.
- In another bowl, beat the cream cheese and sugar together until smooth. Add the eggs one at a time, then the vanilla, mixing well after each addition. Tip: Don’t overmix to avoid incorporating too much air.
- Divide the cheesecake batter evenly among the prepared crusts, filling each about 3/4 full.
- Bake for 20 minutes, or until the centers are just set. Tip: The cheesecakes will firm up as they cool, so it’s okay if they seem a bit jiggly.
- Let the cheesecakes cool in the tin for 10 minutes, then transfer to a wire rack to cool completely. Top with your favorite toppings before serving.
Enjoy the creamy texture and rich flavor of these mini cheesecakes, perfect for parties or as a sweet treat. For a festive touch, arrange them on a tiered stand with a variety of toppings for guests to choose from.
Homemade Chicken Nuggets with Dipping Sauces
Alright, let’s dive into making some crispy, golden homemade chicken nuggets that’ll have everyone asking for seconds. This recipe is perfect for beginners, with clear, step-by-step instructions to ensure success.
Ingredients
- 1 lb boneless, skinless chicken breasts – I find cutting them into even pieces ensures uniform cooking.
- 1 cup all-purpose flour – A staple in my pantry for that perfect crispy coating.
- 2 large eggs – I prefer room temp eggs here for better mixing.
- 1 cup breadcrumbs – Panko works wonders for extra crunch.
- 1 tsp salt – Just the right amount to season the chicken.
- 1/2 tsp black pepper – Freshly ground adds a nice kick.
- 1/2 tsp garlic powder – For that subtle, savory depth.
- 1/2 tsp paprika – A little smokiness goes a long way.
- 1/4 cup vegetable oil – Extra virgin olive oil is my go-to for frying.
Instructions
- Preheat your oven to 375°F (190°C) and line a baking sheet with parchment paper.
- Cut the chicken breasts into 1-inch pieces, ensuring they’re all roughly the same size for even cooking.
- In a shallow bowl, whisk the eggs until smooth. This is your wet mixture.
- In another bowl, combine the flour, salt, pepper, garlic powder, and paprika. This is your dry mixture.
- Place the breadcrumbs in a third bowl. Now you have your breading station set up: dry, wet, breadcrumbs.
- Dip each chicken piece first into the dry mixture, shaking off any excess.
- Next, dip it into the egg mixture, letting any excess drip off.
- Finally, coat it in breadcrumbs, pressing gently to adhere. Place on the prepared baking sheet.
- Heat the oil in a large skillet over medium-high heat. Once hot, add the chicken in batches, frying for 2-3 minutes per side until golden brown.
- Transfer the nuggets to the oven and bake for 10 minutes to ensure they’re cooked through.
Ready to serve, these nuggets are irresistibly crispy on the outside and tender on the inside. Pair them with your favorite dipping sauces for a fun, customizable meal that’s sure to please.
DIY Trail Mix with Sweet and Salty Ingredients
Ready to whip up a snack that’s as fun to make as it is to eat? This DIY Trail Mix with Sweet and Salty Ingredients is the perfect blend of textures and flavors, ideal for on-the-go munching or a quick energy boost.
Ingredients
- 1 cup roasted, unsalted almonds (I love the crunch they add)
- 1/2 cup dried cranberries (for that chewy sweetness)
- 1/2 cup dark chocolate chips (go for the good stuff, it makes a difference)
- 1/2 cup pretzel sticks (the salty contrast is key)
- 1/4 cup pumpkin seeds (a little extra crunch and nutrition)
- 1 tbsp honey (just a drizzle to bind everything together)
Instructions
- Preheat your oven to 350°F to toast the almonds and pumpkin seeds for an extra layer of flavor.
- Spread the almonds and pumpkin seeds on a baking sheet in a single layer. Toast in the oven for 5 minutes, then let them cool. This enhances their nutty flavor.
- In a large mixing bowl, combine the toasted almonds, pumpkin seeds, dried cranberries, dark chocolate chips, and pretzel sticks.
- Drizzle the honey over the mixture. Use a spatula to gently fold everything together until evenly coated. The honey acts as a light binder.
- Spread the trail mix on a parchment-lined baking sheet to cool and set for about 10 minutes. This prevents clumping.
- Once cooled, transfer your trail mix to an airtight container or enjoy immediately.
Now you’ve got a snack that’s perfectly balanced between sweet and salty, with a delightful mix of textures. Try serving it in small paper cones for a fun, portable treat at your next gathering.
Conclusion
With 20 fun and creative recipes to choose from, there’s something here for every home cook to enjoy! Whether you’re craving comfort food or looking to try something new, these dishes are sure to delight. Don’t forget to whip up your favorites, share your thoughts in the comments, and pin this article for later. Happy cooking!

I’m Brandon, the face behind the recipes. As a dedicated food enthusiast, I love experimenting with flavors and sharing my culinary adventures with you.