Craving meals that are as nourishing as they are delicious? Look no further! We’ve rounded up 18 mouthwatering Plant Paradox recipes that make healthy eating a breeze—without skimping on flavor. From cozy weeknight dinners to vibrant seasonal dishes, these meals prove that gut-friendly food can be downright irresistible. Ready to transform your kitchen? Let’s dive in!
Cauliflower Rice Stir-Fry with Coconut Aminos
Zesty and vibrant, this Cauliflower Rice Stir-Fry with Coconut Aminos is your ticket to a quick, healthy meal that doesn’t skimp on flavor. Perfect for those nights when you’re craving something delicious but don’t want to spend hours in the kitchen.
Ingredients
- 1 tbsp coconut oil
- 2 cups riced cauliflower (fresh or frozen)
- 1/2 cup diced red bell pepper
- 1/2 cup sliced carrots
- 1/4 cup chopped green onions
- 2 tbsp coconut aminos
- 1 tsp garlic powder
- 1/2 tsp ground ginger
- 1/4 tsp red pepper flakes
- 1 tbsp sesame seeds (for garnish)
Instructions
- Heat the pan: Melt coconut oil in a large skillet over medium heat (about 350°F).
- Sauté veggies: Add red bell pepper and carrots to the skillet, stirring occasionally for 3-4 minutes until slightly softened.
- Add cauliflower rice: Stir in the riced cauliflower, breaking up any clumps, and cook for 5 minutes until it starts to brown slightly.
- Season the mix: Sprinkle garlic powder, ground ginger, and red pepper flakes over the vegetables, stirring to combine evenly.
- Pour in aminos: Drizzle coconut aminos over the stir-fry, mixing well to coat all the ingredients. Cook for another 2 minutes.
- Garnish and serve: Remove from heat, sprinkle with green onions and sesame seeds, and serve immediately for the best texture.
The stir-fry comes out with a delightful crunch from the veggies, a slight kick from the spices, and a rich umami flavor thanks to the coconut aminos. Try topping it with a fried egg for an extra protein boost!
Zucchini Noodles with Avocado Pesto
Ever find yourself staring at a pile of zucchini wondering how to turn it into something that doesn’t taste like health guilt? Let’s spiral those bad boys into noodles and toss them with an avocado pesto that’s so creamy, you’ll forget it’s actually good for you.
Ingredients
- 2 medium zucchinis, spiralized into noodles
- 1 ripe avocado, pitted and peeled
- 1/4 cup fresh basil leaves
- 2 tbsp pine nuts
- 1 garlic clove, minced
- 2 tbsp olive oil
- 1 tbsp lemon juice
- 1/2 tsp salt
- 1/4 tsp black pepper
- 1/4 cup grated Parmesan cheese
Instructions
- Blend the pesto: In a food processor, combine the avocado, basil, pine nuts, garlic, olive oil, lemon juice, salt, and pepper. Blend until smooth. Tip: If the pesto is too thick, add a tablespoon of water at a time until desired consistency.
- Toss the noodles: In a large bowl, combine the zucchini noodles with the avocado pesto. Use tongs to toss until the noodles are evenly coated. Tip: Let the noodles sit for 5 minutes to soften slightly if you prefer them less crunchy.
- Add the cheese: Sprinkle the grated Parmesan cheese over the noodles and toss once more to combine. Tip: For a vegan version, skip the Parmesan or use a nutritional yeast substitute.
The zucchini noodles are refreshingly crisp, while the avocado pesto is luxuriously smooth with a bright kick from the lemon. Serve it chilled for a summer picnic or warm it slightly for a cozy dinner vibe.
Roasted Sweet Potato and Kale Salad
Boy, do I have a treat for you today! This Roasted Sweet Potato and Kale Salad is the kind of dish that makes you feel like a gourmet chef without having to fuss over the stove all day. It’s hearty, it’s healthy, and it’s got that perfect mix of sweet and savory that’ll have you going back for seconds.
Ingredients
- 2 medium sweet potatoes, peeled and diced into 1/2-inch cubes
- 1 bunch kale, stems removed and leaves torn into bite-sized pieces
- 2 tbsp olive oil
- 1/2 tsp salt
- 1/4 tsp black pepper
- 1/4 tsp garlic powder
- 1/4 tsp smoked paprika
- 1 tbsp maple syrup
- 1/4 cup crumbled feta cheese
- 1/4 cup chopped walnuts
Instructions
- Preheat oven: Preheat your oven to 400°F (200°C). This ensures your sweet potatoes roast perfectly.
- Toss sweet potatoes: In a large bowl, toss the sweet potato cubes with 1 tbsp olive oil, salt, pepper, garlic powder, and smoked paprika until evenly coated.
- Roast sweet potatoes: Spread the sweet potatoes on a baking sheet in a single layer. Roast for 25 minutes, flipping halfway through, until they’re tender and slightly caramelized.
- Massage kale: While the sweet potatoes roast, place the kale in a large bowl. Drizzle with the remaining 1 tbsp olive oil and the maple syrup. Massage the kale with your hands for 2-3 minutes until it softens and reduces in volume.
- Combine and serve: Once the sweet potatoes are done, let them cool slightly before adding them to the kale. Toss gently to combine. Top with crumbled feta and chopped walnuts for that perfect crunch and creaminess.
The roasted sweet potatoes bring a caramelized sweetness that pairs beautifully with the earthy kale, while the feta adds a tangy punch and the walnuts give it a satisfying crunch. Serve it warm for a cozy dinner or cold for a refreshing lunch – it’s versatile like that!
Grilled Chicken with Lemon Herb Marinade
Perfect for those summer evenings when you’re craving something light yet satisfying, this Grilled Chicken with Lemon Herb Marinade is a game-changer. It’s like your taste buds are getting a little vacation, thanks to the zesty lemon and fresh herbs that pack every bite with flavor.
Ingredients
- 4 boneless, skinless chicken breasts (about 1.5 lbs)
- 1/4 cup olive oil
- 1/4 cup fresh lemon juice (about 2 lemons)
- 2 tbsp chopped fresh parsley
- 1 tbsp chopped fresh rosemary
- 1 tbsp chopped fresh thyme
- 2 cloves garlic, minced
- 1 tsp salt
- 1/2 tsp black pepper
Instructions
- Marinate for flavor: In a large bowl, whisk together olive oil, lemon juice, parsley, rosemary, thyme, garlic, salt, and pepper. Add chicken breasts, turning to coat. Cover and refrigerate for at least 1 hour, or up to 4 hours for deeper flavor.
- Preheat the grill: Heat your grill to medium-high (about 375°F to 400°F). Tip: A properly heated grill ensures those beautiful grill marks without sticking.
- Grill to perfection: Remove chicken from marinade, letting excess drip off. Grill for 6-7 minutes per side, or until internal temperature reaches 165°F. Tip: Resist the urge to flip too early; letting the chicken sear properly prevents sticking.
- Rest before serving: Transfer grilled chicken to a plate, cover loosely with foil, and let rest for 5 minutes. Tip: Resting allows juices to redistribute, ensuring every bite is juicy.
The chicken comes out incredibly tender with a bright, herby crust that’s just begging to be paired with a crisp salad or some grilled veggies. Try slicing it over a bed of quinoa for a protein-packed bowl that’s as nutritious as it is delicious.
Spaghetti Squash with Garlic and Olive Oil
Just when you thought spaghetti couldn’t get any healthier, here comes spaghetti squash to shake things up. This dish is like the cool, low-carb cousin of your favorite pasta, all dressed up with garlic and olive oil for a simple yet satisfying meal.
Ingredients
- 1 medium spaghetti squash (about 4 cups when cooked)
- 3 tbsp olive oil
- 4 cloves garlic, minced
- 1/2 tsp salt
- 1/4 tsp black pepper
- 1/4 tsp red pepper flakes (optional for a little heat)
- 2 tbsp grated Parmesan cheese (optional for serving)
- Fresh parsley, chopped (for garnish)
Instructions
- Preheat oven: Heat your oven to 400°F (200°C). This ensures your squash cooks evenly and gets those nice, tender strands.
- Prep squash: Carefully cut the spaghetti squash in half lengthwise. Scoop out the seeds and stringy bits with a spoon. Tip: Microwave the whole squash for 2-3 minutes to soften it before cutting, making it easier to handle.
- Roast squash: Drizzle the cut sides with 1 tbsp olive oil and sprinkle with salt and pepper. Place cut-side down on a baking sheet. Roast for 40 minutes or until the flesh is easily pierced with a fork.
- Cook garlic: While the squash roasts, heat the remaining 2 tbsp olive oil in a small pan over medium heat. Add the minced garlic and red pepper flakes, cooking for 1-2 minutes until fragrant but not browned. Tip: Keep the heat medium to avoid burning the garlic, which can turn bitter.
- Shred squash: Once the squash is cool enough to handle, use a fork to scrape the flesh into strands. It should look like spaghetti!
- Combine: Toss the squash strands with the garlic oil mixture. Taste and adjust seasoning if needed.
- Serve: Sprinkle with Parmesan cheese and fresh parsley before serving. Tip: For an extra touch, serve it in the squash shells for a fun, edible bowl.
The texture is wonderfully al dente, with a slight crunch that’s so satisfying. The garlic and olive oil keep it light but flavorful, and that optional sprinkle of Parmesan? Chef’s kiss. Try topping it with a fried egg for a hearty breakfast twist.
Turmeric-Spiced Cauliflower Soup
So, you’re staring at a head of cauliflower wondering how to turn it into something magical, right? Well, buckle up because this Turmeric-Spiced Cauliflower Soup is about to blow your mind with its creamy texture and warm, spicy flavors. It’s like a hug in a bowl, perfect for those days when you need a little extra comfort.
Ingredients
- 1 large head cauliflower, chopped into florets
- 2 tbsp olive oil
- 1 medium onion, diced
- 3 cloves garlic, minced
- 1 tsp ground turmeric
- 1/2 tsp ground cumin
- 1/4 tsp ground ginger
- 4 cups vegetable broth
- 1/2 cup coconut milk
- Salt to taste
Instructions
- Preheat the pot: Heat olive oil in a large pot over medium heat.
- Sauté the aromatics: Add diced onion and minced garlic to the pot, sautéing until the onion is translucent, about 5 minutes.
- Spice it up: Stir in ground turmeric, cumin, and ginger, cooking for another minute until fragrant.
- Add cauliflower and broth: Toss in the cauliflower florets and pour in the vegetable broth. Bring to a boil, then reduce heat to simmer for 20 minutes, or until cauliflower is tender.
- Blend until smooth: Carefully transfer the soup to a blender, or use an immersion blender directly in the pot, blending until the soup is smooth and creamy.
- Finish with coconut milk: Stir in coconut milk and season with salt to taste. Heat through for another 2 minutes.
This soup is luxuriously creamy with a golden hue that’ll make your Instagram followers jealous. The turmeric gives it a warm, earthy flavor that’s balanced by the sweetness of the coconut milk. Try topping it with a sprinkle of roasted chickpeas for an extra crunch that’ll take it to the next level.
Baked Salmon with Dill and Lemon
Ever find yourself staring at a piece of salmon, wondering how to make it taste like it came from a fancy restaurant without actually having to go to one? Well, buckle up, because this Baked Salmon with Dill and Lemon is about to become your go-to for impressing yourself and maybe even some guests.
Ingredients
- 1.5 lbs salmon fillet, skin-on
- 2 tbsp olive oil
- 1 tbsp fresh dill, chopped
- 1 lemon, thinly sliced
- 1/2 tsp salt
- 1/4 tsp black pepper
- 1/4 tsp garlic powder
Instructions
- Preheat oven: Preheat your oven to 375°F (190°C) to ensure it’s ready to go when your salmon is.
- Prepare salmon: Place the salmon fillet on a baking sheet lined with parchment paper for easy cleanup. Drizzle with olive oil and rub it all over the fillet.
- Season generously: Sprinkle the salt, black pepper, and garlic powder evenly over the salmon. Don’t be shy; this is where the flavor starts.
- Add dill and lemon: Scatter the chopped dill over the salmon, then arrange the lemon slices on top. The lemon not only adds flavor but keeps the salmon moist.
- Bake to perfection: Bake in the preheated oven for 12-15 minutes. The salmon is done when it flakes easily with a fork but is still juicy inside.
- Rest before serving: Let the salmon rest for 5 minutes after baking. This lets the juices redistribute, making every bite as good as the last.
The result? A salmon that’s perfectly tender with a bright, herby kick from the dill and a zesty lemon finish. Serve it over a bed of quinoa or with some roasted veggies for a meal that feels gourmet but is totally doable on a Tuesday night.
Kale and Brussels Sprouts Slaw
Wow, if you’re looking for a salad that’s anything but sad, you’ve hit the jackpot with this Kale and Brussels Sprouts Slaw. It’s crunchy, it’s tangy, and it’s got enough personality to stand up to any main dish you throw at it.
Ingredients
- 1 bunch kale, stems removed and leaves thinly sliced
- 1 lb Brussels sprouts, trimmed and thinly sliced
- 1/2 cup mayonnaise
- 2 tbsp Dijon mustard
- 1 tbsp apple cider vinegar
- 1 tbsp honey
- 1/2 tsp salt
- 1/4 tsp black pepper
- 1/4 cup grated Parmesan cheese
- 1/4 cup sliced almonds, toasted
Instructions
- Prep the greens: In a large bowl, combine the sliced kale and Brussels sprouts.
- Make the dressing: In a small bowl, whisk together the mayonnaise, Dijon mustard, apple cider vinegar, honey, salt, and pepper until smooth.
- Combine: Pour the dressing over the greens and toss until everything is evenly coated. Tip: Let it sit for 10 minutes to soften the greens slightly.
- Add crunch: Sprinkle the grated Parmesan and toasted almonds over the top. Tip: Toast the almonds in a dry skillet over medium heat for 2-3 minutes until golden for extra flavor.
- Serve: Give it one final toss and serve immediately. Tip: For a heartier meal, top with grilled chicken or shrimp.
This slaw is all about the contrast – the creamy dressing clings to every nook and cranny of the greens, while the almonds add a satisfying crunch. Serve it in a big, colorful bowl to really show off its vibrant colors, or pack it for a picnic where it won’t wilt under the sun.
Roasted Beet and Arugula Salad
First off, let’s talk about how roasted beets are basically nature’s candy, and when you toss them with peppery arugula, you’ve got a salad that’s as vibrant in flavor as it is in color. This Roasted Beet and Arugula Salad is the perfect mix of sweet, earthy, and fresh, with a little crunch from walnuts for good measure.
Ingredients
- 3 medium beets, peeled and cut into 1-inch cubes
- 5 oz arugula
- 1/2 cup walnuts, roughly chopped
- 1/4 cup olive oil
- 2 tbsp balsamic vinegar
- 1 tsp honey
- 1/2 tsp salt
- 1/4 tsp black pepper
- 1/4 cup crumbled goat cheese
Instructions
- Preheat oven: Heat your oven to 400°F (200°C) to get it ready for roasting those beets.
- Roast beets: Toss the beet cubes with 2 tbsp olive oil, salt, and pepper. Spread them on a baking sheet and roast for 25-30 minutes, until tender when pierced with a fork. Tip: Line your baking sheet with parchment paper for easy cleanup.
- Toast walnuts: While the beets are roasting, toast the chopped walnuts in a dry skillet over medium heat for 3-5 minutes, stirring often, until fragrant. Tip: Keep an eye on them to prevent burning.
- Make dressing: Whisk together the remaining 2 tbsp olive oil, balsamic vinegar, and honey in a small bowl until well combined.
- Assemble salad: In a large bowl, combine the arugula, roasted beets, and toasted walnuts. Drizzle with the dressing and toss gently to coat. Tip: Add the dressing just before serving to keep the arugula crisp.
- Add cheese: Sprinkle the crumbled goat cheese over the top of the salad for a creamy finish.
The roasted beets bring a sweet, earthy depth that plays so well against the peppery arugula and tangy goat cheese. Serve this salad with a slice of crusty bread to soak up any extra dressing, and you’ve got a meal that’s as satisfying as it is beautiful.
Coconut Flour Pancakes with Berries
So, you’re craving something fluffy, slightly sweet, and packed with a berry punch for breakfast? Let me introduce you to these coconut flour pancakes that are not only easy to whip up but also gluten-free and downright delicious.
Ingredients
- 1/2 cup coconut flour
- 4 large eggs, beaten
- 1/2 cup almond milk
- 1 tbsp honey
- 1 tsp vanilla extract
- 1/2 tsp baking powder
- 1/4 tsp salt
- 1 tbsp coconut oil, for cooking
- 1 cup mixed berries (strawberries, blueberries, raspberries), for serving
Instructions
- Mix dry ingredients: In a large bowl, whisk together the coconut flour, baking powder, and salt.
- Combine wet ingredients: In another bowl, mix the beaten eggs, almond milk, honey, and vanilla extract until well combined.
- Create batter: Gradually add the wet ingredients to the dry ingredients, stirring until the batter is smooth. Let it sit for 5 minutes to thicken.
- Heat pan: Heat a non-stick skillet over medium heat and add a teaspoon of coconut oil.
- Cook pancakes: Pour 1/4 cup of batter for each pancake onto the skillet. Cook for 2-3 minutes until bubbles form on the surface, then flip and cook for another 1-2 minutes.
- Serve warm: Stack the pancakes on a plate and top with mixed berries. Drizzle with extra honey if desired.
These pancakes come out incredibly light with a subtle coconut flavor that pairs perfectly with the tangy berries. For an extra indulgent twist, try adding a dollop of coconut whipped cream on top!
Grilled Shrimp with Cilantro Lime Sauce
Unbelievably easy and packed with flavor, this Grilled Shrimp with Cilantro Lime Sauce is your next go-to for those ‘I need something delicious but don’t want to spend hours in the kitchen’ kind of days. Let’s dive right in, shall we?
Ingredients
- 1 lb large shrimp, peeled and deveined
- 2 tbsp olive oil
- 1 tsp salt
- 1/2 tsp black pepper
- 1/2 tsp garlic powder
- 1/4 cup fresh cilantro, finely chopped
- 2 tbsp lime juice
- 1/4 cup mayonnaise
- 1 tsp honey
Instructions
- Prep the shrimp: In a bowl, toss the shrimp with olive oil, salt, black pepper, and garlic powder until evenly coated. Tip: Let them sit for 10 minutes to soak up all those flavors.
- Make the sauce: Whisk together cilantro, lime juice, mayonnaise, and honey in a small bowl until smooth. Tip: Taste and adjust honey if you like it sweeter.
- Heat the grill: Preheat your grill to medium-high, about 400°F. Tip: Clean the grates well to prevent sticking.
- Grill the shrimp: Place shrimp on the grill and cook for 2-3 minutes per side, until they turn pink and slightly charred. Tip: Don’t overcrowd the grill to ensure even cooking.
- Serve: Drizzle the cilantro lime sauce over the grilled shrimp or serve it on the side for dipping.
The shrimp come out juicy with a perfect char, and the sauce adds a creamy, tangy kick that’s downright addictive. Try skewering them for a fun presentation or tossing them into tacos for a twist!
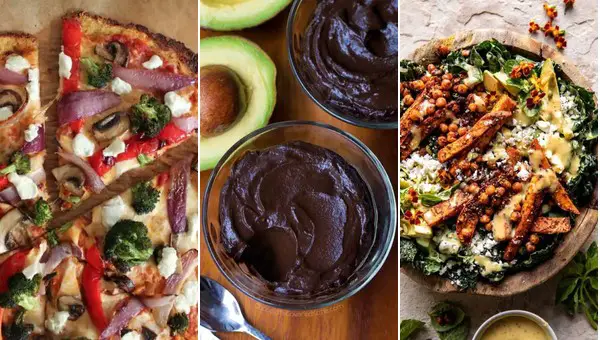
Cauliflower Pizza Crust with Veggie Toppings
Craving pizza but trying to keep it light? Let me introduce you to the game-changer that is cauliflower pizza crust, topped with all your favorite veggies. It’s crispy, it’s flavorful, and yes, it’s actually good for you—no kidding!
Ingredients
- 1 medium head cauliflower, riced (about 3 cups)
- 1 large egg, beaten
- 1/2 cup shredded mozzarella cheese
- 1/4 cup grated Parmesan cheese
- 1/2 tsp dried oregano
- 1/2 tsp garlic powder
- 1/4 tsp salt
- 1 tbsp olive oil
- 1/2 cup marinara sauce
- 1/2 cup sliced bell peppers
- 1/2 cup sliced mushrooms
- 1/4 cup sliced black olives
- 1 cup shredded mozzarella cheese (for topping)
Instructions
- Preheat oven: Heat your oven to 400°F and line a baking sheet with parchment paper.
- Rice cauliflower: Pulse cauliflower florets in a food processor until they resemble rice.
- Cook cauliflower: Microwave riced cauliflower for 4 minutes, then let it cool slightly before squeezing out excess moisture with a clean towel.
- Mix crust: In a bowl, combine the cauliflower, egg, mozzarella, Parmesan, oregano, garlic powder, and salt until well mixed.
- Shape crust: Press the mixture onto the prepared baking sheet into a 1/4-inch thick circle.
- Bake crust: Bake for 20 minutes or until golden and firm to the touch.
- Add toppings: Spread marinara sauce over the crust, then top with bell peppers, mushrooms, olives, and mozzarella cheese.
- Final bake: Return to the oven for 10 minutes, or until the cheese is bubbly and slightly browned.
The crust comes out surprisingly sturdy with a satisfying crunch, while the veggie toppings keep every bite fresh and vibrant. Try serving it with a drizzle of balsamic glaze for an extra pop of flavor!
Herb-Roasted Chicken Thighs
Today’s the day we ditch the takeout menus and whip up something that’ll make your kitchen smell like a gourmet bistro. Let’s talk about these Herb-Roasted Chicken Thighs – juicy, flavorful, and honestly, way easier than you’d think.
Ingredients
- 4 bone-in, skin-on chicken thighs
- 2 tbsp olive oil
- 1 tsp salt
- 1/2 tsp black pepper
- 1 tsp garlic powder
- 1 tsp dried thyme
- 1 tsp dried rosemary
- 1/2 tsp paprika
Instructions
- Preheat oven: Crank that oven to 400°F (200°C) to get it nice and toasty.
- Prep chicken: Pat those chicken thighs dry with paper towels – we’re aiming for crisp skin, not steam.
- Season generously: Rub each thigh with olive oil, then sprinkle both sides with salt, pepper, garlic powder, thyme, rosemary, and paprika. Don’t be shy; this is where the magic happens.
- Arrange for success: Place the thighs skin-side up on a baking sheet lined with foil or parchment for easy cleanup.
- Roast to perfection: Slide them into the oven and roast for 35-40 minutes. You’ll know they’re done when the skin is golden and crispy, and the juices run clear.
- Rest before serving: Let them sit for 5 minutes after roasting. This keeps all those tasty juices right where they belong – inside the chicken.
These thighs come out with skin so crispy you’ll hear it crackle, and meat so tender it practically falls off the bone. Serve them over a bed of garlic mashed potatoes or chop them up for a killer chicken salad tomorrow.
Avocado Chocolate Mousse
Just when you thought avocados couldn’t get any more versatile, here comes a dessert that’ll make you do a double-take. Avocado Chocolate Mousse is the creamy, dreamy treat that’s as easy to make as it is to devour, and trust me, it’s gonna be your new go-to when those chocolate cravings hit.
Ingredients
- 2 ripe avocados, peeled and pitted
- 1/4 cup unsweetened cocoa powder
- 1/4 cup maple syrup
- 1 tsp vanilla extract
- 1/4 cup almond milk
- A pinch of salt
Instructions
- Blend the base: In a food processor, combine the avocados, cocoa powder, maple syrup, vanilla extract, almond milk, and salt. Blend until smooth, scraping down the sides as needed.
- Check consistency: If the mousse is too thick, add a tablespoon of almond milk at a time until you reach your desired consistency. Tip: The mousse will thicken slightly in the fridge, so aim for a bit softer than you’d like.
- Chill to perfection: Transfer the mousse to a bowl and refrigerate for at least 1 hour. Tip: Covering the bowl with plastic wrap touching the surface of the mousse will prevent a skin from forming.
- Serve with flair: Spoon the mousse into serving dishes and top with your favorite toppings like berries, nuts, or a drizzle of extra maple syrup. Tip: For an extra fancy touch, serve in chocolate cups or with a sprinkle of sea salt.
This mousse is luxuriously smooth with a rich chocolate flavor that’s perfectly balanced by the subtle sweetness of maple. It’s the kind of dessert that’ll have your friends guessing the secret ingredient, and when you tell them it’s avocado, well, let’s just say their minds will be blown.
Spiced Pumpkin Soup
Perfect for those crisp fall evenings or whenever you’re craving something cozy, this Spiced Pumpkin Soup is like a warm hug in a bowl. Let’s dive into making this creamy, dreamy dish that’s surprisingly simple to whip up.
Ingredients
- 2 tbsp olive oil
- 1 medium onion, diced
- 2 cloves garlic, minced
- 1 can (15 oz) pumpkin puree
- 3 cups vegetable broth
- 1 cup heavy cream
- 1 tsp ground cinnamon
- 1/2 tsp ground nutmeg
- 1/2 tsp ground ginger
- Salt and pepper to taste
Instructions
- Saute the base: Heat olive oil in a large pot over medium heat. Add diced onion and minced garlic, cooking until the onion is translucent, about 5 minutes.
- Add pumpkin and spices: Stir in the pumpkin puree, cinnamon, nutmeg, and ginger. Cook for 2 minutes to let the spices bloom.
- Pour in liquids: Add vegetable broth and heavy cream, stirring to combine. Bring the mixture to a simmer.
- Simmer to blend flavors: Let the soup simmer for 15 minutes, stirring occasionally. This melds all the flavors together beautifully.
- Season to perfection: Taste and adjust with salt and pepper. Remember, you can always add more, but you can’t take it out!
- Blend for smoothness: Use an immersion blender to puree the soup until smooth. No immersion blender? Carefully transfer to a blender in batches.
- Final simmer: Let the soup simmer for another 5 minutes after blending to ensure it’s perfectly heated through.
This soup is velvety smooth with a rich, spiced flavor that’s not too sweet. Serve it with a dollop of sour cream and a sprinkle of roasted pumpkin seeds for a bit of crunch. Or, go wild and drizzle with a little maple syrup for an extra autumnal touch.
Grilled Portobello Mushrooms with Balsamic Glaze
First off, let’s talk about these Grilled Portobello Mushrooms with Balsamic Glaze – they’re like the steak of the veggie world, minus the moo. Perfect for when you’re craving something meaty but want to keep it green (or, well, brown).
Ingredients
- 4 large Portobello mushrooms, stems removed
- 1/4 cup balsamic vinegar
- 2 tbsp olive oil
- 1 tbsp soy sauce
- 1 tsp minced garlic
- 1/2 tsp dried thyme
- Salt and pepper to taste
Instructions
- Prep the mushrooms: Gently wipe the Portobello caps with a damp paper towel to clean them. Avoid rinsing under water as they’ll soak it up like a sponge.
- Marinate for flavor: In a small bowl, whisk together balsamic vinegar, olive oil, soy sauce, minced garlic, and dried thyme. Brush both sides of the mushrooms with the marinade and let them sit for 10 minutes to soak up all that goodness.
- Grill to perfection: Preheat your grill to medium-high heat (about 400°F). Place the mushrooms on the grill, gill side down first, and cook for 5 minutes. Flip and cook for another 5 minutes until they’re tender and have nice grill marks.
- Glaze and serve: Brush the mushrooms with any remaining marinade during the last minute of grilling for an extra flavor boost. Serve hot off the grill.
These mushrooms come out juicy with a smoky char, and that balsamic glaze? It’s the sweet, tangy cherry on top. Try stacking them on a bun with all the fixings for a killer veggie burger, or slice them up over a salad for a hearty touch.
Cauliflower and Broccoli Casserole
Wow, have I got a cozy, veggie-packed dish for you that’s perfect for those nights when you want something hearty without the heaviness. This Cauliflower and Broccoli Casserole is like a warm hug from your oven, and trust me, it’s as easy to make as it is delicious.
Ingredients
- 1 large head of cauliflower, cut into florets
- 1 large head of broccoli, cut into florets
- 2 cups shredded cheddar cheese
- 1 cup heavy cream
- 2 tbsp butter, melted
- 1 tbsp olive oil
- 1 tsp garlic powder
- 1 tsp onion powder
- 1/2 tsp salt
- 1/2 tsp black pepper
- 1/4 cup breadcrumbs
Instructions
- Preheat oven: Preheat your oven to 375°F (190°C) to get it ready for baking.
- Prep veggies: Toss the cauliflower and broccoli florets with olive oil, garlic powder, onion powder, salt, and pepper on a baking sheet. Spread them out in a single layer for even roasting.
- Roast veggies: Roast in the preheated oven for 20 minutes, or until the edges start to get a little crispy. Tip: Don’t overcrowd the pan, or they’ll steam instead of roast.
- Mix cheese sauce: While the veggies roast, mix the shredded cheddar cheese with heavy cream and melted butter in a bowl until well combined. Tip: Let the cheese sit at room temperature for easier mixing.
- Combine and bake: Transfer the roasted veggies to a casserole dish, pour the cheese sauce over them, and sprinkle breadcrumbs on top. Bake for another 15 minutes, or until the top is golden and bubbly. Tip: For extra crunch, broil for the last 2 minutes.
The casserole comes out with a creamy, cheesy center and a slightly crispy top, making every bite a perfect mix of textures. Serve it alongside a crisp salad or as a standalone dish for a satisfying meal that’ll have everyone asking for seconds.
Chia Seed Pudding with Almond Milk
Alright, let’s dive into making this chia seed pudding that’s as easy as it is delicious. A perfect no-cook breakfast or snack that’ll have you feeling like a meal prep pro with minimal effort.
Ingredients
- 1/4 cup chia seeds
- 1 cup almond milk (unsweetened)
- 1 tbsp maple syrup
- 1/2 tsp vanilla extract
- A pinch of salt
Instructions
- Mix the base: In a medium bowl, whisk together chia seeds, almond milk, maple syrup, vanilla extract, and a pinch of salt until well combined.
- Let it sit: Cover the bowl and let it sit in the fridge for at least 4 hours, or overnight, stirring once after the first 30 minutes to prevent clumping.
- Check consistency: After soaking, give the pudding a stir. If it’s too thick, add a splash more almond milk to reach your desired consistency.
- Serve it up: Divide the pudding into two bowls. Top with your favorite fruits, nuts, or a drizzle of honey for extra sweetness.
This chia seed pudding turns out luxuriously creamy with a slight chew from the seeds, and the almond milk keeps it light and refreshing. Try layering it with fresh berries and granola for a parfait that looks as good as it tastes!
Conclusion
With these 18 delicious Plant Paradox recipes, eating well has never been easier—or tastier! Whether you’re new to the lifestyle or a seasoned pro, there’s something here for everyone. Give them a try, and let us know which dishes are your favorites in the comments below. Don’t forget to share this roundup on Pinterest to inspire others on their healthy living journey. Happy cooking!

I’m Brandon, the face behind the recipes. As a dedicated food enthusiast, I love experimenting with flavors and sharing my culinary adventures with you.