Craving something sweet but need it to be gluten-free? You’re in luck! We’ve rounded up 20 decadent, 5-star-worthy desserts that prove gluten-free doesn’t mean flavor-free. From rich chocolate cakes to melt-in-your-mouth cookies, these treats are so irresistible, no one will guess they’re missing a thing. Ready to indulge? Let’s dive into these heavenly recipes—your sweet tooth will thank you!
Chocolate Avocado Mousse with Fresh Berries
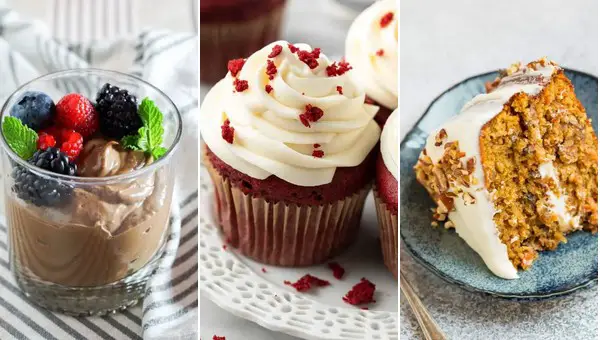
Now, who said healthy can’t be decadent? Dive spoon-first into this velvety Chocolate Avocado Mousse with Fresh Berries, where guilt-free meets sinfully delicious. It’s the perfect dessert to trick your taste buds into thinking you’re indulging, while secretly fueling your body with good fats and antioxidants.
Ingredients
- 2 ripe avocados, pitted and scooped (the riper, the creamier)
- 1/4 cup cocoa powder (unsweetened, for that deep chocolate flavor)
- 1/4 cup maple syrup (or honey, for a touch of natural sweetness)
- 1 tsp vanilla extract (pure, for the best aroma)
- 1/4 cup almond milk (or any milk, to adjust consistency)
- A pinch of salt (to balance the sweetness)
- 1 cup mixed fresh berries (for topping, because color and crunch matter)
Instructions
- In a blender, combine the avocados, cocoa powder, maple syrup, vanilla extract, almond milk, and salt. Blend until smooth, scraping down the sides as needed. Tip: If the mixture is too thick, add a tablespoon more almond milk at a time until desired consistency is reached.
- Once smooth, taste and adjust sweetness with a bit more maple syrup if needed. Tip: The mousse will taste even richer after chilling, so don’t over-sweeten now.
- Transfer the mousse to serving dishes and chill in the refrigerator for at least 1 hour. Tip: Cover with plastic wrap touching the surface to prevent browning.
- Before serving, top with fresh berries for a vibrant contrast.
This mousse is so luxuriously smooth, you’ll forget it’s avocado-based. The berries add a fresh, tangy pop that cuts through the richness, making each bite a perfect balance. Try serving it in espresso cups for a fancy, portion-controlled treat that’ll impress at any dinner party.
Flourless Almond Butter Cookies
Hold onto your aprons, folks, because these Flourless Almond Butter Cookies are about to become your new obsession. They’re so easy, you could whip them up in your sleep (but please, for safety’s sake, don’t).
Ingredients
- 1 cup creamy almond butter (no stir for easier mixing)
- 1/2 cup granulated sugar (or coconut sugar for a healthier twist)
- 1 large egg (room temperature blends better)
- 1/2 tsp baking soda (the secret to the perfect puff)
- 1/4 tsp sea salt (enhances all the flavors)
- 1/2 tsp vanilla extract (pure for the best taste)
- 1/4 cup dark chocolate chips (because chocolate makes everything better)
Instructions
- Preheat your oven to 350°F (175°C) and line a baking sheet with parchment paper. This prevents sticking and makes cleanup a breeze.
- In a medium bowl, mix the almond butter, sugar, egg, baking soda, salt, and vanilla extract until well combined. Tip: A spatula works better than a whisk here to avoid overmixing.
- Fold in the chocolate chips gently. They should be evenly distributed but not smashed.
- Scoop tablespoon-sized balls of dough onto the prepared baking sheet, spacing them about 2 inches apart. They’ll spread, so give them room to breathe.
- Bake for 10-12 minutes, or until the edges are just starting to golden. Tip: They’ll look underdone, but they’ll firm up as they cool—patience is key!
- Let them cool on the baking sheet for 5 minutes before transferring to a wire rack to cool completely. Tip: This step is crucial for that perfect chewy texture.
Bite into these cookies, and you’ll be greeted with a chewy center, a slightly crisp edge, and bursts of chocolate in every bite. Serve them with a cold glass of almond milk for a match made in heaven, or crumble them over your morning yogurt for a decadent breakfast twist.
Gluten-Free Salted Caramel Cheesecake
Today is ‘2025-06-02 00:45:05.281772’, and if you’re anything like us, you’re probably dreaming about dessert right now. This gluten-free salted caramel cheesecake is here to make those dreams a delicious reality, without the gluten but with all the decadence.
Ingredients
- 2 cups gluten-free graham cracker crumbs (or any gluten-free cookie crumbs)
- 1/2 cup melted unsalted butter (or coconut oil for a dairy-free option)
- 24 oz cream cheese, softened (room temperature is key for smooth blending)
- 3/4 cup granulated sugar (adjust to taste)
- 1 tsp vanilla extract (pure for best flavor)
- 3 large eggs (room temperature to prevent cracking)
- 1/2 cup salted caramel sauce (plus extra for drizzling)
- 1/4 tsp sea salt (flaky salt adds a nice texture)
Instructions
- Preheat your oven to 325°F (163°C) and grease a 9-inch springform pan. This ensures your cheesecake doesn’t stick and makes for easy removal.
- Mix the gluten-free graham cracker crumbs with melted butter until well combined. Press firmly into the bottom of the prepared pan to create an even crust. Bake for 10 minutes, then set aside to cool.
- In a large bowl, beat the softened cream cheese until smooth. Gradually add sugar and vanilla extract, beating until fully incorporated. Tip: Scrape down the sides of the bowl to ensure everything mixes evenly.
- Add eggs one at a time, beating just until blended after each addition. Overmixing can incorporate too much air, leading to cracks.
- Pour half of the cream cheese mixture over the crust. Drizzle with 1/4 cup of salted caramel sauce and swirl gently with a knife. Repeat with the remaining mixture and caramel.
- Bake for 45-50 minutes, or until the edges are set but the center still jiggles slightly. Tip: A water bath can help prevent cracks, but isn’t mandatory for deliciousness.
- Turn off the oven and leave the cheesecake inside with the door slightly ajar for 1 hour. This gradual cooling helps prevent sinking.
- Chill in the refrigerator for at least 4 hours, preferably overnight, before serving. Drizzle with additional caramel sauce and a sprinkle of sea salt just before serving.
Perfectly creamy with a hint of salty sweetness, this cheesecake is a showstopper. Serve it with a dollop of whipped cream or a side of fresh berries for an extra touch of elegance.
Vegan Coconut Milk Panna Cotta
Zesty and zippy, this Vegan Coconut Milk Panna Cotta is here to prove that dairy-free desserts can be just as dreamy as their creamy counterparts. Perfect for when you’re craving something sweet but want to keep it light and plant-based.
Ingredients
- 2 cups full-fat coconut milk (shake the can well before opening)
- 1/4 cup maple syrup (or agave for a vegan option)
- 1 tsp vanilla extract (pure for the best flavor)
- 1 1/2 tsp agar agar powder (this is your vegan gelatin, don’t skip it!)
- A pinch of salt (to balance the sweetness)
Instructions
- In a small saucepan, combine the coconut milk, maple syrup, vanilla extract, and a pinch of salt. Warm over medium heat until it just begins to simmer, about 5 minutes, stirring occasionally.
- Sprinkle the agar agar powder over the warm mixture, whisking vigorously to prevent clumps. Continue to cook for another 2 minutes, ensuring the agar agar fully dissolves.
- Remove the saucepan from heat and let the mixture cool for a minute before dividing it evenly among 4 small ramekins or glasses.
- Refrigerate the panna cotta for at least 4 hours, or until set. Tip: Cover with plastic wrap to prevent a skin from forming on top.
- Once set, run a knife around the edge of each ramekin and invert onto a plate to serve. Tip: For a stress-free flip, dip the ramekin in warm water for 10 seconds first.
- Serve chilled, garnished with fresh berries or a drizzle of chocolate sauce for an extra decadent touch. Tip: For a tropical twist, top with toasted coconut flakes.
Silky smooth with a subtle coconut flavor, this panna cotta is a breeze to make and even easier to devour. Try layering it with fruit compote for a stunning parfait effect that’ll wow at any dinner party.
Classic Gluten-Free Tiramisu
Oh, the joys of diving into a dessert that doesn’t play by the rules but still steals the show! Our Classic Gluten-Free Tiramisu is here to prove that indulgence doesn’t need a gluten pass to be absolutely irresistible.
Ingredients
- 6 large egg yolks (room temperature for smoother blending)
- 3/4 cup granulated sugar (because life’s sweet enough, but dessert should be sweeter)
- 2/3 cup milk (whole milk for richness, but any will do in a pinch)
- 1 1/4 cups heavy cream (chilled, because we’re whipping it into submission)
- 8 oz mascarpone cheese (also room temp, unless you enjoy a lumpy struggle)
- 1 cup strong brewed coffee, cooled (espresso is the dream, but we won’t tell if you cheat)
- 2 tbsp coffee liqueur (optional, but highly recommended for a boozy kick)
- 24 gluten-free ladyfingers (because traditional ones are gluten gatekeepers)
- Unsweetened cocoa powder, for dusting (the final flourish that says ‘I’m fancy’)
Instructions
- In a medium saucepan, whisk together egg yolks and sugar until well blended. Gradually whisk in milk.
- Cook over medium heat, stirring constantly, until mixture thickens and coats the back of a spoon, about 10 minutes. Tip: Don’t rush this step; patience prevents scrambled eggs in your dessert.
- Remove from heat and let cool slightly. Then, whisk in mascarpone until smooth. Set aside.
- In a large bowl, beat heavy cream until stiff peaks form. Gently fold into the mascarpone mixture. Tip: Fold, don’t stir, to keep the mixture light and airy.
- Combine cooled coffee and coffee liqueur in a shallow dish. Quickly dip each ladyfinger into the coffee mixture (1-2 seconds per side) and layer in the bottom of a 9×13-inch dish.
- Spread half of the mascarpone mixture over the ladyfingers. Repeat layers with remaining ladyfingers and mascarpone mixture.
- Cover and refrigerate for at least 4 hours, preferably overnight. Tip: This is the hardest part—waiting. But trust us, it’s worth it.
- Before serving, dust the top with cocoa powder. Use a sieve for an even, professional-looking dusting.
Just like that, you’ve got a dessert that’s creamy, dreamy, and gluten-free. The layers of coffee-soaked ladyfingers and lush mascarpone cream come together in a symphony of textures and flavors. Serve it up in elegant glasses for a personal touch, or go family-style and let everyone dig in straight from the dish.
No-Bake Peanut Butter Chocolate Bars
Dive into the world of no-fuss, no-bake desserts with these irresistible No-Bake Peanut Butter Chocolate Bars that’ll have you sneaking bites straight from the pan. Perfect for when your sweet tooth strikes but the oven’s off-duty, these bars are a decadent mash-up of creamy peanut butter and rich chocolate that’s downright magical.
Ingredients
- 1 1/2 cups graham cracker crumbs (or crushed digestive biscuits for a twist)
- 1 cup creamy peanut butter (the gooier, the better)
- 1/2 cup unsalted butter, melted (because everything’s better with butter)
- 1 1/2 cups powdered sugar (sift it to avoid lumps)
- 1 cup semi-sweet chocolate chips (or dark chocolate for the bold)
- 1/4 cup milk (any kind you fancy)
Instructions
- In a large bowl, mix graham cracker crumbs, peanut butter, melted butter, and powdered sugar until well combined. Tip: Use your hands for the best mix—it’s messy but fun!
- Press the mixture firmly into an 8×8 inch pan lined with parchment paper. Tip: A flat-bottomed glass helps to smooth it out evenly.
- In a microwave-safe bowl, combine chocolate chips and milk. Microwave in 30-second intervals, stirring in between, until smooth. Tip: Don’t overheat—chocolate burns faster than your last diet attempt.
- Pour the melted chocolate over the peanut butter layer, spreading it gently with a spatula.
- Chill in the refrigerator for at least 2 hours, or until the chocolate is set. Tip: Impatient? The freezer speeds things up!
- Cut into bars and serve. For an extra flair, sprinkle with sea salt or crushed peanuts before the chocolate sets.
Craving something that’s both crunchy and creamy? These bars are your dream come true, with a texture that’s firm yet yielding, and a flavor that’s a perfect balance of sweet and salty. Serve them chilled with a glass of cold milk, or get fancy by drizzling with caramel for an over-the-top treat.
Gluten-Free Lemon Blueberry Tart
Just when you thought gluten-free desserts couldn’t get any more delightful, along comes this zesty, berry-packed tart that’s about to steal the show at your next brunch or dessert table. It’s the perfect blend of tangy and sweet, with a crust so crisp you’ll forget it’s gluten-free!
Ingredients
- 1 1/2 cups almond flour (for a nutty, tender crust)
- 1/4 cup coconut oil, melted (or any neutral oil for a subtle flavor)
- 2 tbsp maple syrup (adjust to taste for sweetness)
- 1 cup fresh blueberries (frozen works in a pinch, but thaw first)
- 1/4 cup lemon juice (freshly squeezed for the brightest flavor)
- 1 tbsp lemon zest (because more lemon is always better)
- 1/2 cup coconut cream (chilled overnight for best results)
- 2 tbsp powdered sugar (for that Instagram-worthy dusting)
Instructions
- Preheat your oven to 350°F (175°C) and lightly grease a 9-inch tart pan.
- In a bowl, mix almond flour, melted coconut oil, and maple syrup until a dough forms. Press evenly into the tart pan. Tip: Use the bottom of a measuring cup to smooth the dough for an even crust.
- Bake the crust for 10-12 minutes until golden. Let it cool completely. Tip: Cooling prevents the crust from getting soggy when adding the filling.
- While the crust cools, whisk together lemon juice, lemon zest, and coconut cream until smooth. Fold in blueberries gently to avoid crushing them.
- Pour the filling into the cooled crust and refrigerate for at least 2 hours, until set. Tip: For a firmer set, leave it in the fridge overnight.
- Before serving, dust with powdered sugar for a sweet finish.
This tart is a symphony of textures, from the crunchy almond crust to the creamy, berry-studded filling. Try serving it with a dollop of whipped coconut cream for an extra indulgent touch or garnish with edible flowers for a pop of color.
Rich Flourless Chocolate Cake
Magnificent, isn’t it? The mere thought of a flourless chocolate cake can make your taste buds do a happy dance. This decadent delight is the superhero of desserts—gluten-free, rich, and unapologetically chocolatey. Perfect for when you want to indulge without the guilt (or the flour).
Ingredients
- 1 cup semisweet chocolate chips (or chop up your favorite dark chocolate bar)
- 1/2 cup unsalted butter (because salted butter in desserts is a crime)
- 3/4 cup granulated sugar (adjust if you’re team less-sweet)
- 3 large eggs (room temperature, unless you enjoy the thrill of lumpy batter)
- 1/2 cup unsweetened cocoa powder (the darker, the better)
- 1 tsp vanilla extract (the secret handshake of baking)
- 1/4 tsp salt (to make the chocolate sing)
Instructions
- Preheat your oven to 375°F (190°C). Grease an 8-inch round cake pan and line the bottom with parchment paper for a foolproof release.
- In a microwave-safe bowl, melt the chocolate chips and butter together in 30-second bursts, stirring in between, until smooth. No microwave? A double boiler works too—just don’t let the water boil over.
- Whisk in the sugar until it’s fully incorporated. The mixture should look shiny and slightly grainy—that’s the sugar doing its thing.
- Add the eggs one at a time, whisking well after each addition. This is your arm workout for the day.
- Sift in the cocoa powder and salt, then add the vanilla extract. Fold gently until just combined. Overmixing is the enemy of fudgy texture.
- Pour the batter into the prepared pan and smooth the top with a spatula. Bake for 25 minutes—the cake should be set but still a bit jiggly in the center.
- Let the cake cool in the pan for 10 minutes, then transfer to a wire rack to cool completely. Patience is key here; cutting into it too soon is a recipe for crumbly disaster.
Rich beyond belief, this cake is like a chocolate truffle in slice form. Serve it with a dusting of powdered sugar or a dollop of whipped cream for extra flair. Or, go rogue and pair it with a scoop of vanilla ice cream—because why not?
Gluten-Free Apple Crumble with Oats
Howdy, dessert lovers! If you’re on the hunt for a gluten-free treat that’s as easy to make as it is delicious to eat, you’ve just struck gold. This apple crumble with oats is your ticket to dessert heaven, no gluten passport required.
Ingredients
- 4 cups peeled, diced apples (Granny Smith for tartness or Honeycrisp for sweetness)
- 1 cup gluten-free oats (certified gluten-free to avoid cross-contamination)
- 1/2 cup almond flour (for a nutty flavor, or sub with coconut flour)
- 1/4 cup maple syrup (adjust to taste, or use honey for a different sweetness profile)
- 2 tbsp coconut oil, melted (or any neutral oil)
- 1 tsp cinnamon (because apple and cinnamon are BFFs)
- 1/4 tsp salt (to balance the sweetness)
Instructions
- Preheat your oven to 350°F (175°C) and lightly grease an 8-inch baking dish. This ensures your crumble doesn’t stick and makes cleanup a breeze.
- In a large bowl, toss the diced apples with 1/2 tsp cinnamon until evenly coated. This step is where the magic starts, so don’t skimp on the cinnamon!
- Spread the apple mixture evenly in the prepared baking dish. A little patience here ensures every bite is apple-y goodness.
- In the same bowl, mix the gluten-free oats, almond flour, remaining cinnamon, salt, and maple syrup. Stir in the melted coconut oil until the mixture resembles coarse crumbs. Tip: If the mixture feels too dry, add a tad more maple syrup or oil.
- Sprinkle the oat mixture over the apples, covering them completely. Press down lightly to create a crust that’ll crisp up beautifully in the oven.
- Bake for 30-35 minutes, or until the topping is golden brown and the apples are bubbling around the edges. The smell? Absolutely divine.
Voilà! You’ve just made a gluten-free apple crumble that’s crispy on top, tender in the middle, and bursting with flavor. Serve it warm with a scoop of vanilla ice cream for that classic combo, or get adventurous with a dollop of coconut whipped cream. Either way, it’s a win.
Pumpkin Spice Chia Pudding
Kickstart your morning with a dish that’s as fun to make as it is to eat—Pumpkin Spice Chia Pudding. This autumnal delight packs a punch of flavor and nutrition, proving that healthy can indeed be delicious.
Ingredients
- 1/2 cup chia seeds (for that perfect pudding consistency)
- 2 cups almond milk (or any milk of your choice, for creaminess)
- 1/2 cup pumpkin puree (not pie filling, for real pumpkin flavor)
- 2 tbsp maple syrup (adjust to sweetness preference)
- 1 tsp vanilla extract (for a hint of warmth)
- 1 tsp pumpkin spice (because it’s not fall without it)
- A pinch of salt (to balance the sweetness)
Instructions
- In a medium bowl, whisk together almond milk, pumpkin puree, maple syrup, vanilla extract, pumpkin spice, and salt until well combined.
- Add chia seeds to the mixture, stirring vigorously to prevent clumping. Tip: Let it sit for 5 minutes, then stir again to ensure even soaking.
- Cover the bowl and refrigerate for at least 4 hours, or overnight, until the mixture thickens to a pudding-like consistency. Tip: Overnight soaking yields the best texture.
- Give the pudding a good stir before serving to fluff it up. Tip: If it’s too thick, stir in a little more almond milk to reach your desired consistency.
Unbelievably creamy and packed with the cozy flavors of fall, this Pumpkin Spice Chia Pudding is a breakfast game-changer. Serve it topped with granola for crunch or a dollop of whipped cream for extra indulgence.
Gluten-Free Red Velvet Cupcakes
Kick off your baking shoes because we’re about to dive into the world of gluten-free goodness that doesn’t skimp on flavor or fun. These red velvet cupcakes are here to prove that gluten-free can be just as decadent and delicious as the traditional version, with a playful twist that’ll have everyone asking for seconds.
Ingredients
- 1 1/2 cups gluten-free flour blend (look for one with xanthan gum included)
- 1 cup granulated sugar (because life’s too short for less sweetness)
- 1/4 cup unsweetened cocoa powder (the darker, the better for that rich color)
- 1 tsp baking soda (the magic that makes them rise)
- 1/2 tsp salt (to balance the sweetness)
- 1 cup buttermilk (or a DIY version with milk + 1 tbsp lemon juice, let sit for 5 mins)
- 1/2 cup vegetable oil (or any neutral oil you have on hand)
- 2 large eggs (room temperature for best results)
- 2 tbsp red food coloring (go for the gel kind for vibrant color)
- 1 tsp vanilla extract (the secret flavor booster)
- 1 tsp white vinegar (trust us, it’s essential)
Instructions
- Preheat your oven to 350°F (175°C) and line a muffin tin with cupcake liners. This ensures no sticking and easy cleanup.
- In a large bowl, whisk together the gluten-free flour blend, sugar, cocoa powder, baking soda, and salt. Tip: Sifting the dry ingredients can prevent lumps for a smoother batter.
- In another bowl, mix the buttermilk, vegetable oil, eggs, red food coloring, vanilla extract, and white vinegar until well combined. Tip: Adding the vinegar last helps activate the baking soda for a better rise.
- Gradually add the wet ingredients to the dry ingredients, stirring until just combined. Overmixing can lead to dense cupcakes, so stop when you no longer see dry flour.
- Divide the batter evenly among the prepared cupcake liners, filling each about 2/3 full. Tip: An ice cream scoop can make this step mess-free and ensure uniform sizes.
- Bake for 18-20 minutes, or until a toothpick inserted into the center comes out clean. The tops should spring back when lightly touched.
- Allow the cupcakes to cool in the pan for 5 minutes, then transfer to a wire rack to cool completely before frosting.
These cupcakes boast a tender crumb and a rich, velvety texture that’s perfectly balanced with a subtle cocoa flavor. Serve them with a dollop of cream cheese frosting and a sprinkle of edible glitter for that extra wow factor at your next gathering.
Hazelnut Chocolate Truffles
Delightfully decadent and dangerously addictive, these Hazelnut Chocolate Truffles are the little bites of joy your dessert table has been missing. Perfect for when you want to impress without the stress, they’re like rolling in luxury—literally, because you’ll be rolling them in cocoa powder.
Ingredients
- 1 cup heavy cream (for a richer taste, try using double cream)
- 12 oz semisweet chocolate, finely chopped (the better the chocolate, the better the truffle)
- 1/2 cup hazelnuts, toasted and finely chopped (because crunch is everything)
- 2 tbsp unsalted butter, softened (for that silky smooth texture)
- 1 tsp vanilla extract (the secret whisper of flavor)
- 1/2 cup cocoa powder, for rolling (or get creative with crushed nuts or coconut)
Instructions
- In a small saucepan, heat the heavy cream over medium heat until it just begins to simmer, about 3-4 minutes. Watch closely to avoid boiling.
- Place the chopped chocolate in a heatproof bowl. Pour the hot cream over the chocolate and let it sit for 2 minutes to soften.
- Add the butter and vanilla extract to the bowl. Stir gently until the mixture is smooth and glossy. Tip: If the chocolate isn’t fully melting, you can microwave the mixture in 10-second bursts, stirring in between.
- Fold in the chopped hazelnuts until evenly distributed. Cover the bowl with plastic wrap and refrigerate for at least 2 hours, or until the mixture is firm enough to scoop.
- Using a small scoop or a tablespoon, portion the mixture and roll into 1-inch balls. Tip: For easier handling, lightly oil your hands or wear food-safe gloves.
- Roll each truffle in cocoa powder until fully coated. Tip: For a variety, try rolling some in additional chopped hazelnuts or even a mix of cocoa and espresso powder for a mocha twist.
- Place the finished truffles on a parchment-lined tray and refrigerate for another 30 minutes to set.
Bite into these truffles to discover a creamy center with a delightful crunch, all wrapped up in a dusting of cocoa that’s as fun to make as it is to eat. Serve them in mini cupcake liners for a party, or keep them all to yourself—we won’t judge.
Gluten-Free Key Lime Pie
Ready to dive into a dessert that’s as zesty as your Aunt Linda’s comments at Thanksgiving? This gluten-free key lime pie is a tangy, creamy dream that’ll have you forgetting all about its wheat-filled counterparts. Plus, it’s so easy, even your cat could probably make it (but please don’t let your cat in the kitchen).
Ingredients
- 1 1/2 cups gluten-free graham cracker crumbs (or make your own by blitzing gluten-free cookies)
- 1/3 cup melted butter (or coconut oil for a dairy-free twist)
- 1/4 cup granulated sugar (because life’s sweet enough, but not that sweet)
- 3 large egg yolks (save the whites for an omelet or, you know, a protein-packed snack)
- 1 can (14 oz) sweetened condensed milk (the secret to its creamy goodness)
- 1/2 cup key lime juice (freshly squeezed is best, but bottled works in a pinch)
- 1 tbsp key lime zest (for that extra zing)
- 1 cup heavy whipping cream (chilled, because patience is a virtue)
- 2 tbsp powdered sugar (to sweeten the deal)
Instructions
- Preheat your oven to 350°F (175°C) because we’re not savages—we bake our pies.
- In a medium bowl, mix the gluten-free graham cracker crumbs, melted butter, and granulated sugar until it resembles wet sand. Tip: Press the mixture firmly into your pie dish to avoid a crumbly disaster.
- Bake the crust for 10 minutes, then let it cool. Meanwhile, whisk together the egg yolks and sweetened condensed milk until smooth. Tip: Room temperature egg yolks mix better, so plan ahead.
- Stir in the key lime juice and zest until the mixture thickens slightly. Pour into the cooled crust.
- Bake for 15 minutes, then cool to room temperature before chilling in the fridge for at least 4 hours. Tip: Cover with plastic wrap to prevent fridge smells from crashing the party.
- Before serving, beat the heavy whipping cream and powdered sugar until stiff peaks form. Spread over the pie or dollop on individual slices.
Every bite of this pie is a creamy, tangy symphony with a crumbly gluten-free crust that holds its own. Serve it with a sprinkle of extra zest or a side of ‘how did you make this gluten-free?’ compliments.
Raspberry Almond Thumbprint Cookies
Oh, the joy of biting into a cookie that’s both buttery and jammy, with a nutty crunch that makes your taste buds do a happy dance! These Raspberry Almond Thumbprint Cookies are the little gems of the cookie world, perfect for when you want something sweet, but not too sweet, and oh-so-pretty to look at.
Ingredients
- 1 cup unsalted butter, softened (because life’s too short for hard butter)
- 2/3 cup granulated sugar (for that sweet, sweet love)
- 1/2 teaspoon almond extract (or vanilla, if you’re feeling rebellious)
- 2 cups all-purpose flour (the backbone of our cookie operation)
- 1/2 cup raspberry jam (the star of the show, go for seedless if you’re fancy)
- 1/2 cup sliced almonds, toasted (for that crunch factor)
Instructions
- Preheat your oven to 350°F (175°C) because we’re not baking with wishes and dreams.
- In a large bowl, cream together the softened butter and sugar until light and fluffy. This is where your arm workout comes in, or you know, use a mixer.
- Mix in the almond extract, because flavor is key, and then gradually add the flour until the dough comes together. Tip: If the dough feels too sticky, chill it for 30 minutes. It’s like a time-out, but for cookies.
- Roll the dough into 1-inch balls, then make a thumbprint in the center of each. Yes, literally use your thumb – it’s called thumbprint cookies for a reason.
- Fill each thumbprint with about 1/2 teaspoon of raspberry jam. Don’t overfill, unless you want a jammy mess (no judgment here).
- Sprinkle the toasted almonds around the edges of each cookie for that nutty goodness and extra crunch.
- Bake for 12-15 minutes, or until the edges are just starting to turn golden. Tip: They’ll continue to firm up as they cool, so resist the urge to eat them straight out of the oven.
- Let them cool on the baking sheet for 5 minutes, then transfer to a wire rack to cool completely. Patience is a virtue, especially in baking.
How delightful are these cookies? The buttery base, the tangy raspberry jam, and the crunchy almonds create a symphony of textures and flavors. Serve them at your next tea party, or just hoard them all for yourself – we won’t tell.
Gluten-Free Carrot Cake with Cream Cheese Frosting
Oh, the joys of finding a gluten-free dessert that doesn’t taste like you’re chewing on cardboard! This carrot cake is so moist, flavorful, and downright delicious, you’ll forget it’s missing the gluten. Perfect for those with dietary restrictions or anyone who loves a good cake (because, let’s be honest, who doesn’t?).
Ingredients
- 2 cups gluten-free all-purpose flour (look for a blend with xanthan gum)
- 1 tsp baking soda (make sure it’s fresh for maximum rise)
- 1/2 tsp salt (sea salt adds a nice touch)
- 1 1/2 tsp ground cinnamon (or pumpkin spice for a twist)
- 4 large eggs (room temperature for best results)
- 1 cup granulated sugar (can sub coconut sugar for a healthier option)
- 1 cup brown sugar (packed, for that deep molasses flavor)
- 1 cup vegetable oil (or any neutral oil)
- 3 cups grated carrots (about 4-5 medium carrots, don’t skimp!)
- 1 cup chopped walnuts (optional, but highly recommended for crunch)
- 8 oz cream cheese, softened (full-fat for the creamiest frosting)
- 1/4 cup unsalted butter, softened (salted works in a pinch)
- 2 cups powdered sugar (sifted to avoid lumps)
- 1 tsp vanilla extract (pure, not imitation, for the best flavor)
Instructions
- Preheat your oven to 350°F (175°C) and grease two 9-inch round cake pans. Line the bottoms with parchment paper for easy removal.
- In a medium bowl, whisk together the gluten-free flour, baking soda, salt, and cinnamon. Set aside.
- In a large bowl, beat the eggs, granulated sugar, brown sugar, and oil until well combined. Tip: Use a hand mixer for ease and to ensure a smooth batter.
- Gradually add the dry ingredients to the wet ingredients, mixing just until combined. Overmixing can lead to a tough cake.
- Fold in the grated carrots and walnuts (if using) until evenly distributed throughout the batter.
- Divide the batter evenly between the prepared pans. Bake for 25-30 minutes, or until a toothpick inserted into the center comes out clean. Tip: Rotate the pans halfway through baking for even cooking.
- Let the cakes cool in the pans for 10 minutes, then transfer to a wire rack to cool completely. Tip: Cooling completely prevents the frosting from melting.
- For the frosting, beat the cream cheese and butter together until smooth. Gradually add the powdered sugar and vanilla, beating until light and fluffy.
- Once the cakes are cool, frost the top of one layer, place the second layer on top, and frost the top and sides of the cake.
Carrot cake that’s gluten-free but full of flavor? Check. Cream cheese frosting that’s rich and tangy? Double check. Serve this beauty at your next gathering or keep it all to yourself—we won’t judge. Either way, it’s a guaranteed hit.
Banana Bread Pudding with Cinnamon Glaze
Ready to turn those sad, overripe bananas sitting on your counter into something spectacular? Let’s dive into a dessert that’s like a cozy hug for your taste buds, with a sweet twist that’ll have you coming back for seconds (or thirds, no judgment here).
Ingredients
- 4 cups day-old bread, cubed (stale bread absorbs better)
- 3 large overripe bananas, mashed (the spottier, the sweeter)
- 2 cups whole milk (for richness, but any milk works)
- 3 large eggs (room temperature blends smoother)
- 1/2 cup granulated sugar (adjust if bananas are very sweet)
- 1 tsp vanilla extract (the real deal, please)
- 1/2 tsp ground cinnamon (or more, because why not?)
- 1/4 tsp salt (balances the sweetness)
- 1/2 cup powdered sugar (for the glaze, sifted to avoid lumps)
- 2 tbsp milk (for the glaze, adjust to desired consistency)
- 1/2 tsp ground cinnamon (for the glaze, because more cinnamon is always better)
Instructions
- Preheat your oven to 350°F (175°C) and grease a 9×13 inch baking dish. This ensures your pudding doesn’t stick and makes cleanup a breeze.
- In a large bowl, whisk together the mashed bananas, milk, eggs, granulated sugar, vanilla extract, cinnamon, and salt until well combined. Tip: A fork works great for mashing bananas right in the bowl.
- Add the bread cubes to the banana mixture, gently folding until all the bread is coated and has absorbed some of the liquid. Let it sit for 10 minutes to soak up more flavor.
- Pour the mixture into the prepared baking dish, spreading it out evenly. Bake for 45-50 minutes, or until the top is golden and the center is set. Tip: A toothpick inserted in the center should come out clean.
- While the pudding bakes, make the cinnamon glaze by whisking together powdered sugar, milk, and cinnamon until smooth. Adjust the milk for your preferred thickness.
- Once the pudding is done, let it cool for about 10 minutes before drizzling with the cinnamon glaze. Tip: Drizzle while warm so the glaze seeps into the pudding slightly.
Just imagine the creamy, banana-packed layers with pockets of soft bread, all hugged by a sweet cinnamon glaze. Serve it warm with a scoop of vanilla ice cream for an extra indulgent treat, or enjoy it as is for breakfast (we won’t tell).
Gluten-Free Matcha Green Tea Cookies
Whisking up a storm in the kitchen just got a whole lot greener with these gluten-free matcha green tea cookies. Perfect for when you’re craving something sweet but want to keep it on the healthier side, these little gems are like a hug from the inside—with a caffeine kick!
Ingredients
- 1 cup gluten-free flour blend (look for one with xanthan gum for better texture)
- 1/2 cup coconut sugar (or granulated sugar, if you prefer)
- 1/4 cup unsalted butter, softened (or coconut oil for a dairy-free version)
- 1 large egg (room temperature for smoother mixing)
- 1 tbsp matcha green tea powder (culinary grade for the best flavor)
- 1/2 tsp vanilla extract (the real deal, not imitation)
- 1/4 tsp baking soda (fresh for maximum rise)
- 1/8 tsp salt (just a pinch to balance the sweetness)
Instructions
- Preheat your oven to 350°F (175°C) and line a baking sheet with parchment paper to prevent sticking.
- In a medium bowl, cream together the softened butter and coconut sugar until light and fluffy, about 2 minutes. Tip: Scrape down the sides of the bowl to ensure everything mixes evenly.
- Beat in the egg and vanilla extract until fully incorporated. The mixture should look smooth and slightly glossy.
- Sift in the gluten-free flour, matcha powder, baking soda, and salt. Fold gently until just combined—overmixing can lead to tough cookies. Tip: A spatula works best here to keep the dough tender.
- Scoop tablespoon-sized balls of dough onto the prepared baking sheet, spacing them about 2 inches apart. They’ll spread a bit as they bake.
- Bake for 10-12 minutes, or until the edges are just starting to turn golden. Tip: The cookies will continue to firm up as they cool, so don’t overbake for a softer center.
- Let the cookies cool on the baking sheet for 5 minutes before transferring to a wire rack to cool completely.
Light as air with a delicate crumb, these cookies pack a punch of earthy matcha flavor that’s perfectly balanced by the sweetness of the dough. Serve them alongside a cup of hot tea for a matcha double-whammy, or crumble them over vanilla ice cream for an unexpected twist.
Strawberry Rhubarb Crisp with Almond Topping
Feast your eyes and forks on this divine Strawberry Rhubarb Crisp with Almond Topping, a dessert that’s as fun to make as it is to devour. Perfect for those who love a little tart with their sweet, this dish is a summer soirée superstar.
Ingredients
- 4 cups fresh strawberries, hulled and halved (frozen works in a pinch)
- 2 cups rhubarb, chopped into 1/2-inch pieces (no leaves, they’re toxic!)
- 1 cup granulated sugar (adjust to taste based on fruit sweetness)
- 1 tbsp lemon juice (freshly squeezed for that zing)
- 1 cup all-purpose flour (spooned and leveled for accuracy)
- 1/2 cup packed brown sugar (light or dark, your call)
- 1/2 cup rolled oats (not instant, for the perfect crunch)
- 1/2 cup sliced almonds (toasted for extra flavor, if you’re fancy)
- 1/2 tsp salt (because balance is key)
- 1/2 cup unsalted butter, melted (or coconut oil for a vegan twist)
Instructions
- Preheat your oven to 375°F (190°C) and grab a 9×13 inch baking dish. No greasing needed—this baby is self-lubricating.
- In a large bowl, toss strawberries, rhubarb, granulated sugar, and lemon juice until the fruit is evenly coated. Let it sit for 10 minutes to macerate—fancy for ‘get juicy’.
- Meanwhile, in another bowl, mix flour, brown sugar, oats, almonds, and salt. Drizzle in melted butter and stir until the mixture resembles coarse crumbs. Pro tip: Use your hands for a more tactile experience.
- Spread the fruit mixture evenly in the baking dish. Sprinkle the topping over the fruit, covering it completely. No fruit left behind!
- Bake for 35-40 minutes, or until the topping is golden brown and the fruit is bubbling like a science experiment gone right.
- Let it cool for at least 15 minutes before serving—unless you enjoy molten fruit lava. We don’t judge.
Velvety soft fruit meets a crunchy, nutty topping in this crisp, creating a texture party in your mouth. Serve it warm with a scoop of vanilla ice cream for the ultimate ‘I love me’ moment, or go rogue with a dollop of whipped cream and a sprinkle of extra almonds.
Gluten-Free Dark Chocolate Brownies
Craving something decadently chocolatey but gluten-free? These dark chocolate brownies are here to save your day (and your diet excuses) with their rich, fudgy goodness that nobody will believe is missing the gluten.
Ingredients
- 1 cup almond flour (for that perfect, nutty base)
- 1/2 cup cocoa powder (the darker, the better)
- 1/2 tsp baking powder (the unsung hero of rise)
- 1/4 tsp salt (to make the chocolate pop)
- 2 large eggs (room temperature, please)
- 1/2 cup maple syrup (or honey, if you’re feeling fancy)
- 1/4 cup melted coconut oil (or any neutral oil, but coconut adds a hint of magic)
- 1 tsp vanilla extract (because vanilla is always a good idea)
- 1/2 cup dark chocolate chips (because more chocolate is never wrong)
Instructions
- Preheat your oven to 350°F (175°C) and line an 8×8 inch baking pan with parchment paper, leaving some overhang for easy removal.
- In a large bowl, whisk together the almond flour, cocoa powder, baking powder, and salt until no lumps remain.
- In another bowl, beat the eggs, then mix in the maple syrup, melted coconut oil, and vanilla extract until well combined.
- Pour the wet ingredients into the dry ingredients and stir until just combined. Tip: Overmixing is the enemy of fudgy brownies.
- Fold in the dark chocolate chips, reserving a handful to sprinkle on top for that Instagram-worthy finish.
- Spread the batter evenly into the prepared pan and sprinkle the reserved chocolate chips on top.
- Bake for 20-25 minutes, or until the edges are set but the center is still slightly soft. Tip: A toothpick inserted should come out with a few moist crumbs, not clean.
- Let the brownies cool in the pan for at least 10 minutes before lifting them out using the parchment overhang. Tip: Patience is key here; cooling ensures they set properly.
Get ready to dive into brownies that are outrageously moist, with a deep chocolate flavor that’s perfectly balanced by a slight nuttiness. Serve them warm with a scoop of vanilla ice cream for an unbeatable duo, or enjoy them as is for a gluten-free treat that doesn’t skimp on indulgence.
Coconut Macaroons Dipped in Chocolate
Now, let’s talk about a little piece of heaven that’s deceptively simple to make but will have your friends thinking you’ve been hiding a pastry chef in your closet. Coconut macaroons dipped in chocolate are the perfect blend of chewy, sweet, and just a tad indulgent.
Ingredients
- 14 oz sweetened shredded coconut (pack it down when measuring)
- 14 oz sweetened condensed milk (because we’re not messing around with sweetness)
- 1 tsp vanilla extract (the good stuff, please)
- 2 large egg whites (room temperature is your friend here)
- 1/4 tsp salt (just a pinch to balance the sweet)
- 8 oz semi-sweet chocolate chips (or dark if you’re feeling fancy)
- 1 tbsp coconut oil (for that silky chocolate dip)
Instructions
- Preheat your oven to 325°F (163°C) and line a baking sheet with parchment paper. No sticking, no crying.
- In a large bowl, mix together the shredded coconut, sweetened condensed milk, and vanilla extract until well combined. Think of it as a coconutty hug.
- In a separate bowl, beat the egg whites and salt until stiff peaks form. This is where your arm gets a workout, so no skimping!
- Gently fold the beaten egg whites into the coconut mixture. Be gentle; you’re not making a smoothie.
- Using a cookie scoop or your hands, form the mixture into small mounds on the prepared baking sheet. They should look like little coconut snowballs.
- Bake for 20-25 minutes, or until the macaroons are golden brown. Keep an eye on them; they go from golden to ‘oops’ quickly.
- Let the macaroons cool completely on the baking sheet. Patience is a virtue, especially with desserts.
- In a microwave-safe bowl, melt the chocolate chips and coconut oil in 30-second bursts, stirring in between, until smooth. No one likes burnt chocolate.
- Dip the bottom of each macaroon into the melted chocolate, then place them back on the parchment paper to set. For extra flair, drizzle more chocolate on top.
- Let the chocolate set at room temperature or pop them in the fridge for a quicker fix. Either way, they’re worth the wait.
Crunchy on the outside, chewy on the inside, and with that rich chocolate finish, these macaroons are a textural dream. Serve them on a platter at your next gathering, or keep them all to yourself—we won’t judge.
Conclusion
With 20 decadent, gluten-free desserts that are truly irresistible, this roundup has something for every sweet tooth! Whether you’re baking for a special occasion or just treating yourself, these 5-star recipes are sure to delight. Don’t forget to try your favorites, leave a comment below, and share the love by pinning this article on Pinterest. Happy baking!

I’m Brandon, the face behind the recipes. As a dedicated food enthusiast, I love experimenting with flavors and sharing my culinary adventures with you.