‘Tis the season for festive feasting—without the guilt! Whether you’re hosting a holiday gathering or simply craving cozy, wholesome flavors, we’ve rounded up 20 deliciously healthy Christmas recipes that are as nourishing as they are festive. From show-stopping mains to decadent (yet lightened-up) desserts, these dishes prove you can savor every bite while staying on track. Ready to cook up some holiday magic? Let’s dig in!
Roasted Brussels Sprouts with Balsamic Glaze
Brussels sprouts might just be the underdog of the veggie world, but toss them in the oven with a little love and a balsamic glaze, and they’ll steal the show at your dinner table. Trust me, even the skeptics will be coming back for seconds.
Ingredients
- 1.5 lbs Brussels sprouts, trimmed and halved
- 3 tbsp olive oil
- 1 tsp salt
- 1/2 tsp black pepper
- 1/4 cup balsamic vinegar
- 2 tbsp honey
- 1 clove garlic, minced
Instructions
- Preheat oven: Crank your oven to 400°F (200°C) to get it nice and toasty for those sprouts.
- Toss sprouts: In a big bowl, mix the Brussels sprouts with olive oil, salt, and pepper until they’re evenly coated. Tip: Make sure each sprout gets some love for even roasting.
- Roast to perfection: Spread them out on a baking sheet in a single layer. Roast for 25-30 minutes, flipping halfway, until they’re crispy and golden. Tip: Don’t crowd the pan, or you’ll steam them instead of roasting.
- Simmer glaze: While the sprouts are doing their thing, whisk balsamic vinegar, honey, and garlic in a small saucepan over medium heat. Let it bubble away for about 5 minutes until it thickens slightly. Tip: Keep an eye on it to prevent burning.
- Glaze and serve: Drizzle the balsamic glaze over the roasted sprouts right before serving. The sweet and tangy glaze clings to the crispy edges, making every bite a flavor explosion. Try serving them over a bed of creamy polenta for a cozy meal.
The sprouts come out with a perfect crunch on the outside, tender on the inside, and that glaze? It’s the kind of sticky, sweet, and tangy magic that’ll have you licking your fingers. Throw some toasted pecans on top for an extra crunch if you’re feeling fancy.
Quinoa-Stuffed Bell Peppers
Just imagine biting into a vibrant, quinoa-stuffed bell pepper that’s as nutritious as it is delicious. Perfect for a weeknight dinner or impressing your in-laws, this dish is a game-changer with its hearty filling and sweet, roasted pepper goodness.
Ingredients
– 4 large bell peppers (any color), tops cut off and seeds removed
– 1 cup quinoa, rinsed
– 2 cups vegetable broth
– 1 tbsp olive oil
– 1 small onion, diced
– 2 cloves garlic, minced
– 1 tsp ground cumin
– 1/2 tsp smoked paprika
– 1/4 tsp salt
– 1/4 tsp black pepper
– 1 can (15 oz) black beans, drained and rinsed
– 1 cup corn kernels (fresh or frozen)
– 1/2 cup shredded cheddar cheese
– Fresh cilantro, chopped (for garnish)
Instructions
1. Preheat oven: Heat your oven to 375°F (190°C) to get it ready for roasting the peppers.
2. Cook quinoa: In a medium saucepan, combine quinoa and vegetable broth. Bring to a boil, then reduce heat to low, cover, and simmer for 15 minutes until the broth is absorbed and quinoa is fluffy.
3. Sauté veggies: Heat olive oil in a large skillet over medium heat. Add onion and garlic, sautéing for about 3 minutes until soft. Stir in cumin, smoked paprika, salt, and black pepper for that flavor kick.
4. Combine filling: To the skillet, add the cooked quinoa, black beans, and corn. Mix well and cook for another 2 minutes to warm through.
5. Stuff peppers: Spoon the quinoa mixture into the hollowed-out bell peppers, packing it down slightly. Top each with shredded cheddar cheese.
6. Bake to perfection: Place the stuffed peppers in a baking dish and bake for 25-30 minutes, until the peppers are tender and the cheese is bubbly and slightly golden.
7. Garnish and serve: Sprinkle with fresh cilantro before serving for a pop of color and freshness.
These quinoa-stuffed bell peppers come out with a satisfying contrast between the tender pepper and the hearty, spiced filling. Serve them with a dollop of sour cream or avocado slices for an extra creamy texture.
Herb-Roasted Turkey Breast
Boy, do I have a treat for you today! This Herb-Roasted Turkey Breast is the kind of dish that makes you look like a kitchen wizard with minimal effort. It’s juicy, flavorful, and perfect for when you’re craving something a little fancy but don’t want to spend all day in the kitchen.
Ingredients
- 1 (3 to 4-pound) boneless turkey breast
- 2 tbsp olive oil
- 1 tbsp chopped fresh rosemary
- 1 tbsp chopped fresh thyme
- 1 tbsp chopped fresh sage
- 1 tsp salt
- 1/2 tsp black pepper
- 1/2 tsp garlic powder
- 1/2 tsp onion powder
Instructions
- Preheat the oven: Set your oven to 375°F (190°C) to ensure it’s hot and ready for the turkey.
- Prepare the turkey: Pat the turkey breast dry with paper towels to help the herbs stick better.
- Mix the herbs: In a small bowl, combine the olive oil, rosemary, thyme, sage, salt, pepper, garlic powder, and onion powder. Tip: Fresh herbs make a huge difference here, but dried can work in a pinch—just use half the amount.
- Rub the mixture: Generously rub the herb mixture all over the turkey breast, making sure to get it into every nook and cranny for maximum flavor.
- Roast the turkey: Place the turkey breast on a rack in a roasting pan and roast in the preheated oven for about 50-60 minutes, or until the internal temperature reaches 165°F (74°C). Tip: Use a meat thermometer to avoid overcooking—it’s your best friend in the kitchen.
- Rest before slicing: Let the turkey rest for 10 minutes after taking it out of the oven. This keeps all those delicious juices inside when you slice it. Tip: Cover it loosely with foil to keep it warm while it rests.
The result? A turkey breast that’s incredibly moist with a crispy, herb-packed crust that’s downright addictive. Slice it up for sandwiches, serve it alongside some roasted veggies, or just eat it straight off the cutting board—no judgment here.
Sweet Potato Casserole with Pecan Topping
Venturing into the world of comfort food, let’s tackle a dish that’s like a hug in a casserole dish—sweet potato casserole with a crunchy pecan topping. It’s the kind of recipe that makes you wonder why you don’t make it every day, especially when you see how simple it is to throw together.
Ingredients
- 3 cups mashed sweet potatoes (about 3 large sweet potatoes, peeled, boiled, and mashed)
- 1/2 cup granulated sugar
- 1/4 cup milk
- 1/4 cup melted butter
- 1 tsp vanilla extract
- 2 eggs, beaten
- 1/2 tsp salt
- 1 cup chopped pecans
- 1/2 cup packed brown sugar
- 1/4 cup all-purpose flour
- 2 tbsp melted butter
Instructions
- Preheat oven: Heat your oven to 350°F (175°C) to ensure it’s ready for baking.
- Mix sweet potatoes: In a large bowl, combine the mashed sweet potatoes, granulated sugar, milk, 1/4 cup melted butter, vanilla extract, beaten eggs, and salt. Mix until smooth.
- Transfer to dish: Pour the sweet potato mixture into a greased 9×13 inch baking dish, spreading it evenly.
- Prepare topping: In a separate bowl, mix the chopped pecans, brown sugar, flour, and 2 tbsp melted butter until the mixture is crumbly.
- Add topping: Sprinkle the pecan mixture evenly over the sweet potato mixture in the baking dish.
- Bake: Place the dish in the preheated oven and bake for 25-30 minutes, or until the topping is golden brown and the edges are bubbly.
The casserole comes out with a creamy, velvety sweet potato base that’s perfectly balanced by the crunchy, buttery pecan topping. Serve it warm as a side dish that might just steal the show, or dollop it with whipped cream for a dessert twist.
Cauliflower Mashed Potatoes
Alright, let’s dive into making some cauliflower mashed potatoes that’ll have you questioning why you ever bothered with the regular kind. It’s creamy, it’s dreamy, and it’s sneakily healthy—what’s not to love?
Ingredients
- 1 large head of cauliflower, cut into florets (about 4 cups)
- 3 cloves garlic, peeled
- 1/4 cup unsalted butter, melted
- 1/4 cup heavy cream
- 1/2 tsp salt
- 1/4 tsp black pepper
- 1/4 cup grated Parmesan cheese
Instructions
- Prep the cauliflower: Toss the cauliflower florets and garlic cloves into a large pot. Fill with enough water to just cover the cauliflower.
- Boil until tender: Bring to a boil over high heat, then reduce to a simmer. Cook for about 10 minutes, or until the cauliflower is super tender when poked with a fork.
- Drain well: Drain the cauliflower and garlic in a colander. Let it sit for a minute to steam off any excess water—soggy mashed ‘potatoes’ are a no-go.
- Blend it up: Transfer the cauliflower and garlic to a food processor. Add the melted butter, heavy cream, salt, and pepper. Blend until smooth, scraping down the sides as needed.
- Add the cheese: Throw in the Parmesan cheese and pulse a few more times until it’s fully incorporated. Taste and adjust seasoning if necessary.
And there you have it—cauliflower mashed potatoes that are so fluffy and rich, you’ll forget they’re actually good for you. Serve them up with a drizzle of olive oil and an extra sprinkle of Parmesan for that extra oomph.
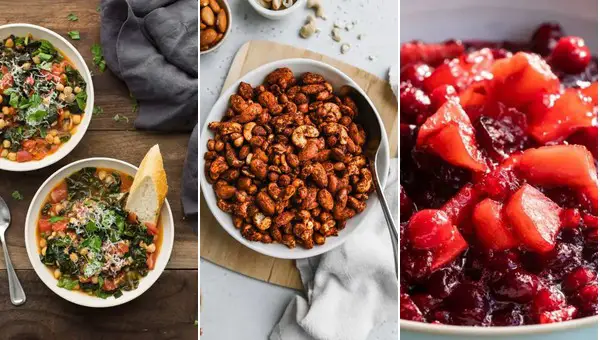
Spiced Cranberry Apple Sauce
Zesty and full of fall vibes, this Spiced Cranberry Apple Sauce is your go-to for adding a little pizzazz to your holiday table or just spicing up a Tuesday night. It’s like your favorite sweater but in sauce form—comforting, familiar, and with just the right amount of spark.
Ingredients
- 4 cups peeled, cored, and chopped apples (about 4 medium apples)
- 2 cups fresh cranberries
- 1 cup granulated sugar
- 1/2 cup water
- 1 tbsp lemon juice
- 1 tsp ground cinnamon
- 1/2 tsp ground nutmeg
- 1/4 tsp ground cloves
Instructions
- Prep the fruits: Toss the chopped apples and cranberries into a large saucepan. No need to be perfect here—rustic chops add character.
- Sweeten the deal: Sprinkle in the sugar, then pour the water and lemon juice over the top. The lemon juice isn’t just for flavor; it keeps the apples from browning too much.
- Spice it up: Add the cinnamon, nutmeg, and cloves. Stir everything together so the spices don’t clump in one spot.
- Simmer to perfection: Bring the mixture to a boil over medium-high heat, then reduce to a simmer. Let it bubble away for about 20 minutes, stirring occasionally, until the apples are soft and the cranberries have burst.
- Mash or leave chunky: Depending on your texture preference, you can mash the sauce with a potato masher for a smoother consistency or leave it chunky. Tip: If you’re serving this with pork, a chunkier texture holds up better.
- Cool down: Remove from heat and let it cool slightly before serving. It’ll thicken up as it cools, so don’t panic if it seems a bit thin at first.
This sauce strikes the perfect balance between tart and sweet, with the spices adding a warm depth that’ll have everyone asking for seconds. Try it dolloped on vanilla ice cream for a dessert that’s unexpectedly divine.
Lentil and Vegetable Shepherd’s Pie
Zesty and packed with flavor, this Lentil and Vegetable Shepherd’s Pie is the ultimate comfort food that’s surprisingly easy to whip up. Perfect for those nights when you’re craving something hearty but don’t want to spend hours in the kitchen.
Ingredients
- 1 cup dried green lentils, rinsed
- 2 cups vegetable broth
- 2 tbsp olive oil
- 1 large onion, diced
- 2 carrots, peeled and diced
- 2 celery stalks, diced
- 3 garlic cloves, minced
- 1 tsp dried thyme
- 1 tsp dried rosemary
- 1/2 tsp salt
- 1/4 tsp black pepper
- 1 cup frozen peas
- 4 cups mashed potatoes (prepared with butter and milk)
- 1/2 cup shredded cheddar cheese
Instructions
- Cook lentils: In a medium saucepan, combine lentils and vegetable broth. Bring to a boil, then reduce heat to low, cover, and simmer for 25 minutes or until lentils are tender.
- Sauté vegetables: Heat olive oil in a large skillet over medium heat. Add onion, carrots, and celery, cooking for 5 minutes until softened. Stir in garlic, thyme, rosemary, salt, and pepper, cooking for another minute until fragrant.
- Combine and simmer: Add the cooked lentils and frozen peas to the skillet, stirring to combine. Let the mixture simmer for 5 minutes to meld the flavors.
- Layer and bake: Preheat oven to 375°F. Spread the lentil mixture in a baking dish, top with mashed potatoes, and sprinkle with cheddar cheese. Bake for 20 minutes or until the top is golden and bubbly.
- Rest before serving: Let the pie sit for 5 minutes after baking to set. This makes it easier to slice and serve.
The pie comes out with a creamy, cheesy top layer that contrasts beautifully with the hearty, flavorful lentil and vegetable filling. Try serving it with a side of crisp green salad for a complete meal that’s both satisfying and nutritious.
Baked Salmon with Lemon and Dill
Guess what? I’ve got this super simple yet fancy-looking baked salmon recipe that’ll make you feel like a gourmet chef without breaking a sweat. It’s all about that perfect combo of lemon and dill, making the salmon juicy, flavorful, and oh-so-tender.
Ingredients
- 1.5 lbs salmon fillet, skin-on
- 2 tbsp olive oil
- 1 lemon, thinly sliced
- 2 tbsp fresh dill, chopped
- 1 tsp salt
- 1/2 tsp black pepper
- 1/2 tsp garlic powder
Instructions
- Preheat oven: Crank your oven to 375°F (190°C) to get it nice and toasty for the salmon.
- Prep salmon: Place the salmon fillet on a baking sheet lined with parchment paper, skin side down. Drizzle olive oil over the top and rub it all over the salmon.
- Season generously: Sprinkle the salt, black pepper, and garlic powder evenly over the salmon. Don’t be shy; this is where the flavor starts!
- Add lemon and dill: Lay the lemon slices on top of the salmon, then sprinkle the chopped dill over everything. The lemon will infuse the salmon with a bright, tangy flavor as it bakes.
- Bake to perfection: Slide the baking sheet into the oven and bake for 12-15 minutes. The salmon is done when it flakes easily with a fork but still looks moist inside.
- Rest before serving: Let the salmon sit for a couple of minutes after baking. This lets the juices redistribute, making every bite succulent.
The salmon comes out flaky and moist, with the lemon and dill creating a fresh, herby vibe that’s just irresistible. Try serving it over a bed of quinoa or with some roasted asparagus for a complete meal that’s as nutritious as it is delicious.
Whole Grain Stuffing with Apples and Walnuts
This whole grain stuffing with apples and walnuts is the cozy, flavorful side dish your holiday table has been missing. Trust me, it’s like a warm hug in food form, with just the right amount of crunch and sweetness to keep things interesting.
Ingredients
- 6 cups whole grain bread, cubed and slightly stale
- 2 tbsp olive oil
- 1 large onion, diced
- 2 celery stalks, diced
- 2 apples, cored and diced
- 1 cup walnuts, roughly chopped
- 2 cups vegetable broth
- 1 tsp dried sage
- 1 tsp dried thyme
- 1/2 tsp salt
- 1/4 tsp black pepper
Instructions
- Preheat oven: Heat your oven to 375°F (190°C) to get it ready for baking.
- Sauté veggies: In a large skillet over medium heat, warm the olive oil. Add the onion and celery, cooking until they’re soft and translucent, about 5 minutes.
- Add apples and walnuts: Toss in the apples and walnuts, cooking for another 3 minutes until the apples start to soften. Tip: If you prefer a bit more crunch in your walnuts, add them halfway through this step.
- Combine with bread: In a large bowl, mix the sautéed mixture with the bread cubes, ensuring everything is evenly distributed.
- Season and moisten: Sprinkle the sage, thyme, salt, and pepper over the mixture, then pour in the vegetable broth. Stir gently until the bread is moist but not soggy. Tip: The broth should be just enough to moisten the bread without making it mushy.
- Bake to perfection: Transfer the mixture to a greased baking dish and bake uncovered for 30 minutes, or until the top is golden and crispy. Tip: For an extra crispy top, broil for the last 2 minutes of baking.
The result? A stuffing that’s perfectly balanced between soft and crunchy, with the sweet apples and earthy walnuts playing off each other beautifully. Serve it alongside your main dish, or hey, it’s hearty enough to stand alone as a vegetarian main course with a side of greens.
Avocado and Pomegranate Salad
Ready to dive into a salad that’s as fun to make as it is to eat? This Avocado and Pomegranate Salad is a vibrant mix of creamy, crunchy, and juicy, perfect for when you’re craving something fresh but substantial.
Ingredients
- 2 ripe avocados, peeled, pitted, and diced
- 1 cup pomegranate seeds
- 1/4 cup extra virgin olive oil
- 2 tbsp fresh lime juice
- 1/2 tsp salt
- 1/4 tsp black pepper
- 1/4 cup chopped fresh cilantro
Instructions
- Prep the avocados: Gently dice the avocados into bite-sized pieces to keep them from turning into mush.
- Mix the dressing: In a small bowl, whisk together the olive oil, lime juice, salt, and pepper until well combined. Tip: The lime not only adds flavor but also helps keep the avocados green.
- Combine the salad: In a large bowl, toss the diced avocados and pomegranate seeds with the dressing. Be gentle to avoid mashing the avocados.
- Add the finishing touches: Sprinkle the chopped cilantro over the salad for a fresh, herby kick. Tip: If you’re not a cilantro fan, mint makes a great substitute.
- Serve immediately: This salad is best enjoyed right after it’s made to prevent the avocados from browning. Tip: For an extra crunch, toss in some toasted almonds or walnuts.
The contrast between the creamy avocados and the burst of sweetness from the pomegranate seeds is downright addictive. Try serving it on a bed of mixed greens for an extra layer of texture, or alongside grilled chicken for a heartier meal.
Roasted Carrot and Ginger Soup
Mmm, there’s nothing like the smell of roasted carrots wafting through your kitchen to make it feel like home. Today, we’re diving into a bowl of comfort with this Roasted Carrot and Ginger Soup that’s as easy to make as it is delicious. Let’s get those carrots roasting and the soup simmering!
Ingredients
- 2 lbs carrots, peeled and chopped into 1-inch pieces
- 1 tbsp olive oil
- 1 large onion, diced
- 2 cloves garlic, minced
- 1 tbsp fresh ginger, grated
- 4 cups vegetable broth
- 1/2 tsp salt
- 1/4 tsp black pepper
- 1/4 cup heavy cream (optional)
Instructions
- Preheat oven: Heat your oven to 400°F to get it ready for roasting those carrots.
- Roast carrots: Toss the chopped carrots with olive oil on a baking sheet and roast for 25 minutes, or until they’re tender and slightly caramelized at the edges.
- Sauté aromatics: In a large pot over medium heat, sauté the onion until translucent, about 5 minutes. Add the garlic and ginger, cooking for another minute until fragrant.
- Combine and simmer: Add the roasted carrots and vegetable broth to the pot. Bring to a boil, then reduce heat and simmer for 15 minutes to let the flavors meld.
- Blend soup: Carefully blend the soup until smooth using an immersion blender or a regular blender in batches. Tip: If using a regular blender, let the soup cool slightly and leave the lid slightly ajar to allow steam to escape.
- Season and finish: Stir in salt and pepper. For a creamy version, add heavy cream and stir until well combined.
This soup is velvety smooth with a sweet and spicy kick from the ginger. Serve it with a swirl of cream and a sprinkle of fresh herbs for a little extra flair, or pair it with crusty bread for the ultimate comfort meal.
Spinach and Feta Stuffed Mushrooms
Perfect for when you’re craving something fancy but don’t want to spend all day in the kitchen, these Spinach and Feta Stuffed Mushrooms are a game-changer. They’re cheesy, they’re savory, and they’ve got just enough green to make you feel virtuous.
Ingredients
- 12 large white mushrooms (about 1.5 inches in diameter), stems removed and finely chopped
- 2 tbsp olive oil
- 1 cup fresh spinach, finely chopped
- 1/2 cup feta cheese, crumbled
- 1/4 cup breadcrumbs
- 1 clove garlic, minced
- 1/4 tsp salt
- 1/4 tsp black pepper
Instructions
- Prep the mushrooms: Gently clean the mushrooms with a damp paper towel and remove the stems. Finely chop the stems and set aside.
- Sauté the filling: Heat olive oil in a pan over medium heat. Add the chopped mushroom stems, spinach, and garlic. Sauté for about 5 minutes, until the spinach is wilted and the mushrooms are soft.
- Mix the stuffing: Remove the pan from heat and stir in the feta cheese, breadcrumbs, salt, and pepper until well combined.
- Stuff the mushrooms: Preheat your oven to 375°F. Fill each mushroom cap with the spinach and feta mixture, pressing down lightly to pack it in.
- Bake to perfection: Place the stuffed mushrooms on a baking sheet and bake for 20 minutes, or until the tops are golden and the mushrooms are tender.
The result? A bite-sized explosion of creamy feta and earthy spinach, all nestled in a tender mushroom cap. Try serving them on a platter with a drizzle of balsamic glaze for an extra pop of flavor.
Chickpea and Kale Stew
Folks, if you’re looking for a dish that’s as nourishing as it is no-fuss, let me introduce you to this Chickpea and Kale Stew. It’s the kind of meal that hugs you from the inside, perfect for those days when you want something hearty without spending hours in the kitchen.
Ingredients
- 2 tablespoons olive oil
- 1 medium onion, diced
- 3 garlic cloves, minced
- 1 teaspoon ground cumin
- 1/2 teaspoon smoked paprika
- 1/4 teaspoon red pepper flakes
- 1 (15-ounce) can chickpeas, drained and rinsed
- 1 (14.5-ounce) can diced tomatoes
- 2 cups vegetable broth
- 1 bunch kale, stems removed and leaves chopped
- Salt and pepper to taste
Instructions
- Heat the oil: In a large pot, heat 2 tablespoons of olive oil over medium heat until shimmering.
- Sauté the aromatics: Add the diced onion and minced garlic, cooking until the onion is translucent, about 5 minutes.
- Toast the spices: Stir in the ground cumin, smoked paprika, and red pepper flakes, cooking for 1 minute until fragrant.
- Add the chickpeas and tomatoes: Pour in the drained chickpeas and diced tomatoes, stirring to combine with the aromatics and spices.
- Pour in the broth: Add 2 cups of vegetable broth, bringing the mixture to a simmer. Let it cook for 10 minutes to meld the flavors.
- Wilt the kale: Stir in the chopped kale, cooking until it’s wilted and bright green, about 5 minutes. Season with salt and pepper to taste.
This stew is a beautiful mess of textures—creamy chickpeas, tender kale, and a broth that’s got just the right amount of kick. Serve it with a slice of crusty bread for dipping, or over a bowl of quinoa if you’re feeling extra virtuous.
Gluten-Free Gingerbread Cookies
Zesty and full of warmth, these gluten-free gingerbread cookies are your new go-to for a cozy bake session. Perfect for when you’re craving something sweet with a little spice, and hey, they’re gluten-free, so everyone can join in on the fun!
Ingredients
- 2 cups gluten-free all-purpose flour
- 1 tsp baking soda
- 2 tsp ground ginger
- 1 tsp ground cinnamon
- 1/2 tsp ground cloves
- 1/4 tsp salt
- 3/4 cup packed brown sugar
- 1/2 cup unsalted butter, softened
- 1 large egg
- 1/4 cup molasses
- 1 tsp vanilla extract
Instructions
- Mix dry ingredients: In a medium bowl, whisk together the gluten-free flour, baking soda, ginger, cinnamon, cloves, and salt until well combined.
- Cream butter and sugar: In a large bowl, beat the softened butter and brown sugar together until light and fluffy, about 2 minutes.
- Add wet ingredients: Beat in the egg, molasses, and vanilla extract until the mixture is smooth and well incorporated.
- Combine mixtures: Gradually add the dry ingredients to the wet ingredients, mixing until a dough forms. Tip: If the dough feels too sticky, chill it for 30 minutes to make it easier to handle.
- Preheat oven: Heat your oven to 350°F (175°C) and line baking sheets with parchment paper.
- Roll and cut: On a lightly floured surface, roll the dough to about 1/4-inch thickness and cut into shapes with cookie cutters. Tip: Dip your cookie cutter in gluten-free flour to prevent sticking.
- Bake: Place the cookies on the prepared baking sheets and bake for 8-10 minutes, or until the edges are just starting to brown. Tip: For softer cookies, pull them out when they’re just set but still soft in the middle.
- Cool: Let the cookies cool on the baking sheets for 5 minutes before transferring to a wire rack to cool completely.
These cookies are wonderfully chewy with a deep, spicy flavor that’s not too overpowering. Try serving them with a dollop of whipped cream for an extra indulgent treat, or package them up as a sweet homemade gift.
Roasted Butternut Squash with Sage
Look, I know butternut squash can seem a bit intimidating with its tough skin and odd shape, but trust me, once you roast it with a little sage, it transforms into this sweet, caramelized masterpiece that’s totally worth the effort.
Ingredients
- 1 medium butternut squash, peeled, seeded, and cut into 1-inch cubes
- 2 tbsp olive oil
- 1 tbsp chopped fresh sage
- 1/2 tsp salt
- 1/4 tsp black pepper
Instructions
- Preheat oven: Crank your oven to 400°F (200°C) to get it nice and hot for roasting.
- Toss squash: In a large bowl, mix the squash cubes with olive oil, sage, salt, and pepper until evenly coated. Tip: Don’t skimp on the oil—it helps the squash caramelize beautifully.
- Spread on pan: Lay the squash out in a single layer on a baking sheet. Crowding the pan leads to steaming, not roasting, so give them space!
- Roast to perfection: Pop the pan in the oven and roast for 25-30 minutes, flipping halfway through, until the edges are golden and crispy. Tip: The squash is done when you can easily pierce it with a fork.
- Serve warm: Let it cool for a minute, then dig in. The sage gives it this earthy vibe that’s just *chef’s kiss* with the squash’s natural sweetness.
The texture? Think crispy on the outside, tender on the inside, with a flavor that’s like fall in a bite. Try tossing it with some pasta or quinoa for a hearty meal, or just eat it straight off the pan—no judgment here.
Quinoa and Cranberry Pilaf
Dive into this quinoa and cranberry pilaf that’s as easy to make as it is delicious, perfect for those nights when you want something wholesome without the hassle. It’s a dish that brings a little sweetness, a little nuttiness, and a whole lot of comfort to your table.
Ingredients
- 1 cup quinoa, rinsed and drained
- 1 3/4 cups water
- 1/2 cup dried cranberries
- 1/4 cup sliced almonds, toasted
- 2 tbsp olive oil
- 1 small onion, finely chopped
- 2 cloves garlic, minced
- 1/2 tsp salt
- 1/4 tsp black pepper
- 1/4 tsp ground cinnamon
Instructions
- Toast the quinoa: Heat a medium saucepan over medium heat. Add the quinoa and toast for about 5 minutes, stirring frequently, until it starts to smell nutty.
- Cook the quinoa: Add the water to the saucepan, bring to a boil, then reduce the heat to low. Cover and simmer for 15 minutes, or until the water is absorbed and the quinoa is fluffy.
- Sauté the aromatics: While the quinoa cooks, heat olive oil in a small skillet over medium heat. Add the onion and garlic, sautéing until soft and fragrant, about 5 minutes.
- Combine everything: Fluff the quinoa with a fork, then stir in the sautéed onion and garlic, dried cranberries, toasted almonds, salt, pepper, and cinnamon. Mix well to combine all the flavors.
- Let it rest: Cover the pilaf and let it sit for 5 minutes off the heat. This allows the flavors to meld together beautifully.
This pilaf is wonderfully fluffy with pops of sweetness from the cranberries and a nice crunch from the almonds. Serve it as a side or bulk it up with some grilled chicken for a hearty main dish.
Grilled Asparagus with Lemon Zest
Look, I know asparagus might not be the first thing you think of when firing up the grill, but trust me, this Grilled Asparagus with Lemon Zest is about to change your mind. It’s crispy, it’s zesty, and it’s ridiculously easy to make—perfect for those nights when you want to feel fancy without actually trying.
Ingredients
- 1 bunch of asparagus, trimmed
- 2 tbsp olive oil
- 1 tsp salt
- 1/2 tsp black pepper
- Zest of 1 lemon
Instructions
- Preheat the grill: Heat your grill to medium-high, about 400°F, so it’s ready to go when your asparagus is.
- Toss with oil: In a bowl, drizzle the asparagus with olive oil and toss to coat evenly. This ensures every spear gets perfectly crispy.
- Season well: Sprinkle the asparagus with salt and black pepper, giving it a good mix so the seasoning is distributed.
- Grill to perfection: Place the asparagus on the grill perpendicular to the grates so they don’t fall through. Grill for 3-4 minutes per side, until you see those beautiful char marks.
- Add the zest: Right after taking the asparagus off the grill, zest the lemon over the top. The heat will help release the lemon’s oils, making the flavor pop.
The asparagus comes out with a smoky crunch, while the lemon zest adds a bright, tangy finish. Try serving it alongside a creamy dip or over a bed of quinoa for a little extra oomph.
Dark Chocolate Avocado Mousse
Believe it or not, this Dark Chocolate Avocado Mousse is the creamy, dreamy dessert you’ve been waiting for, and yes, it’s secretly healthy. Perfect for when you’re craving something sweet but don’t want to feel like you’ve overdone it.
Ingredients
- 2 ripe avocados, peeled and pitted
- 1/2 cup dark chocolate chips, melted
- 1/4 cup honey
- 1/4 cup cocoa powder
- 1 tsp vanilla extract
- 1/4 tsp salt
- 1/2 cup heavy cream
Instructions
- Blend the base: In a food processor, combine the avocados, melted dark chocolate chips, honey, cocoa powder, vanilla extract, and salt. Blend until smooth.
- Whip the cream: In a separate bowl, whip the heavy cream until stiff peaks form. This will give your mousse that light, airy texture we’re after.
- Fold together: Gently fold the whipped cream into the avocado mixture until fully incorporated. Be careful not to overmix to keep it fluffy.
- Chill to set: Transfer the mousse into serving dishes and refrigerate for at least 2 hours. This patience-testing step is crucial for the perfect consistency.
This mousse is luxuriously smooth with a rich chocolate flavor that’s balanced by the subtle freshness of avocado. Serve it with a sprinkle of sea salt or fresh berries for an extra touch of elegance.
Spiced Roasted Nuts
Craving something crunchy, spicy, and downright addictive? Let’s whip up some Spiced Roasted Nuts that’ll have you sneaking handfuls straight from the baking sheet. Perfect for game night, a fancy cheese board, or just because you deserve a treat.
Ingredients
- 2 cups mixed nuts (almonds, cashews, walnuts)
- 1 tbsp olive oil
- 1 tbsp honey
- 1 tsp smoked paprika
- 1/2 tsp cayenne pepper
- 1/2 tsp sea salt
- 1/4 tsp garlic powder
Instructions
- Preheat oven: Crank your oven to 325°F (163°C) to get it nice and toasty for the nuts.
- Mix spices: In a small bowl, whisk together the smoked paprika, cayenne pepper, sea salt, and garlic powder. This is where the magic starts, so don’t skimp!
- Coat nuts: Toss the mixed nuts with olive oil and honey in a large bowl until they’re evenly coated. Pro tip: Use your hands for this—it’s messy but ensures every nut gets love.
- Add spices: Sprinkle the spice mix over the nuts and toss again until they’re fully dressed in their spicy jackets.
- Spread out: Lay the nuts in a single layer on a baking sheet lined with parchment paper. Crowding leads to steaming, not roasting, so give them space.
- Roast: Pop them in the oven for 15 minutes, then give them a stir. Roast for another 10 minutes until they’re golden and smell like heaven. Watch closely—nuts go from perfect to burnt in a blink.
- Cool: Let them cool on the baking sheet. They’ll crisp up as they cool, so resist the urge to dive in immediately.
These nuts are a fiery, smoky, slightly sweet crunch fest. Serve them alongside a cold beer or crumble them over vanilla ice cream for a spicy-sweet surprise.
Berry and Yogurt Parfait
Fancy a quick, no-fuss breakfast that looks like you spent hours on it? Let me introduce you to the Berry and Yogurt Parfait, a layered delight that’s as fun to make as it is to eat. Perfect for those mornings when you’re half-awake but still want something Instagram-worthy.
Ingredients
– 1 cup Greek yogurt (plain or vanilla)
– 1/2 cup granola
– 1 cup mixed berries (strawberries, blueberries, raspberries)
– 1 tbsp honey
– 1/2 tsp vanilla extract (if using plain yogurt)
Instructions
1. Prep the berries: Wash your mixed berries under cold water and pat them dry. If using strawberries, slice them into thin pieces.
2. Sweeten the yogurt: In a small bowl, mix the Greek yogurt with honey and vanilla extract (if using plain yogurt) until well combined. Taste and add more honey if you like it sweeter.
3. Layer the parfait: Start with a layer of yogurt at the bottom of a glass or bowl. Add a layer of granola, then a layer of berries. Repeat the layers until you reach the top, finishing with a few berries on top for a pretty look.
4. Let it sit: For the best texture, let the parfait sit in the fridge for about 10 minutes before serving. This allows the granola to soften slightly and the flavors to meld together.
5. Serve and enjoy: Grab a spoon and dig in! The contrast between the creamy yogurt, crunchy granola, and juicy berries is just *chef’s kiss*.
This parfait is a textural dream with every spoonful—creamy, crunchy, and bursting with berry goodness. Try drizzling a little extra honey on top or adding a sprinkle of cinnamon to the granola for an extra flavor kick.
Conclusion
With these 20 delicious and nutritious Christmas recipes, you can celebrate the season without sacrificing flavor or health! Whether you’re whipping up a cozy breakfast or a festive dinner, there’s something here for everyone. Give them a try, and don’t forget to share your favorites in the comments below. Loved this roundup? Pin it to your holiday board for easy inspiration later. Happy cooking and merry feasting!

I’m Brandon, the face behind the recipes. As a dedicated food enthusiast, I love experimenting with flavors and sharing my culinary adventures with you.