Friendsgiving is all about good food and even better company—without the stress! Whether you’re hosting a crowd or bringing a dish to share, these 20 easy, delicious recipes are guaranteed to impress. From cozy comfort classics to fresh seasonal twists, we’ve got something for every taste (and every last-minute shopper). So grab a plate, gather your favorite people, and let’s dig in!
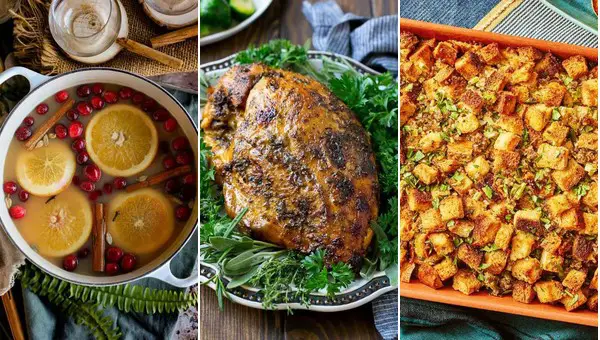
Slow Cooker Turkey Breast with Herbs
First off, let me tell you, this Slow Cooker Turkey Breast with Herbs is the kind of recipe that makes you look like a kitchen wizard with minimal effort. It’s juicy, flavorful, and basically cooks itself while you binge-watch your favorite show.
Ingredients
- 1 (4 to 5-pound) boneless turkey breast
- 2 tbsp olive oil
- 1 tbsp salt
- 1 tsp black pepper
- 1 tsp garlic powder
- 1 tsp onion powder
- 1 tsp dried thyme
- 1 tsp dried rosemary
- 1 tsp dried sage
- 1 cup chicken broth
Instructions
- Prep the turkey: Pat the turkey breast dry with paper towels. This helps the herbs stick better.
- Season generously: Rub the turkey all over with olive oil, then sprinkle with salt, pepper, garlic powder, onion powder, thyme, rosemary, and sage. Don’t be shy—this is where the flavor magic happens.
- Slow cook to perfection: Place the turkey in the slow cooker, pour chicken broth around it, and cook on low for 6-7 hours or until the internal temperature reaches 165°F. Pro tip: Use a meat thermometer to avoid guessing.
- Rest before slicing: Let the turkey rest for 10 minutes after cooking. This keeps all those delicious juices inside when you slice it.
The turkey comes out so tender, it practically falls apart, with herbs that perfume every bite. Try serving it over a bed of mashed potatoes or shred it for sandwiches—either way, it’s a win.
Garlic Mashed Potatoes with Cream Cheese
Hey there, let’s talk about turning those humble potatoes into a creamy, dreamy side dish that’ll steal the show at any dinner table. Garlic mashed potatoes with cream cheese? Yes, please—it’s like the comfort food version of a warm hug.
Ingredients
- 2 lbs Yukon Gold potatoes, peeled and quartered
- 4 cloves garlic, minced
- 1/2 cup heavy cream
- 4 oz cream cheese, softened
- 4 tbsp unsalted butter
- 1 tsp salt
- 1/2 tsp black pepper
Instructions
- Boil the potatoes: In a large pot, cover the quartered potatoes with cold water by an inch. Bring to a boil over high heat, then reduce to a simmer and cook until the potatoes are fork-tender, about 15-20 minutes.
- Cook the garlic: While the potatoes are boiling, melt 2 tbsp of butter in a small skillet over medium heat. Add the minced garlic and sauté until fragrant, about 1 minute—don’t let it brown!
- Drain and mash: Drain the potatoes well, then return them to the pot. Add the remaining 2 tbsp of butter, cream cheese, heavy cream, sautéed garlic, salt, and pepper.
- Mash to perfection: Use a potato masher to blend everything together until smooth and creamy. For extra fluffiness, a hand mixer can be used on low speed—just don’t overmix or they’ll get gluey.
- Season and serve: Taste and adjust the seasoning if needed. Serve hot, with a little extra butter melting on top if you’re feeling indulgent.
These garlic mashed potatoes are so creamy, they practically whisper sweet nothings to your taste buds. Try them alongside a juicy steak or piled high on a shepherd’s pie for the ultimate comfort meal.
Green Bean Casserole with Crispy Onions
Today’s the day we tackle the ultimate comfort food classic, but with a twist that’ll have your taste buds doing a happy dance. Green Bean Casserole with Crispy Onions is like that cozy sweater you can’t wait to slip into when the weather turns — except, you know, edible and covered in crispy, golden onions.
Ingredients
- 1 lb fresh green beans, trimmed and halved
- 1 can (10.5 oz) condensed cream of mushroom soup
- 1/2 cup milk
- 1 tsp soy sauce
- 1/4 tsp black pepper
- 1 1/3 cups crispy fried onions
- 1 tbsp butter, melted
Instructions
- Prep the beans: Bring a large pot of salted water to a boil. Add the green beans and cook for 5 minutes, then drain and rinse under cold water to stop the cooking.
- Mix the sauce: In a large bowl, whisk together the cream of mushroom soup, milk, soy sauce, and black pepper until smooth.
- Combine and bake: Add the green beans to the sauce mixture and stir to coat. Transfer to a greased baking dish and bake at 350°F for 25 minutes.
- Add the onions: Sprinkle the crispy onions evenly over the top of the casserole, then drizzle with melted butter. Bake for an additional 5 minutes, or until the onions are golden and crispy.
- Serve hot: Let the casserole sit for a couple of minutes before serving to allow the sauce to thicken slightly.
The creamy, savory sauce clings to every green bean, while the crispy onions add a delightful crunch that’s downright addictive. Try serving it alongside a juicy roast chicken or pile it high on your plate next to a scoop of mashed potatoes for the ultimate comfort food feast.
Sweet Potato Casserole with Marshmallow Topping
Ever had one of those days where only something sweet, creamy, and a little bit nostalgic will do? Well, buckle up, because this sweet potato casserole with a gooey marshmallow topping is about to become your new best friend. It’s like a hug in dish form, perfect for when you need a little comfort or just an excuse to eat marshmallows for dinner.
Ingredients
- 3 cups mashed sweet potatoes (about 3 large sweet potatoes, peeled, boiled, and mashed)
- 1/2 cup granulated sugar
- 2 large eggs, lightly beaten
- 1/2 tsp salt
- 4 tbsp unsalted butter, melted
- 1/2 cup milk
- 1 tsp vanilla extract
- 1/2 tsp ground cinnamon
- 1/4 tsp ground nutmeg
- 2 cups mini marshmallows
Instructions
- Preheat oven: Preheat your oven to 350°F (175°C) and grease a 9×13 inch baking dish. This ensures your casserole doesn’t stick and makes cleanup a breeze.
- Mix ingredients: In a large bowl, combine the mashed sweet potatoes, sugar, eggs, salt, melted butter, milk, vanilla extract, cinnamon, and nutmeg. Mix until everything is well incorporated. Tip: For extra smooth potatoes, run them through a food processor before mixing.
- Bake base: Pour the sweet potato mixture into the prepared baking dish and smooth the top with a spatula. Bake for 25 minutes, or until the edges start to pull away from the dish.
- Add marshmallows: Remove the casserole from the oven and evenly sprinkle the mini marshmallows over the top. Tip: For an even toastier top, you can broil the casserole for the last 2-3 minutes, but watch it closely to prevent burning.
- Final bake: Return the casserole to the oven and bake for an additional 10 minutes, or until the marshmallows are golden and puffy.
The result? A creamy, spiced sweet potato base with a cloud-like marshmallow topping that’s slightly crispy on the outside and melty in the middle. Serve it straight from the dish for a family-style vibe, or scoop it into individual ramekins for a fancy twist.
Cranberry Orange Sauce with Fresh Herbs
Believe it or not, this cranberry orange sauce with fresh herbs is about to become your go-to side dish for everything from Thanksgiving turkey to your morning toast. It’s tangy, sweet, and herby all at once, and ridiculously easy to whip up.
Ingredients
- 12 oz fresh cranberries
- 1 cup granulated sugar
- 1 cup fresh orange juice
- Zest of 1 orange
- 2 tbsp fresh rosemary, finely chopped
- 1 tbsp fresh thyme leaves
- 1/2 tsp salt
Instructions
- Combine ingredients: In a medium saucepan, mix cranberries, sugar, orange juice, and orange zest.
- Simmer for flavor: Cook over medium heat until the sugar dissolves and the cranberries start to pop, about 10 minutes. Stir occasionally to prevent sticking.
- Add herbs: Stir in rosemary, thyme, and salt. Reduce heat to low and simmer for another 5 minutes to let the herbs infuse their flavors.
- Check consistency: The sauce should thicken slightly but still be pourable. If it’s too thick, add a tablespoon of water at a time until desired consistency is reached.
- Cool down: Remove from heat and let it cool to room temperature. The sauce will thicken more as it cools.
This sauce strikes the perfect balance between sweet and tart, with the fresh herbs adding a surprising depth. Try it dolloped over goat cheese on crackers for an instant appetizer hit.
Herb-Roasted Carrots with Honey Glaze
Guess what? I’ve got this ridiculously easy yet fancy-looking side dish that’ll make you look like a kitchen wizard with minimal effort. Herb-Roasted Carrots with Honey Glaze is all about throwing a few things together and letting the oven do its magic.
Ingredients
- 1 lb carrots, peeled and cut into 2-inch sticks
- 2 tbsp olive oil
- 1 tbsp honey
- 1 tsp dried thyme
- 1/2 tsp salt
- 1/4 tsp black pepper
- 1/4 tsp garlic powder
Instructions
- Preheat oven: Crank your oven to 400°F (200°C) to get it nice and hot for those carrots.
- Toss carrots: In a big bowl, mix the carrot sticks with olive oil, thyme, salt, pepper, and garlic powder until they’re all shiny and happy.
- Roast to perfection: Spread the carrots on a baking sheet in a single layer and roast for 20 minutes. Tip: Give them a stir halfway through for even browning.
- Glaze with honey: Drizzle the honey over the carrots and toss them around. Pop them back in the oven for another 5 minutes until they’re sticky and slightly caramelized.
- Serve immediately: Get them on a plate while they’re hot. The honey glaze will be all glossy, and the thyme will smell amazing.
These carrots come out with this awesome mix of sweet and savory, and the edges get a little crispy. Try tossing them with some crumbled feta or a handful of toasted almonds for extra pizzazz.
Cheesy Cornbread Casserole
Wow, have I got a comfort food classic for you today that’s going to make your taste buds do a happy dance. This Cheesy Cornbread Casserole is the perfect blend of sweet, savory, and oh-so-cheesy, with a texture that’s just the right amount of crumbly and moist. It’s like a hug in a dish, and honestly, who couldn’t use one of those?
Ingredients
- 1 cup all-purpose flour
- 1 cup yellow cornmeal
- 1/4 cup granulated sugar
- 1 tbsp baking powder
- 1/2 tsp salt
- 1 cup milk
- 1/3 cup vegetable oil
- 1 large egg, lightly beaten
- 1 cup shredded cheddar cheese
- 1 cup canned corn kernels, drained
- 1/2 cup sour cream
- 2 tbsp unsalted butter, melted
Instructions
- Preheat oven: Heat your oven to 375°F (190°C) and grease a 9-inch square baking dish. This ensures your casserole doesn’t stick and gets that golden edge we all love.
- Mix dry ingredients: In a large bowl, whisk together the flour, cornmeal, sugar, baking powder, and salt. Tip: Sifting the dry ingredients can prevent lumps for a smoother batter.
- Combine wet ingredients: In another bowl, mix the milk, vegetable oil, and beaten egg until well combined. Pour this into the dry ingredients and stir just until moistened. Overmixing can lead to tough cornbread, so keep it gentle.
- Add mix-ins: Fold in the shredded cheddar cheese, corn kernels, and sour cream. The sour cream adds moisture and a slight tang that balances the sweetness perfectly.
- Bake to perfection: Pour the batter into the prepared dish and drizzle with melted butter. Bake for 25-30 minutes, or until the top is golden and a toothpick comes out clean. Tip: Let it sit for 5 minutes before serving to make slicing easier.
This casserole comes out with a delightful contrast between the crispy, buttery top and the soft, cheesy interior. Serve it alongside a bowl of chili or top it with a dollop of honey butter for an extra sweet kick. Trust me, it’s a game-changer.
Classic Stuffing with Sage and Sausage
Visions of holiday dinners dance in your head, but let’s be real, this Classic Stuffing with Sage and Sausage is too good to save for just once a year. It’s the kind of dish that makes you want to hug your plate, with its golden crust, juicy sausage, and that herby sage aroma that fills your kitchen like a warm welcome.
Ingredients
- 1 lb Italian sausage, casings removed
- 1/2 cup unsalted butter
- 2 large onions, diced
- 4 celery stalks, diced
- 3 cloves garlic, minced
- 1 tbsp fresh sage, chopped
- 1 tsp salt
- 1/2 tsp black pepper
- 8 cups day-old bread, cubed
- 2 cups chicken broth
- 2 large eggs, beaten
Instructions
- Brown the sausage: In a large skillet over medium heat, cook the sausage, breaking it into small pieces with a spoon, until no longer pink, about 5 minutes. Transfer to a bowl and set aside.
- Sauté the veggies: In the same skillet, melt the butter over medium heat. Add onions, celery, and garlic, cooking until soft, about 5 minutes. Stir in sage, salt, and pepper.
- Combine everything: In a large bowl, mix the bread cubes, sausage, and veggie mixture. Gradually add chicken broth and eggs, tossing until the bread is evenly moistened.
- Bake to perfection: Transfer the mixture to a greased 9×13 inch baking dish. Cover with foil and bake at 350°F for 30 minutes. Remove foil and bake for another 15 minutes until the top is crispy and golden.
This stuffing is a textural dream—crispy on top, soft in the middle, with little bursts of savory sausage. Serve it alongside your favorite roast or, honestly, just eat it straight from the dish with a big spoon. No judgment here.
Pumpkin Pie with Spiced Whipped Cream
Alright, let’s dive into making this cozy classic that screams autumn but let’s be real, is delicious any time of year. Pumpkin Pie with Spiced Whipped Cream is like a hug in dessert form, and I’m here to walk you through making it like we’re hanging out in my kitchen.
Ingredients
- 1 (15 oz) can pumpkin puree
- 3/4 cup granulated sugar
- 1/2 tsp salt
- 1 tsp ground cinnamon
- 1/2 tsp ground ginger
- 1/4 tsp ground cloves
- 2 large eggs
- 1 (12 oz) can evaporated milk
- 1 unbaked 9-inch pie crust
- 1 cup heavy whipping cream
- 2 tbsp powdered sugar
- 1/2 tsp vanilla extract
- 1/4 tsp ground cinnamon
Instructions
- Preheat oven: Crank your oven to 425°F (220°C) because we’re starting hot to get that perfect crust.
- Mix filling: In a large bowl, whisk together the pumpkin puree, granulated sugar, salt, cinnamon, ginger, and cloves until smooth. Tip: Make sure your spices are fresh for the best flavor.
- Add eggs and milk: Beat in the eggs one at a time, then gradually stir in the evaporated milk until the mixture is silky.
- Pour into crust: Carefully pour the filling into your unbaked pie crust. Tip: To prevent spills, place the pie crust on a baking sheet before filling.
- Bake: Bake at 425°F for 15 minutes, then reduce the temperature to 350°F (175°C) and bake for another 40-50 minutes, until a knife inserted near the center comes out clean.
- Cool: Let the pie cool on a wire rack for at least 2 hours. This is crucial for the filling to set properly.
- Whip cream: While the pie cools, beat the heavy whipping cream, powdered sugar, vanilla, and cinnamon until stiff peaks form. Tip: Chill your bowl and beaters beforehand for quicker whipping.
- Serve: Slice the pie and top each piece with a dollop of the spiced whipped cream.
The pie is creamy and spiced just right, with a flaky crust that’s the perfect contrast. Try serving it with a drizzle of caramel for an extra decadent touch.
Roasted Brussels Sprouts with Balsamic Glaze
Unbelievably, these roasted Brussels sprouts with balsamic glaze will make even the most skeptical veggie haters come back for seconds. They’re crispy, they’re sweet, they’re tangy, and honestly, they’re a little bit addictive.
Ingredients
- 1.5 lbs Brussels sprouts, trimmed and halved
- 3 tbsp olive oil
- 1/2 tsp salt
- 1/4 tsp black pepper
- 1/4 cup balsamic vinegar
- 2 tbsp honey
- 1 clove garlic, minced
Instructions
- Preheat oven: Heat your oven to 400°F (200°C) to ensure it’s hot enough to crisp up those sprouts.
- Toss sprouts: In a large bowl, combine the Brussels sprouts with olive oil, salt, and pepper. Make sure every sprout is nicely coated for even roasting.
- Roast to perfection: Spread the sprouts on a baking sheet in a single layer. Roast for 25-30 minutes, flipping halfway through, until they’re golden and crispy on the edges.
- Simmer glaze: While the sprouts roast, mix balsamic vinegar, honey, and minced garlic in a small saucepan. Bring to a simmer over medium heat, then reduce to low and let it thicken for about 5 minutes, stirring occasionally.
- Glaze and serve: Once the sprouts are done, drizzle them with the balsamic glaze and toss to coat. Serve immediately while they’re hot and crispy.
These sprouts come out with the perfect crunch, and the balsamic glaze adds a sweet and tangy kick that’s downright irresistible. Try serving them over a bed of creamy polenta for a cozy, comforting meal.
Easy Gravy Made from Turkey Drippings
Gravy doesn’t have to be a Thanksgiving-only affair, and this easy-peasy version made from turkey drippings is proof. Let’s turn those golden pan juices into a silky, flavor-packed gravy that’ll make even your weeknight mashed potatoes feel like a holiday.
Ingredients
- 1/4 cup turkey drippings
- 1/4 cup all-purpose flour
- 2 cups chicken or turkey stock, warmed
- 1/2 tsp salt
- 1/4 tsp black pepper
- 1 tbsp unsalted butter
Instructions
- Collect drippings: After roasting your turkey, carefully pour the drippings from the pan into a fat separator or measuring cup. Let it sit for a minute so the fat rises to the top.
- Skim fat: Spoon off 1/4 cup of the clear fat from the top of the drippings and pour it into a medium saucepan over medium heat.
- Make roux: Whisk the flour into the fat and cook, stirring constantly, for about 2 minutes until it turns a light golden color. This is your flavor base, so don’t rush it.
- Add stock: Gradually whisk in the warmed stock, ensuring there are no lumps. Keep whisking until the mixture is smooth and begins to thicken, about 3-4 minutes.
- Season: Stir in the salt, pepper, and butter, then reduce the heat to low. Let it simmer for another 5 minutes, stirring occasionally, until the gravy coats the back of a spoon.
This gravy is luxuriously smooth with a rich, savory depth that’ll have you questioning why you ever settled for the jarred stuff. Try it over roasted veggies or biscuits for a twist on the classic.
Apple Pecan Salad with Maple Dressing
So, you’re staring at your fridge, thinking salad sounds good but also… boring. Let me introduce you to the Apple Pecan Salad with Maple Dressing – it’s like fall decided to throw a party in your mouth, and everyone’s invited.
Ingredients
- 2 cups mixed greens (washed and dried)
- 1 large apple (thinly sliced)
- 1/2 cup pecans (toasted and chopped)
- 1/4 cup feta cheese (crumbled)
- 2 tbsp olive oil
- 1 tbsp maple syrup
- 1 tbsp apple cider vinegar
- 1/2 tsp Dijon mustard
- 1/4 tsp salt
- 1/4 tsp black pepper
Instructions
- Toast the pecans: Spread pecans on a baking sheet and toast in a preheated 350°F oven for 5-7 minutes, until fragrant. Let cool, then chop.
- Make the dressing: In a small bowl, whisk together olive oil, maple syrup, apple cider vinegar, Dijon mustard, salt, and pepper until well combined.
- Assemble the salad: In a large bowl, toss the mixed greens with the sliced apple, toasted pecans, and crumbled feta cheese.
- Dress the salad: Drizzle the maple dressing over the salad and toss gently to coat everything evenly.
The crunch of the pecans, the sweetness of the apple, and the tangy feta make this salad anything but boring. Serve it alongside grilled chicken for a hearty meal or enjoy it as is for a light lunch that packs a flavor punch.
Parmesan Roasted Asparagus
Zesty and fresh, this Parmesan Roasted Asparagus is your ticket to veggie heaven with minimal effort. It’s the kind of side dish that steals the show, and lucky for you, it’s as easy as tossing a few things together and letting the oven do its magic.
Ingredients
– 1 bunch of asparagus, trimmed
– 2 tbsp olive oil
– 1/4 cup grated Parmesan cheese
– 1/2 tsp garlic powder
– 1/2 tsp salt
– 1/4 tsp black pepper
Instructions
1. Preheat oven: Crank your oven to 400°F (200°C) to get it nice and toasty for the asparagus.
2. Prep asparagus: Lay the trimmed asparagus on a baking sheet in a single layer. Drizzle with olive oil and toss to coat evenly.
3. Season: Sprinkle the asparagus with garlic powder, salt, and black pepper. Toss again to ensure every spear is seasoned.
4. Roast: Pop the baking sheet into the oven and roast for 12-15 minutes, until the asparagus is tender but still has a bit of crunch.
5. Add cheese: Sprinkle the grated Parmesan cheese over the asparagus and return to the oven for 2-3 minutes, just until the cheese is melted and slightly golden.
6. Serve: Transfer the asparagus to a serving dish and enjoy immediately while it’s hot and the cheese is gooey.
This Parmesan Roasted Asparagus comes out with a perfect balance of crisp-tender spears and a savory, cheesy topping. Try serving it alongside grilled chicken or fish for a meal that feels fancy but is totally doable on a weeknight.
Corn Pudding with Cheddar Cheese
Okay, so you’re craving something cozy, cheesy, and a little bit corny? Perfect, because today we’re diving into making a Corn Pudding with Cheddar Cheese that’s so good, it’ll have you questioning why you ever bothered with anything else. It’s like a hug in a dish, but with more cheese.
Ingredients
- 2 cups fresh corn kernels (or frozen, thawed)
- 1 cup shredded sharp cheddar cheese
- 2 large eggs, lightly beaten
- 1 cup whole milk
- 1/2 cup heavy cream
- 1/4 cup unsalted butter, melted
- 1/4 cup granulated sugar
- 1/4 cup all-purpose flour
- 1 tsp salt
- 1/2 tsp black pepper
- 1/2 tsp paprika
Instructions
- Preheat oven: Preheat your oven to 350°F (175°C) and grease a 2-quart baking dish. This ensures your pudding doesn’t stick and bakes evenly.
- Mix dry ingredients: In a large bowl, whisk together the flour, sugar, salt, pepper, and paprika. This combo gives your pudding that perfect balance of sweet and savory.
- Combine wet ingredients: In another bowl, mix the eggs, milk, cream, and melted butter until well combined. Pro tip: room temperature ingredients mix better, so take them out ahead of time.
- Fold in corn and cheese: Add the corn and shredded cheddar to the wet mixture, then gently fold in the dry ingredients until just combined. Don’t overmix to keep the texture light.
- Bake to perfection: Pour the mixture into the prepared dish and bake for 45-50 minutes, or until the top is golden and the center is set. A toothpick should come out clean when it’s done.
This corn pudding comes out creamy with a slight bite from the cheddar, and the corn adds just the right amount of sweetness. Serve it warm with a sprinkle of extra cheese on top, or alongside some grilled chicken for a meal that’s anything but boring.
Pecan Pie Bars with Shortbread Crust
Hey there! Let’s dive into making these irresistible Pecan Pie Bars with a buttery shortbread crust that’ll have everyone asking for the recipe. Trust me, they’re the perfect blend of crunchy, gooey, and downright delicious.
Ingredients
- 1 cup unsalted butter, softened
- 1/2 cup granulated sugar
- 2 cups all-purpose flour
- 1/4 tsp salt
- 3 large eggs
- 1 cup light corn syrup
- 1 cup packed brown sugar
- 2 tbsp unsalted butter, melted
- 1 tsp vanilla extract
- 1 1/2 cups chopped pecans
Instructions
- Preheat oven: Heat your oven to 350°F (175°C) and line a 9×13 inch baking pan with parchment paper, leaving an overhang on the sides for easy removal.
- Make crust: In a large bowl, beat 1 cup softened butter and granulated sugar until light and fluffy. Gradually mix in flour and salt until combined. Press evenly into the prepared pan. Bake for 20 minutes or until lightly golden.
- Prepare filling: While the crust bakes, whisk together eggs, corn syrup, brown sugar, 2 tbsp melted butter, and vanilla extract until smooth. Stir in pecans.
- Assemble and bake: Pour the filling over the hot crust. Return to the oven and bake for 25-30 minutes, or until the filling is set. A little jiggle in the center is okay; it’ll firm up as it cools.
- Cool completely: Let the bars cool in the pan on a wire rack for at least 2 hours. Use the parchment overhang to lift them out before cutting into squares.
These bars are a dream with their crisp shortbread base and that classic pecan pie topping. Serve them slightly warm with a scoop of vanilla ice cream for an extra special treat.
Baked Mac and Cheese with Breadcrumb Topping
Unbelievable as it may seem, this baked mac and cheese with a crispy breadcrumb topping is about to become your new best friend. It’s the kind of dish that hugs you from the inside, perfect for those days when only comfort food will do.
Ingredients
- 8 oz elbow macaroni
- 2 cups shredded sharp cheddar cheese
- 1 cup shredded mozzarella cheese
- 2 cups whole milk
- 1/4 cup unsalted butter
- 1/4 cup all-purpose flour
- 1/2 tsp salt
- 1/2 tsp black pepper
- 1/2 tsp paprika
- 1 cup panko breadcrumbs
- 2 tbsp melted butter
Instructions
- Boil the pasta: Cook the elbow macaroni in a large pot of boiling salted water until al dente, about 8 minutes. Drain and set aside.
- Make the roux: In the same pot, melt 1/4 cup butter over medium heat. Whisk in the flour and cook for 1 minute until golden.
- Add milk: Gradually whisk in the milk until the mixture is smooth. Cook for 3-4 minutes, stirring constantly, until thickened.
- Cheese it up: Remove from heat and stir in the cheddar and mozzarella cheeses until melted. Season with salt, pepper, and paprika.
- Combine: Add the cooked macaroni to the cheese sauce, stirring until well coated.
- Prep the topping: In a small bowl, mix the panko breadcrumbs with 2 tbsp melted butter.
- Bake: Transfer the mac and cheese to a greased baking dish. Sprinkle the breadcrumb mixture evenly on top. Bake at 375°F for 20 minutes, or until the topping is golden and crispy.
The first bite gives you that creamy, cheesy goodness with a satisfying crunch from the breadcrumbs. Try serving it with a side of hot sauce for an extra kick, or keep it classic with a crisp green salad.
Spiced Mulled Apple Cider
Wow, is there anything cozier than a steaming mug of spiced mulled apple cider on a crisp evening? Let me walk you through making this hug-in-a-mug that’s packed with all the warm, spicy goodness you crave.
Ingredients
- 4 cups apple cider
- 1 orange, sliced into rounds
- 2 cinnamon sticks
- 1 tsp whole cloves
- 1 star anise
- 1/4 cup brown sugar
- 1/2 tsp vanilla extract
Instructions
- Combine ingredients: In a large pot, mix the apple cider, orange slices, cinnamon sticks, cloves, star anise, and brown sugar.
- Heat gently: Place the pot over medium heat and bring the mixture to a simmer, stirring occasionally to dissolve the sugar. Do not boil to preserve the flavors.
- Simmer for flavor: Reduce the heat to low and let the cider simmer for 20 minutes, allowing the spices to infuse. Tip: The longer it simmers, the more intense the flavors.
- Add vanilla: Stir in the vanilla extract and simmer for an additional 5 minutes. Tip: Vanilla adds a sweet depth, so don’t skip it!
- Strain and serve: Remove the pot from heat. Strain the cider into mugs to remove the spices and orange slices. Tip: For an extra touch, garnish with a fresh cinnamon stick or orange slice.
This spiced mulled apple cider is a symphony of warm, aromatic flavors with a silky texture that’ll make you want to curl up by the fire. Try serving it with a dash of whipped cream on top for a decadent twist.
Chocolate Pecan Tart with Caramel Drizzle
Alright, let’s dive into making this decadent Chocolate Pecan Tart with Caramel Drizzle that’s sure to impress. Imagine biting into a buttery crust filled with rich chocolate and crunchy pecans, all topped with a gooey caramel drizzle—yes, it’s as heavenly as it sounds.
Ingredients
- 1 1/2 cups all-purpose flour
- 1/2 cup unsalted butter, cold and cubed
- 1/4 cup granulated sugar
- 1/4 tsp salt
- 1 large egg yolk
- 1 tbsp ice water
- 1 cup semi-sweet chocolate chips
- 1 cup pecans, roughly chopped
- 1/2 cup heavy cream
- 1/4 cup light corn syrup
- 1/4 cup brown sugar, packed
- 2 tbsp unsalted butter
- 1/2 tsp vanilla extract
Instructions
- Prep the crust: In a food processor, pulse together flour, cold cubed butter, granulated sugar, and salt until mixture resembles coarse crumbs. Add egg yolk and ice water; pulse until dough comes together. Press dough into a 9-inch tart pan and chill for 30 minutes.
- Bake the crust: Preheat oven to 350°F. Line chilled crust with parchment and fill with pie weights. Bake for 15 minutes, remove weights, and bake for another 10 minutes until golden. Let cool.
- Add the filling: Sprinkle chocolate chips and chopped pecans over the cooled crust. In a saucepan, heat heavy cream, corn syrup, brown sugar, and butter until sugar dissolves. Remove from heat, stir in vanilla, and pour over chocolate and pecans.
- Final bake: Bake at 350°F for 20 minutes until filling is set. Let cool completely before drizzling with additional caramel if desired.
This tart is a textural dream—crispy crust, creamy chocolate, and crunchy pecans, all tied together with that sweet caramel drizzle. Serve it slightly warm with a scoop of vanilla ice cream for an extra indulgent treat.
Rosemary Garlic Dinner Rolls
Picture this: you’re about to make the most aromatic, buttery dinner rolls that’ll have your kitchen smelling like a fancy bakery. And guess what? They’re easier than convincing your cat to take a bath. Let’s dive into these Rosemary Garlic Dinner Rolls that are perfect for tearing apart and slathering with even more butter.
Ingredients
- 1 cup warm milk (110°F)
- 2 tbsp sugar
- 1 packet active dry yeast (2 1/4 tsp)
- 3 cups all-purpose flour
- 1 tsp salt
- 1/4 cup unsalted butter, melted
- 2 tbsp fresh rosemary, finely chopped
- 3 garlic cloves, minced
- 1 egg, beaten (for egg wash)
Instructions
- Activate the yeast: In a large bowl, mix warm milk, sugar, and yeast. Let it sit for 5 minutes until frothy.
- Mix dry ingredients: In another bowl, whisk together flour and salt.
- Combine and knead: Add the flour mixture, melted butter, rosemary, and garlic to the yeast mixture. Knead for 5 minutes until smooth.
- First rise: Cover the dough with a towel and let it rise in a warm place for 1 hour, or until doubled in size.
- Shape the rolls: Punch down the dough and divide into 12 equal pieces. Roll each into a ball and place in a greased baking dish.
- Second rise: Cover and let rise for another 30 minutes.
- Preheat and prep: Preheat oven to 375°F. Brush the rolls with beaten egg.
- Bake to perfection: Bake for 20-25 minutes until golden brown.
These rolls come out fluffy with a crispy top, packed with the earthy rosemary and punchy garlic. Serve them warm with a side of garlic butter for dipping, and watch them disappear before your eyes.
Maple Glazed Butternut Squash
Maple glazed butternut squash is that sweet, savory side dish that somehow makes you feel like a gourmet chef without needing to fuss over a ton of ingredients. It’s the perfect blend of cozy and fancy, and today, I’m walking you through how to make it so good, you’ll wanna brag about it.
Ingredients
- 1 medium butternut squash, peeled, seeded, and cut into 1-inch cubes
- 2 tbsp olive oil
- 1/4 cup pure maple syrup
- 1 tsp ground cinnamon
- 1/2 tsp salt
- 1/4 tsp ground black pepper
Instructions
- Preheat oven: Heat your oven to 400°F (200°C) to get it nice and hot for roasting.
- Toss squash: In a large bowl, toss the butternut squash cubes with olive oil, maple syrup, cinnamon, salt, and pepper until evenly coated. Tip: Make sure each piece is well-coated for maximum flavor.
- Spread on pan: Spread the squash in a single layer on a baking sheet. Tip: Use parchment paper for easy cleanup and to prevent sticking.
- Roast squash: Roast in the preheated oven for 25-30 minutes, stirring halfway through, until the squash is tender and the edges are caramelized. Tip: Keep an eye on it towards the end to avoid burning.
- Serve warm: Remove from the oven and let it cool for a minute before serving. The squash should be fork-tender with a glossy, sticky-sweet glaze that’s downright irresistible.
The texture? Perfectly tender with just the right amount of bite. The flavor? A heavenly mix of sweet maple and warm cinnamon that’ll have you sneaking bites straight from the pan. Try serving it over a bed of wild rice or alongside some roasted chicken for a meal that feels special without the extra work.
Conclusion
With these 20 delicious and easy Friendsgiving recipes, hosting a stress-free feast has never been tastier! Whether you’re a seasoned cook or just starting out, there’s something here for everyone. Give these dishes a try, then let us know which ones were your favorites in the comments. Loved this roundup? Share the foodie love by pinning it on Pinterest—happy cooking and happy Friendsgiving!

I’m Brandon, the face behind the recipes. As a dedicated food enthusiast, I love experimenting with flavors and sharing my culinary adventures with you.