Craving something sweet but need it to be gluten-free? You’re in luck! We’ve rounded up 20 decadent, 5-star-worthy desserts that prove gluten-free doesn’t mean flavor-free. From rich chocolate cakes to melt-in-your-mouth cookies, these treats are so irresistible, no one will guess they’re missing a thing. Ready to indulge? Let’s dive into these heavenly recipes—your sweet tooth will thank you!
Chocolate Avocado Mousse with Fresh Berries
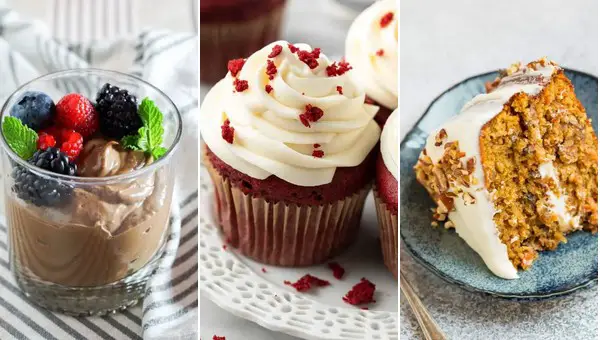
Mmm, let me tell you about this Chocolate Avocado Mousse with Fresh Berries that’s about to blow your mind. It’s creamy, dreamy, and packed with all the good stuff, plus it’s ridiculously easy to make. Perfect for when you’re craving something sweet but want to keep it on the healthier side.
Ingredients
- 2 ripe avocados, peeled and pitted
- 1/4 cup unsweetened cocoa powder
- 1/4 cup maple syrup
- 1 tsp vanilla extract
- 1/4 cup almond milk
- A pinch of salt
- 1 cup mixed fresh berries (strawberries, blueberries, raspberries)
Instructions
- Blend the base: In a blender, combine the avocados, cocoa powder, maple syrup, vanilla extract, almond milk, and a pinch of salt. Blend until smooth and creamy, scraping down the sides as needed.
- Chill to set: Transfer the mousse to a bowl and refrigerate for at least 30 minutes to let it set and enhance the flavors.
- Prepare the berries: While the mousse is chilling, wash your berries and pat them dry. Slice the strawberries if they’re large.
- Serve with style: Spoon the chilled mousse into serving glasses or bowls and top with the fresh berries. For an extra touch, drizzle with a little more maple syrup or sprinkle with cocoa powder.
This mousse is luxuriously smooth with a rich chocolate flavor that’s perfectly balanced by the freshness of the berries. Try serving it in little mason jars for a cute, picnic-ready dessert or layer it with granola for a parfait twist.
Flourless Almond Butter Cookies
Dang, have I got a treat for you today! These flourless almond butter cookies are so easy, you’ll be whipping them up in your sleep. And the best part? They’re gluten-free, packed with protein, and taste like a dream.
Ingredients
- 1 cup creamy almond butter (no added sugar)
- 1/2 cup granulated sugar
- 1 large egg
- 1/2 tsp baking soda
- 1/4 tsp salt
- 1/2 tsp vanilla extract
Instructions
- Preheat oven: Crank that oven to 350°F (175°C) and line a baking sheet with parchment paper. No sticking, no fuss.
- Mix wet ingredients: In a bowl, combine the almond butter, sugar, egg, and vanilla extract. Stir until it’s smoother than your last pickup line.
- Add dry ingredients: Sprinkle in the baking soda and salt. Mix until just combined—overmixing is the enemy of fluffy cookies.
- Scoop dough: Use a tablespoon to scoop the dough onto the prepared baking sheet, spacing them about 2 inches apart. They’ll spread like gossip, so give them room.
- Bake to perfection: Slide them into the oven for 10-12 minutes, or until the edges are golden but the centers are still soft. They’ll firm up as they cool, promise.
- Cool down: Let them chill on the baking sheet for 5 minutes before transferring to a wire rack. Patience is a virtue, especially with cookies.
These cookies are chewy with a slight crunch around the edges, and the almond butter gives them a rich, nutty flavor that’s downright addictive. Try sandwiching them with a scoop of vanilla ice cream for an over-the-top dessert.
Gluten-Free Salted Caramel Cheesecake
Every now and then, we all crave something sweet, rich, and a little bit fancy without the gluten guilt, right? Well, buckle up, because this gluten-free salted caramel cheesecake is about to become your new best friend—it’s creamy, dreamy, and has that perfect sweet-salty kick.
Ingredients
- 2 cups gluten-free graham cracker crumbs
- 1/2 cup melted unsalted butter
- 1/4 cup granulated sugar
- 24 oz cream cheese, softened
- 3/4 cup granulated sugar
- 3 large eggs
- 1 tsp vanilla extract
- 1/2 cup salted caramel sauce, plus extra for drizzling
- 1/4 tsp sea salt
Instructions
- Prep the crust: Mix the gluten-free graham cracker crumbs, melted butter, and 1/4 cup sugar in a bowl until well combined. Press firmly into the bottom of a 9-inch springform pan. Chill for 10 minutes to set.
- Beat the cream cheese: In a large bowl, beat the softened cream cheese and 3/4 cup sugar until smooth. Tip: Make sure the cream cheese is at room temperature to avoid lumps.
- Add eggs and vanilla: Beat in the eggs one at a time, then stir in the vanilla extract. Tip: Don’t overmix after adding the eggs to keep the filling creamy.
- Swirl in caramel: Pour half the batter over the crust. Drizzle with 1/4 cup salted caramel sauce and swirl with a knife. Repeat with the remaining batter and caramel.
- Bake to perfection: Bake at 325°F for 45-50 minutes until the edges are set but the center is slightly wobbly. Tip: A water bath can prevent cracks, but hey, cracks just mean more caramel can pool in there!
- Chill out: Let the cheesecake cool in the oven with the door ajar for 1 hour, then refrigerate for at least 4 hours.
- Serve with style: Drizzle with extra caramel, sprinkle with sea salt, and slice with a hot knife for clean cuts.
This cheesecake is luxuriously smooth with a buttery crust that’ll have you forgetting it’s gluten-free. Serve it with a dollop of whipped cream or a shot of espresso for that extra ‘wow’ factor.
Vegan Coconut Milk Panna Cotta
This vegan coconut milk panna cotta is so silky and dreamy, you won’t believe it’s dairy-free. Trust me, it’s the perfect dessert to impress your friends or treat yourself after a long day.
Ingredients
- 2 cups full-fat coconut milk
- 1/4 cup maple syrup
- 1 tsp vanilla extract
- 1 1/2 tsp agar agar powder
- Pinch of salt
Instructions
- Heat the mixture: In a small saucepan, combine coconut milk, maple syrup, vanilla extract, agar agar powder, and a pinch of salt. Whisk well to combine.
- Bring to a simmer: Place the saucepan over medium heat. Bring the mixture to a gentle simmer, stirring occasionally to prevent sticking. Tip: Don’t let it boil to keep the flavors fresh and vibrant.
- Simmer for activation: Once simmering, reduce the heat to low and let it cook for 5 minutes, stirring constantly. This activates the agar agar, ensuring your panna cotta sets perfectly.
- Strain for smoothness: Pour the mixture through a fine-mesh strainer into a jug or bowl to catch any lumps. Tip: This step is key for that ultra-smooth texture we’re after.
- Pour and chill: Divide the mixture evenly among 4 ramekins or glasses. Let them cool to room temperature, then refrigerate for at least 4 hours, or until fully set. Tip: Covering them with plastic wrap prevents a skin from forming on top.
The result? A creamy, dreamy panna cotta with a subtle coconut sweetness that’s just begging to be topped with fresh berries or a drizzle of chocolate sauce. Serve it straight from the fridge for the best texture—cool, firm, but still wobbly in that perfect panna cotta way.
Classic Gluten-Free Tiramisu
Today’s the day we tackle a gluten-free version of the classic tiramisu that’ll have your friends begging for the recipe. Trust me, it’s easier than you think, and yes, it’s just as indulgent as the original.
Ingredients
- 1 1/2 cups heavy cream
- 8 oz mascarpone cheese, softened
- 1/2 cup granulated sugar
- 1 tsp vanilla extract
- 1 cup strong brewed coffee, cooled
- 2 tbsp coffee liqueur (optional)
- 24 gluten-free ladyfingers
- 2 tbsp unsweetened cocoa powder
Instructions
- Whip the cream: In a large bowl, whip the heavy cream until stiff peaks form. This is your moment to shine with that electric mixer.
- Mix mascarpone: In another bowl, beat the mascarpone, sugar, and vanilla until smooth. Fold in the whipped cream gently to keep it fluffy.
- Combine coffee and liqueur: Mix the cooled coffee with coffee liqueur in a shallow dish. Dip each ladyfinger into the mixture for about 1 second per side—they should be moist but not soggy.
- Layer it up: Arrange half the dipped ladyfingers in a single layer in your dish. Spread half the mascarpone mixture over them. Repeat the layers.
- Chill and dust: Cover and refrigerate for at least 4 hours, or overnight if you can wait. Before serving, dust the top with cocoa powder through a fine sieve for that fancy finish.
The texture? Light as a cloud with a coffee kick that’ll wake you up better than your alarm. Serve it in pretty glasses for a dinner party, or heck, straight from the dish—no judgment here.
No-Bake Peanut Butter Chocolate Bars
Man, do I have a treat for you that’s going to make your sweet tooth sing and your kitchen stay cool—no oven required! These No-Bake Peanut Butter Chocolate Bars are the lazy baker’s dream, combining creamy peanut butter and rich chocolate into a dessert that’s as easy to make as it is to devour.
Ingredients
- 1 1/2 cups graham cracker crumbs
- 1 cup creamy peanut butter
- 1/2 cup unsalted butter, melted
- 1 1/2 cups powdered sugar
- 1 cup semi-sweet chocolate chips
- 1/4 cup milk
Instructions
- Mix the base: In a large bowl, combine graham cracker crumbs, peanut butter, melted butter, and powdered sugar until the mixture resembles wet sand. Tip: If it’s too crumbly, add a tad more peanut butter.
- Press into pan: Firmly press the mixture into an 8×8 inch baking dish lined with parchment paper. Use the back of a spoon to smooth it out. Tip: Wet your fingers slightly to prevent sticking.
- Melt the chocolate: In a microwave-safe bowl, heat chocolate chips and milk in 30-second bursts, stirring in between, until smooth. Tip: Don’t overheat or the chocolate will seize.
- Spread the chocolate: Pour the melted chocolate over the peanut butter layer and spread evenly with a spatula.
- Chill to set: Refrigerate for at least 2 hours, or until the chocolate is firm to the touch. Tip: For quicker setting, pop it in the freezer for 30 minutes.
- Cut and serve: Lift the bars out using the parchment paper and cut into squares. Serve cold for a satisfying snap.
These bars are all about the contrast—creamy peanut butter meets a crisp chocolate shell, making every bite a little adventure. Try topping them with a sprinkle of sea salt before the chocolate sets for a sweet-salty twist that’ll blow your mind.
Gluten-Free Lemon Blueberry Tart
Oh man, if you’re looking for a dessert that’s both refreshing and a little fancy without being fussy, this Gluten-Free Lemon Blueberry Tart is your jam. It’s got that perfect balance of tangy and sweet, and the best part? No one will even guess it’s gluten-free.
Ingredients
- 1 1/2 cups almond flour
- 1/4 cup coconut flour
- 1/4 cup melted coconut oil
- 2 tbsp maple syrup
- 1/4 tsp salt
- 1 cup fresh blueberries
- 1/2 cup lemon juice
- 1 tbsp lemon zest
- 1/2 cup coconut milk
- 2 tbsp honey
- 1 tsp vanilla extract
- 1/4 tsp turmeric (for color, optional)
Instructions
- Preheat oven: Heat your oven to 350°F (175°C) to get it ready for the crust.
- Mix dry ingredients: In a bowl, combine 1 1/2 cups almond flour, 1/4 cup coconut flour, and 1/4 tsp salt. Tip: Sifting the flours can make the crust extra smooth.
- Add wet ingredients: Stir in 1/4 cup melted coconut oil and 2 tbsp maple syrup until the mixture resembles coarse crumbs.
- Press into pan: Firmly press the mixture into a 9-inch tart pan, making sure it’s evenly distributed. Tip: Use the bottom of a glass to smooth it out.
- Bake crust: Bake for 10-12 minutes until lightly golden. Let it cool completely.
- Prepare filling: In a saucepan over medium heat, combine 1/2 cup lemon juice, 1 tbsp lemon zest, 1/2 cup coconut milk, 2 tbsp honey, and 1 tsp vanilla extract. Whisk constantly for 5 minutes until slightly thickened. Tip: Add 1/4 tsp turmeric here if you want a brighter yellow color.
- Add blueberries: Gently fold in 1 cup fresh blueberries, then pour the filling into the cooled crust.
- Chill: Refrigerate for at least 2 hours until set. The waiting is the hardest part, but it’s worth it.
This tart comes out with a crumbly, nutty crust that contrasts beautifully with the creamy, zesty filling. Serve it with a dollop of coconut whipped cream for an extra indulgent touch.
Rich Flourless Chocolate Cake
You know those days when only chocolate will do, but you’re trying to keep it kinda sorta healthy? Yeah, me too. That’s where this rich flourless chocolate cake comes in—it’s so decadent, no one will believe it’s gluten-free. Plus, it’s a breeze to make, which means more time for eating.
Ingredients
- 1 cup (2 sticks) unsalted butter, plus extra for greasing the pan
- 8 ounces semisweet chocolate, chopped
- 1 1/4 cups granulated sugar
- 3/4 cup unsweetened cocoa powder
- 1 teaspoon vanilla extract
- 1/4 teaspoon salt
- 4 large eggs
Instructions
- Preheat oven: Heat your oven to 300°F and grease a 9-inch springform pan with butter.
- Melt chocolate and butter: In a medium saucepan over low heat, melt the butter and chocolate together, stirring until smooth. Remove from heat.
- Mix dry ingredients: Whisk in the sugar, cocoa powder, vanilla extract, and salt until well combined.
- Add eggs: Beat in the eggs one at a time, ensuring each is fully incorporated before adding the next. Tip: Room temperature eggs blend more smoothly.
- Bake: Pour the batter into the prepared pan and bake for 45-50 minutes, or until the edges are set but the center is still a bit wobbly. Tip: Don’t overbake—the cake will continue to set as it cools.
- Cool: Let the cake cool in the pan on a wire rack for 10 minutes, then remove the sides of the pan and cool completely. Tip: For clean slices, use a hot knife.
This cake is all about the texture—dense, fudgy, and oh-so-chocolatey. Serve it with a dusting of powdered sugar or a scoop of vanilla ice cream for that extra wow factor.
Gluten-Free Apple Crumble with Oats
Baking this gluten-free apple crumble with oats is like giving your taste buds a cozy hug, and honestly, who doesn’t need that? It’s the perfect mix of sweet, spiced apples and a crispy, buttery topping that’ll have you sneaking bites straight from the pan.
Ingredients
- 4 cups peeled and sliced apples (about 4 medium apples)
- 1/2 cup granulated sugar
- 1 tbsp lemon juice
- 1 tsp ground cinnamon
- 1/4 tsp ground nutmeg
- 1 cup gluten-free rolled oats
- 1/2 cup almond flour
- 1/4 cup packed brown sugar
- 1/4 cup melted coconut oil
- 1/2 tsp vanilla extract
- Pinch of salt
Instructions
- Preheat oven: Heat your oven to 350°F (175°C) to ensure it’s ready to go when your crumble is assembled.
- Mix apples: In a large bowl, toss the sliced apples with granulated sugar, lemon juice, cinnamon, and nutmeg until evenly coated. Tip: Letting this sit for 10 minutes helps the apples release their juices, making the filling extra flavorful.
- Prepare topping: In another bowl, combine oats, almond flour, brown sugar, melted coconut oil, vanilla extract, and salt. Mix until the mixture resembles coarse crumbs. Tip: If the mixture feels too dry, add a tad more coconut oil until it clumps together nicely.
- Assemble crumble: Spread the apple mixture evenly in a 9-inch baking dish, then sprinkle the oat topping over the apples, covering them completely.
- Bake to perfection: Bake for 35-40 minutes, or until the topping is golden brown and the apples are bubbly. Tip: For an extra crispy topping, broil for the last 2 minutes, but keep an eye on it to prevent burning.
The crumble comes out with a delightfully crunchy top that gives way to tender, spiced apples underneath. Serve it warm with a scoop of vanilla ice cream for that classic combo, or get fancy with a drizzle of caramel sauce for extra indulgence.
Pumpkin Spice Chia Pudding
Wow, have I got a treat for you today—Pumpkin Spice Chia Pudding that’s so easy, you’ll wonder why you haven’t been making it all along. Perfect for those mornings when you’re craving something cozy but can’t be bothered to turn on the stove.
Ingredients
- 1/2 cup chia seeds
- 1 1/2 cups almond milk, unsweetened
- 1/2 cup pumpkin puree
- 2 tbsp maple syrup
- 1 tsp vanilla extract
- 1 tsp pumpkin pie spice
- A pinch of salt
Instructions
- Mix the base: In a medium bowl, whisk together almond milk, pumpkin puree, maple syrup, vanilla extract, pumpkin pie spice, and a pinch of salt until smooth.
- Add chia seeds: Stir in the chia seeds, making sure they’re evenly distributed throughout the mixture to avoid clumping.
- Let it sit: Cover the bowl and refrigerate for at least 4 hours, or overnight. The chia seeds need time to absorb the liquid and expand.
- Give it a stir: After the resting period, give the pudding a good stir to break up any clumps that may have formed.
- Serve chilled: Spoon the pudding into bowls and top with your favorite toppings like sliced almonds or a dollop of whipped cream.
This pudding is luxuriously creamy with a hint of warmth from the pumpkin spice—ideal for layering with granola for crunch or enjoying straight up with a spoon. Trust me, it’s like fall in a bowl, any time of year.
Gluten-Free Red Velvet Cupcakes
Did you know that gluten-free baking doesn’t have to be a daunting task? Today, we’re diving into the world of deliciously moist and vibrant gluten-free red velvet cupcakes that’ll have everyone begging for the recipe. Perfect for any occasion, these cupcakes are a game-changer with their rich flavor and stunning color.
Ingredients
- 1 1/2 cups gluten-free all-purpose flour
- 1 cup granulated sugar
- 1/4 cup unsweetened cocoa powder
- 1 tsp baking soda
- 1/2 tsp salt
- 1 cup buttermilk, room temperature
- 1/2 cup vegetable oil
- 2 large eggs, room temperature
- 1 tbsp red food coloring
- 2 tsp vanilla extract
- 1 tsp white vinegar
Instructions
- Preheat oven: Heat your oven to 350°F (175°C) and line a muffin tin with cupcake liners.
- Mix dry ingredients: In a large bowl, whisk together the gluten-free flour, sugar, cocoa powder, baking soda, and salt until well combined.
- Combine wet ingredients: In another bowl, mix the buttermilk, vegetable oil, eggs, red food coloring, vanilla extract, and white vinegar until smooth.
- Combine mixtures: Gradually add the wet ingredients to the dry ingredients, stirring until just combined. Tip: Overmixing can lead to dense cupcakes, so stop as soon as you see no more flour streaks.
- Fill liners: Divide the batter evenly among the cupcake liners, filling each about 2/3 full. Tip: An ice cream scoop makes this step mess-free and ensures even sizes.
- Bake: Bake for 18-20 minutes, or until a toothpick inserted into the center comes out clean. Tip: Rotate the pan halfway through baking for even cooking.
- Cool: Let the cupcakes cool in the pan for 5 minutes, then transfer to a wire rack to cool completely.
These cupcakes are incredibly soft with a slight tang from the buttermilk, perfectly balanced by the sweetness. Serve them with a dollop of cream cheese frosting for that classic red velvet experience, or enjoy them as is for a lighter treat.
Hazelnut Chocolate Truffles
Let me tell you, making Hazelnut Chocolate Truffles is like giving yourself a little hug from the inside. It’s surprisingly simple, and the result? Pure magic in your mouth.
Ingredients
- 1 cup heavy cream
- 12 oz semi-sweet chocolate, finely chopped
- 1/2 cup hazelnuts, toasted and finely chopped
- 2 tbsp unsalted butter, softened
- 1 tsp vanilla extract
- 1/4 cup cocoa powder, for dusting
Instructions
- Heat the cream: In a small saucepan, heat 1 cup heavy cream over medium heat until it just begins to simmer, about 3-4 minutes. Do not let it boil.
- Melt the chocolate: Place 12 oz finely chopped semi-sweet chocolate in a heatproof bowl. Pour the hot cream over the chocolate and let it sit for 2 minutes to soften, then stir until smooth.
- Add flavor: Stir in 2 tbsp softened unsalted butter and 1 tsp vanilla extract into the chocolate mixture until fully incorporated.
- Chill the mixture: Cover the bowl with plastic wrap and refrigerate for at least 2 hours, or until the mixture is firm enough to scoop.
- Shape the truffles: Using a small scoop or a tablespoon, form the chilled mixture into 1-inch balls. Roll each ball in 1/4 cup cocoa powder or 1/2 cup finely chopped toasted hazelnuts for coating.
- Final chill: Place the coated truffles on a baking sheet lined with parchment paper and refrigerate for another 30 minutes to set.
These truffles are ridiculously creamy with a satisfying crunch from the hazelnuts. Try serving them with a drizzle of melted chocolate on top for an extra decadent touch.
Gluten-Free Key Lime Pie
Hey there, let’s dive into making a gluten-free key lime pie that’s so tangy and creamy, you won’t even miss the gluten. Perfect for those sunny days when you’re craving something sweet but still want to keep it light and refreshing.
Ingredients
- 1 1/2 cups almond flour (for that nutty, gluten-free crust)
- 1/4 cup coconut oil, melted (to bind the crust together)
- 3 tbsp honey (for a touch of natural sweetness)
- 4 egg yolks (the secret to that creamy filling)
- 1 can (14 oz) sweetened condensed milk (because richness is key)
- 1/2 cup key lime juice (freshly squeezed for the best flavor)
- 1 tbsp key lime zest (for an extra zing)
- 1/4 tsp salt (to balance the sweetness)
Instructions
- Preheat oven: Heat your oven to 350°F to get it ready for baking.
- Mix crust ingredients: In a bowl, combine almond flour, melted coconut oil, and honey until the mixture resembles wet sand.
- Press into pie dish: Firmly press the mixture into a 9-inch pie dish, making sure it’s evenly distributed. Tip: Use the bottom of a measuring cup to smooth it out.
- Bake crust: Bake for 10 minutes, or until lightly golden. Let it cool while you prepare the filling.
- Whisk filling: In another bowl, whisk together egg yolks, sweetened condensed milk, key lime juice, zest, and salt until smooth. Tip: Whisk vigorously to incorporate air for a lighter filling.
- Pour and bake: Pour the filling into the cooled crust and bake for 15 minutes, just until the filling sets but still jiggles slightly in the center.
- Cool completely: Let the pie cool at room temperature, then refrigerate for at least 4 hours. Tip: Cover with plastic wrap to prevent a skin from forming.
The pie sets into this dreamy, creamy texture with a crust that’s subtly nutty and crumbly. Serve it chilled with a dollop of whipped cream or a sprinkle of lime zest for that extra flair.
Raspberry Almond Thumbprint Cookies
Did you know that the simplest ingredients can turn into the most delightful treats? That’s exactly what happens with these Raspberry Almond Thumbprint Cookies – a buttery, nutty base with a sweet-tart raspberry jam center that’s just begging to be devoured.
Ingredients
- 1 cup unsalted butter, softened to room temperature
- 1/2 cup granulated sugar
- 2 cups all-purpose flour, spooned and leveled
- 1/2 teaspoon almond extract
- 1/4 teaspoon salt
- 1/2 cup raspberry jam
- 1/4 cup sliced almonds, for topping
Instructions
- Preheat oven: Heat your oven to 350°F (175°C) and line a baking sheet with parchment paper.
- Cream butter and sugar: In a large bowl, beat the softened butter and granulated sugar together until light and fluffy, about 2 minutes.
- Add dry ingredients: Gradually mix in the flour, almond extract, and salt until just combined. The dough should be soft but not sticky.
- Shape cookies: Roll the dough into 1-inch balls and place them on the prepared baking sheet. Use your thumb to make an indentation in the center of each ball.
- Fill with jam: Spoon about 1/2 teaspoon of raspberry jam into each indentation. Sprinkle sliced almonds around the edges for a crunchy texture.
- Bake to perfection: Bake for 12-15 minutes, or until the edges are lightly golden. Let them cool on the baking sheet for 5 minutes before transferring to a wire rack.
These cookies are a perfect blend of crunchy and chewy, with the almond flavor shining through in every bite. Serve them at your next tea party or pack them as a sweet surprise in lunchboxes – they’re sure to disappear fast!
Gluten-Free Carrot Cake with Cream Cheese Frosting
Man, if you’re looking for a dessert that’s both a crowd-pleaser and a sneaky way to get some veggies in, this gluten-free carrot cake with cream cheese frosting is your golden ticket. It’s moist, it’s flavorful, and it’s got that perfect balance of sweet and spice that’ll have everyone asking for seconds.
Ingredients
- 2 cups gluten-free all-purpose flour
- 1 tsp baking soda
- 1 1/2 tsp baking powder
- 1/2 tsp salt
- 1 1/2 tsp ground cinnamon
- 1/2 tsp ground nutmeg
- 1/4 tsp ground ginger
- 4 large eggs, room temperature
- 1 cup granulated sugar
- 1 cup packed light brown sugar
- 1 cup vegetable oil
- 2 tsp vanilla extract
- 3 cups grated carrots, packed
- 8 oz cream cheese, softened
- 1/2 cup unsalted butter, softened
- 4 cups powdered sugar
- 1 tsp vanilla extract
Instructions
- Preheat oven: Heat your oven to 350°F (175°C) and grease two 9-inch round cake pans.
- Mix dry ingredients: In a bowl, whisk together gluten-free flour, baking soda, baking powder, salt, cinnamon, nutmeg, and ginger.
- Beat wet ingredients: In another bowl, beat eggs, granulated sugar, brown sugar, oil, and 2 tsp vanilla until smooth.
- Combine mixtures: Gradually add the dry ingredients to the wet, mixing until just combined. Fold in the grated carrots.
- Bake cakes: Divide batter between the pans and bake for 25-30 minutes, or until a toothpick comes out clean. Let cool completely.
- Make frosting: Beat cream cheese and butter until smooth. Gradually add powdered sugar and 1 tsp vanilla, beating until fluffy.
- Frost cake: Spread frosting between layers and over the top and sides of the cooled cake.
This cake is incredibly moist, thanks to the carrots and oil, with a spice level that’s just right—not too overpowering. The cream cheese frosting is the perfect tangy contrast to the sweet cake. Try serving it with a drizzle of caramel or a sprinkle of toasted nuts for an extra special touch.
Banana Bread Pudding with Cinnamon Glaze
Ready to dive into a dessert that feels like a warm hug? This Banana Bread Pudding with Cinnamon Glaze is your ticket to comfort town, no passport required. It’s like banana bread and pudding had a delicious baby, and we’re all invited to the party.
Ingredients
- 4 cups stale bread, cubed (about 1/2 a loaf)
- 3 ripe bananas, mashed
- 2 cups whole milk
- 3 large eggs
- 1/2 cup granulated sugar
- 1 tsp vanilla extract
- 1/2 tsp ground cinnamon
- 1/4 tsp salt
- 1/2 cup powdered sugar
- 1 tbsp milk
- 1/2 tsp ground cinnamon
Instructions
- Preheat oven: Heat your oven to 350°F (175°C) and grease a 9×13 inch baking dish.
- Mix bread and bananas: In a large bowl, combine the cubed bread and mashed bananas until the bread is well coated.
- Whisk wet ingredients: In another bowl, whisk together the whole milk, eggs, granulated sugar, vanilla extract, ground cinnamon, and salt until smooth.
- Combine and soak: Pour the wet mixture over the bread and bananas, stirring gently to ensure every piece is soaked. Let it sit for 10 minutes to absorb.
- Bake to perfection: Transfer the mixture to the prepared baking dish and bake for 45 minutes, or until the top is golden and the center is set.
- Make the glaze: While the pudding bakes, whisk together powdered sugar, 1 tbsp milk, and 1/2 tsp ground cinnamon until smooth.
- Glaze and serve: Drizzle the cinnamon glaze over the warm bread pudding right before serving.
The result? A creamy, dreamy bread pudding with pockets of sweet banana and a spicy cinnamon kick. Try serving it with a scoop of vanilla ice cream for that extra ‘wow’ factor.
Gluten-Free Matcha Green Tea Cookies
Baking these gluten-free matcha green tea cookies is like giving your taste buds a little vacation to Japan without leaving your kitchen. They’re subtly sweet, perfectly chewy, and have that gorgeous green hue that makes them as fun to look at as they are to eat.
Ingredients
- 1 cup almond flour
- 1/4 cup coconut flour
- 2 tbsp matcha green tea powder
- 1/2 cup coconut sugar
- 1/4 tsp sea salt
- 1/4 cup coconut oil, melted
- 1 large egg
- 1 tsp vanilla extract
Instructions
- Preheat oven: Heat your oven to 350°F (175°C) and line a baking sheet with parchment paper.
- Mix dry ingredients: In a large bowl, whisk together almond flour, coconut flour, matcha powder, coconut sugar, and sea salt until no lumps remain.
- Combine wet ingredients: In another bowl, mix melted coconut oil, egg, and vanilla extract until well combined.
- Merge mixtures: Pour the wet ingredients into the dry ingredients and stir until a dough forms. Tip: If the dough feels too sticky, let it sit for 5 minutes to thicken.
- Shape cookies: Roll the dough into 12 equal balls, then flatten each slightly on the prepared baking sheet. Tip: Wet your hands with water to prevent sticking.
- Bake: Place in the oven and bake for 10-12 minutes, or until the edges are just starting to turn golden. Tip: Don’t overbake to keep them chewy!
- Cool: Let the cookies cool on the baking sheet for 5 minutes before transferring to a wire rack to cool completely.
These cookies have a delightful chewy center with a slight crisp on the outside, and the matcha gives them a unique, earthy flavor that pairs amazingly with a cup of tea. Try serving them with a dollop of whipped coconut cream for an extra indulgent treat.
Strawberry Rhubarb Crisp with Almond Topping
You know those desserts that just scream summer? Yeah, this Strawberry Rhubarb Crisp with Almond Topping is one of them. It’s like a hug from your grandma, if your grandma was a pastry chef who loved a little crunch in her desserts.
Ingredients
- 4 cups fresh strawberries, hulled and halved
- 2 cups rhubarb, chopped into 1/2-inch pieces
- 1 cup granulated sugar
- 1 tbsp lemon juice
- 1 tsp vanilla extract
- 1 cup all-purpose flour
- 1/2 cup packed brown sugar
- 1/2 tsp ground cinnamon
- 1/4 tsp salt
- 1/2 cup unsalted butter, cold and cubed
- 1/2 cup sliced almonds
Instructions
- Preheat oven: Heat your oven to 375°F (190°C) to get it ready for baking.
- Mix fruits: In a large bowl, toss strawberries and rhubarb with granulated sugar, lemon juice, and vanilla extract until well coated.
- Prepare topping: In another bowl, combine flour, brown sugar, cinnamon, and salt. Cut in the cold butter with a pastry cutter or your fingers until the mixture resembles coarse crumbs. Stir in sliced almonds.
- Assemble crisp: Spread the fruit mixture evenly in a 9-inch baking dish. Sprinkle the topping over the fruit, covering it completely.
- Bake: Bake for 35-40 minutes, or until the topping is golden brown and the fruit is bubbly around the edges.
- Cool slightly: Let the crisp sit for about 10 minutes before serving to allow the juices to thicken slightly.
The topping gets all golden and crispy, while the fruit underneath turns into this jammy, tangy-sweet wonder. Serve it warm with a scoop of vanilla ice cream for that classic vibe, or go wild with a dollop of whipped cream and extra almonds on top.
Gluten-Free Dark Chocolate Brownies
Now, who doesn’t love a brownie that’s rich, fudgy, and gluten-free? These dark chocolate brownies are here to prove that gluten-free doesn’t mean flavor-free. Let’s dive into making these decadent treats that’ll have everyone asking for seconds.
Ingredients
- 1 cup almond flour
- 1/2 cup cocoa powder
- 1/4 tsp salt
- 1/2 cup coconut oil, melted
- 3/4 cup maple syrup
- 2 large eggs
- 1 tsp vanilla extract
- 1/2 cup dark chocolate chips
Instructions
- Preheat oven: Start by preheating your oven to 350°F (175°C) and line an 8×8 inch baking pan with parchment paper.
- Mix dry ingredients: In a medium bowl, whisk together the almond flour, cocoa powder, and salt until well combined.
- Combine wet ingredients: In another bowl, mix the melted coconut oil, maple syrup, eggs, and vanilla extract until smooth.
- Fold together: Gradually add the dry ingredients to the wet ingredients, stirring until just combined. Tip: Don’t overmix to keep the brownies tender.
- Add chocolate chips: Gently fold in the dark chocolate chips for those melty pockets of joy.
- Bake to perfection: Pour the batter into the prepared pan and bake for 20-25 minutes, or until a toothpick comes out with a few moist crumbs. Tip: The brownies will continue to set as they cool, so don’t wait for a clean toothpick.
- Cool before slicing: Let the brownies cool in the pan for at least 10 minutes before transferring to a wire rack. Tip: For cleaner slices, chill the brownies in the fridge for 30 minutes before cutting.
These brownies are the perfect balance of fudgy and cakey, with a deep chocolate flavor that’s not too sweet. Serve them warm with a scoop of vanilla ice cream for an indulgent dessert, or enjoy them as is with your afternoon coffee.
Coconut Macaroons Dipped in Chocolate
Just when you thought coconut couldn’t get any better, we’re dipping it in chocolate. These coconut macaroons are the perfect mix of chewy, sweet, and just a little bit fancy, making them a hit for any occasion or, let’s be honest, a Tuesday afternoon.
Ingredients
- 3 cups sweetened shredded coconut
- 3/4 cup granulated sugar
- 1/4 cup all-purpose flour
- 1/4 tsp salt
- 4 large egg whites
- 1 tsp vanilla extract
- 8 oz semi-sweet chocolate, chopped
- 1 tbsp coconut oil
Instructions
- Preheat oven: Heat your oven to 325°F (163°C) and line a baking sheet with parchment paper. This ensures your macaroons don’t stick and clean-up is a breeze.
- Mix dry ingredients: In a large bowl, combine the shredded coconut, sugar, flour, and salt. Stir until everything is evenly mixed.
- Add wet ingredients: Whisk the egg whites and vanilla extract together in a small bowl, then pour over the dry ingredients. Mix until the coconut is fully coated.
- Shape macaroons: Using a tablespoon or a small ice cream scoop, form the mixture into small mounds on the prepared baking sheet. Pro tip: Wet your hands slightly to prevent sticking.
- Bake: Bake for 20-25 minutes, or until the edges are golden brown. Let them cool on the baking sheet for 5 minutes before transferring to a wire rack.
- Melt chocolate: In a microwave-safe bowl, combine the chopped chocolate and coconut oil. Microwave in 30-second intervals, stirring in between, until smooth.
- Dip macaroons: Dip the bottom of each cooled macaroon into the melted chocolate, then place back on the parchment paper. For extra flair, drizzle more chocolate on top.
- Set chocolate: Let the chocolate set at room temperature for about an hour, or pop them in the fridge for 15 minutes if you’re impatient like me.
These macaroons are a dreamy combo of crispy on the outside, chewy on the inside, and that chocolate dip? Chef’s kiss. Serve them on a platter at your next gathering, or keep them all to yourself—no judgment here.
Conclusion
With 20 decadent, gluten-free desserts that are truly irresistible, this roundup has something for every sweet tooth! Whether you’re baking for a special occasion or just treating yourself, these 5-star recipes are sure to delight. Don’t forget to try your favorites, leave a comment below, and share the love by pinning this article on Pinterest. Happy baking!

I’m Brandon, the face behind the recipes. As a dedicated food enthusiast, I love experimenting with flavors and sharing my culinary adventures with you.